Version Control for Distributed SQL with Flyway’s Maven Plugin
September 30, 2020
Flyway is an open source database version control and migration tool that stresses simplicity and convention over configuration. Changes to the database can be written in SQL (and in some database-specific dialects like PL/SQL and T-SQL) or Java. You interact with Flyway using a command-line client, howeer there are a variety of plugins that can be leveraged, including Maven, Gradle, Spring Boot, and more.
Supported databases include Oracle, SQL Server, DB2, MySQL, PostgreSQL, and others. Because YugabyteDB is PostgreSQL compatible, most third-party tools and apps will work “out of the box.” Flyway is no exception here. This allows developers to deploy and rollback schema changes to YugabyteDB using Flyway by making use of the PostgreSQL JDBC driver.
Flyway relies on seven commands to manage database version control.
- Migrate: Migrates the schema to the latest version. Flyway will create the schema history table automatically if it doesn’t exist.
- Clean: Drops all objects in the configured schemas.
- Info: Prints the details and status information about all the migrations.
- Validate: Validates the applied migrations against the available ones.
- Undo: Undoes the most recently applied versioned migration.
- Baseline: Baselines an existing database, excluding all migrations up to and including baselineVersion.
- Repair: Repairs the schema history table.
In this blog post we’ll walk you though the following steps:
- Install a 3 node YugabyteDB cluster on Google Kubernetes Platform
- Install and configure Flyway locally to work with YugabyteDB
- How to run migrations using the Maven plugin
New to distributed SQL or YugabyteDB? Read on.
Step 1: Install YugabyteDB on a GKE Cluster using Helm 3
In this section we are going to install YugabyteDB on the cluster. The complete steps are documented here. We’ll assume you already have a GKE cluster up and running as a starting point.
The first thing to do is to add the charts repository.
$ helm repo add yugabytedb https://charts.yugabyte.com
Now, fetch the updates.
$ helm repo update
Create a namespace. In this case we’ll call it yb-demo.
$ kubectl create namespace yb-demo
Expected output:
namespace/yb-demo created
We are now ready to install YugabyteDB. In the command below we’ll be specifying values for a resource constrained environment.
$ helm install yb-demo yugabytedb/yugabyte \
--set resource.master.requests.cpu=1,resource.master.requests.memory=1Gi,\
resource.tserver.requests.cpu=1,resource.tserver.requests.memory=1Gi,\
enableLoadBalancer=True --namespace yb-demo --wait
To check the status of the cluster, execute the below command:
$ kubectl get services --namespace yb-demo
![]()
Note the external-IP for yb-tserver-service which we are going to use to establish a connection between YugabyteDB and Flyway. From the screenshot above we can see that the IP is 35.224.XX.XX and the YSQL port is 5433.
Step 2: Creating the Northwind sample database
The next step is to download a sample schema and data. You can find a variety of sample databases that are compatible with YugabyteDB in our Docs. For the purposes of this tutorial we are going to use the Northwind sample database. The Northwind database contains the sales data for a fictitious company called “Northwind Traders,” which imports and exports specialty foods from around the world. The Northwind database is an excellent tutorial schema for a small-business ERP, with customers, orders, inventory, purchasing, suppliers, shipping, employees, and single-entry accounting.
Connect to the yb-tserver-pod by running the following command:
$ kubectl exec -n yb-demo -it yb-tserver-0 /bin/bash
To download the schema and data files, run the following commands:
$ wget https://raw.githubusercontent.com/yugabyte/yugabyte-db/master/sample/northwind_ddl.sql
$ wget https://raw.githubusercontent.com/yugabyte/yugabyte-db/master/sample/northwind_data.sql
To connect to the YSQL service exit out of the pod shell and run the following command:
$ exit
$ kubectl exec -n yb-demo -it yb-tserver-0 -- ysqlsh -h yb-tserver-0.yb-tservers.yb-demo
Create a database and connect to it using the following commands:
yugabyte=# CREATE DATABASE northwind;
northwind=# \c northwind;
We can now create the database objects and load them with data using the files we downloaded to yb-tserver-pod using the following commands:
northwind=# \i 'northwind_ddl.sql';
northwind=# \i 'northwind_data.sql';
Verify that the tables are created by running the following command:
northwind-# \d

                 List of relations
 Schema |          Name          | Type  |  Owner
--------+------------------------+-------+----------
 public | categories             | table | yugabyte
 public | customer_customer_demo | table | yugabyte
 public | customer_demographics  | table | yugabyte
 public | customers              | table | yugabyte
 public | employee_territories   | table | yugabyte
 public | employees              | table | yugabyte
 public | order_details          | table | yugabyte
 public | orders                 | table | yugabyte
 public | products               | table | yugabyte
 public | region                 | table | yugabyte
 public | shippers               | table | yugabyte
 public | suppliers              | table | yugabyte
 public | territories            | table | yugabyte
 public | us_states              | table | yugabyte
(14 rows)
Verify we have data by issuing a simple SELECT:
northwind=# SELECT count(*) FROM products;
 count
-------
    77
(1 row)
By default, a YugabyteDB installation doesn’t have a password setup for the default yugabyte user. Specifying one is done the same way you’d do it in PostgreSQL.
northwind=# ALTER ROLE yugabyte WITH PASSWORD 'password';
Step 3: Install and configure Flyway
For the purposes of this demo we’ll be installing and configuring Flyway Community Edition. After downloading Flyway, navigate to the flyway-6.5.2 directory. We are going to want to make a few configuration changes to get Flyway connected to the YugabyteDB database we just deployed.
In the conf directory locate the flyway.conf file. Uncomment or modify the following lines:
flyway.url=jdbc:postgresql://35.224.XX.XX:5433/northwind
flyway.user=yugabyte
flyway.password=password
At this point Flyway will be able to connect to YugabyteDB running on GKE.
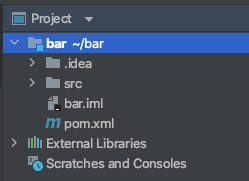
Step 4: Create a project
Create a basic project using the Maven Archetype Plugin by issuing the following command:
$ mvn archetype:generate -B \
    -DarchetypeGroupId=org.apache.maven.archetypes \
    -DarchetypeArtifactId=maven-archetype-quickstart \
    -DarchetypeVersion=1.1 \
    -DgroupId=foo \
    -DartifactId=bar \
    -Dversion=1.0-SNAPSHOT \
    -Dpackage=foobar
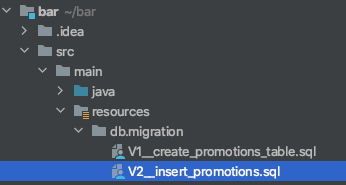
You should now see a project structure similar to the one below in your IDE of choice.
Step 5: Configure the Flyway integration
Edit the pom.xml and add entries for the Flyway plugin, YugabyteDB (PostgreSQL) connectivity, and PostgreSQL Driver.
    <plugins>
      <plugin>
        <groupId>org.flywaydb</groupId>
        <artifactId>flyway-maven-plugin</artifactId>
        <version>6.5.2</version>
        <configuration>
         <url>jdbc:postgresql://XX.XX.XX.XX:5433/northwind</url>
          <user>yugabyte</user>
          <password>password</password>
        </configuration>
        <dependencies>
          <dependency>
            <groupId>org.postgresql</groupId>
            <artifactId>postgresql</artifactId>
            <version>42.2.2</version>
          </dependency>
        </dependencies>
      </plugin>
    </plugins>
Note: There are few other configuration options when it comes to Flyway and Maven. You can find them detailed in the Flyway Documentation.
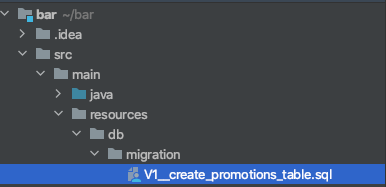
Step 6: Create table migration
Create the migration directory ~bar/src/main/resources/db/migration to hold our SQL scripts.
Create a SQL script in this directory with the following content named V1__create_promotions_table.sql.
CREATE TABLE promotions (
	promotion_id serial PRIMARY KEY,
	supplier_id int2 NOT NULL,
	promotion_name VARCHAR ( 50 ) NOT NULL,
	company_name VARCHAR ( 40 ) NOT NULL,
	start_date DATE NOT NULL,
	stop_date DATE NOT NULL,
	created_on DATE NOT NULL DEFAULT CURRENT_DATE
);
We can now execute this migration at the command line.
$ cd /bar
$ mvn flyway:migrate
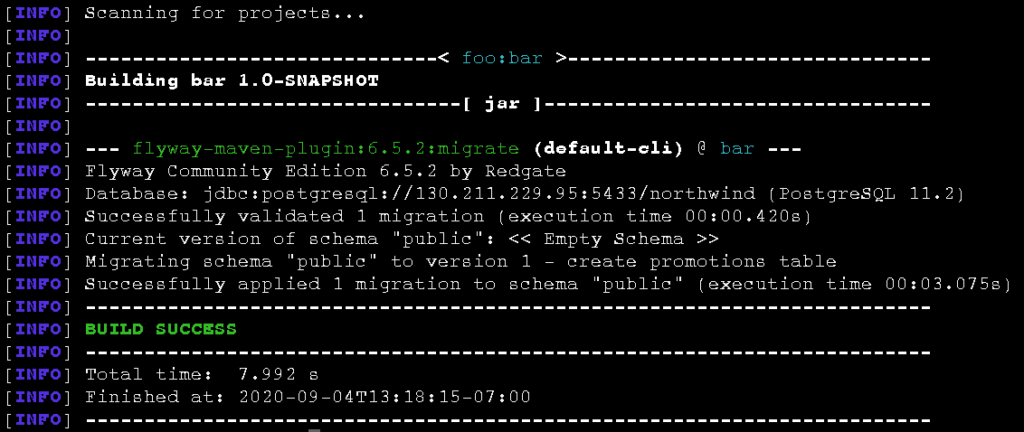
We can verify that the promotions table was indeed built.
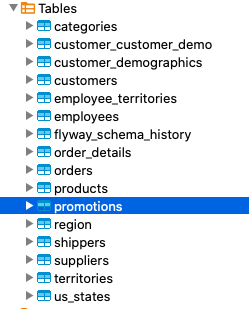
We should also be able to see this migration in the flyway_schema_history table.
![]()
Step 7: Insert data migration
Create the SQL script below, place it in the migration directory with the following and name it V2__insert_promotions.sql.
INSERT INTO promotions (supplier_id, promotion_name, company_name, start_date, stop_date, created_on)
VALUES
('28','Buy One Get One Free', 'Gai pâturage', '1996-08-15', '1996-08-30', CURRENT_DATE),
('19', 'Free Shipping', 'New England Seafood Cannery', '1996-10-15', '1996-10-30', CURRENT_DATE),
('16', 'Free T-Shirt With Every Purchase', 'Bigfoot Breweries', '1996-12-15', '1996-12-30', CURRENT_DATE),
('20','10% Off', 'Gula Malacca', '1996-11-15', '1996-11-30', CURRENT_DATE),
('8', '20% Off', 'Specialty Biscuits, Ltd.', '1996-09-15', '1996-09-30', CURRENT_DATE);
We can now execute this migration at the command line.
$ mvn flyway:migrate
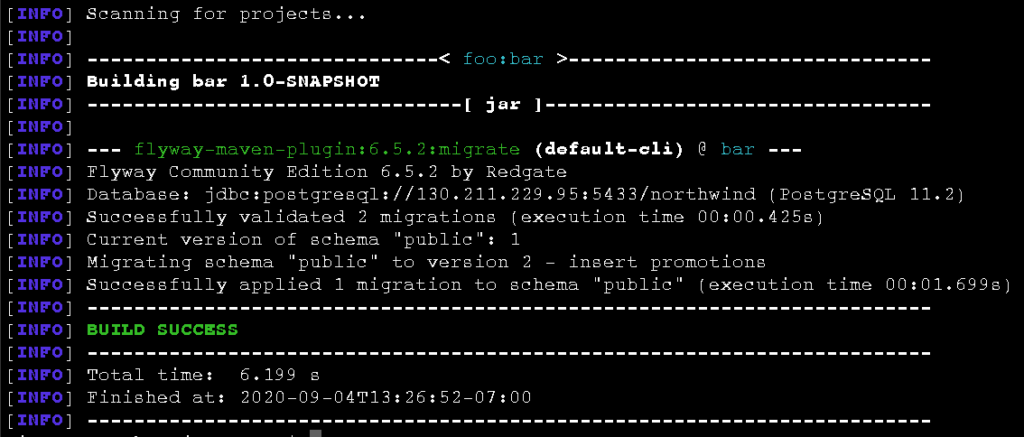
Let’s verify that the data was inserted into the promotions table.

We should also be able to see this migration in the flyway_schema_history table.

Conclusion
That’s it! You now have a 3 node YugabyteDB cluster on GKE, with versioning control managed by a local installation of Flyway. For more information about how to perform more advanced operations in Flyway using the Java API, Maven, or Gradle, check out their documentation.


