Understanding How YugabyteDB Runs on Kubernetes
August 17, 2018
As we reviewed in “Docker, Kubernetes and the Rise of Cloud Native Databases”, Kubernetes has benefited from rapid adoption to become the de-facto choice for container orchestration. This has happened in a short span of only 4 years since Google open sourced the project in 2014. YugabyteDB’s automated sharding and strongly consistent replication architecture lends itself extremely well to containerized deployments powered by Kubernetes orchestration. In this post we’ll look at the various components involved in getting YugabyteDB up and running as Kubernetes StatefulSets.
YugabyteDB Architecture
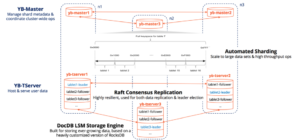
As shown in the architecture diagram below, YugabyteDB is comprised of two types of distributed services.
- YB-Master: Responsible for keeping system metadata (such as shard-to-node mapping), coordinating system-wide operations (such as create/alter drop tables), and initiating maintenance operations (such as load-balancing). It constantly monitors and re-balances the data shards across the available nodes, even in a highly dynamic environment such as a Kubernetes cluster. For fault-tolerance purposes, the number of YB-Masters equals the Replication Factor (RF) of the cluster. The minimum RF needed for fault-tolerance is 3.
- YB-TServer: The data nodes responsible for hosting/serving user data in shards (also known as tablets). The number of data nodes can be increased or decreased on-demand in a cluster.
Modeling YugabyteDB as a Workload on Kubernetes
Orchestrating Stateful Apps with Kubernetes highlights how running stateful applications such as databases in Kubernetes require the use of the StatefulSets workload API. In this context, YB-Master and YB-TServer are modeled as independent StatefulSets, as shown in the YugabyteDB Kubernetes YAML on Github. Each of these StatefulSet pods instantiate one instance of the same yugabytedb/yugabyte container image but the command used to start the container is changed based on the type of server needed. The next few sections detail how exactly the YugabyteDB StatefulSets are structured in the context of running a four-node RF3 cluster on Kubernetes.
Running YB-Master on Kubernetes
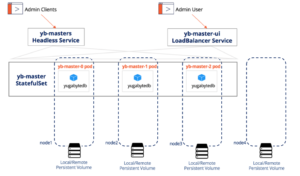
The YB-Master deployment on Kubernetes needs one StatefulSet and two Services. One of these Services is the headless service that enables discovery of the underlying StatefulSet pods and the other is a LoadBalancer service needed to view the YB-Master Admin UI. YugabyteDB admin clients (such as the YugabyteDB EE Admin Console) connect to the any of the pods using the headless service, while admin users can connect to the LoadBalancer service.
yb-master StatefulSet
The YugabyteDB Kubernetes YAML has a section for the yb-master StatefulSet. A few points to highlight in the specification.
Replica count
As shown in the figure above, to setup a 4-node YugabyteDB cluster with RF3, only 3 yb-master StatefulSet pods are needed. Hence the YAML setting for replicas to 3.
apiVersion: apps/v1beta1
kind: StatefulSet
metadata:
  name: yb-master
  labels:
    app: yb-master
spec:
  serviceName: yb-masters
  podManagementPolicy: "Parallel"
  replicas: 3
Pod anti-affinity
podAntiAffinity:
  preferredDuringSchedulingIgnoredDuringExecution:
  - weight: 100
    podAffinityTerm:
      labelSelector:
        matchExpressions:
        - key: app
          operator: In
          values:
          - yb-master
Pod anti-affinity rules are used to ensure no two yb-master pods can be scheduled onto the same Kubernetes node. This enforces maximum fault tolerance possible since a single node failure will only impact one yb-master pod and the cluster will continue functioning normally even with the remaining two yb-master pods on the two other nodes. Additionally, as noted in Kubernetes docs, the preferredDuringSchedulingIgnoredDuringExecution is a soft guarantee from Kubernetes that is better set to requiredDuringSchedulingIgnoredDuringExecution in mission-critical environments such as production.
Communicating with other yb-masters
command:
- "/home/yugabyte/bin/yb-master"
- "--fs_data_dirs=/mnt/data0"
- "--rpc_bind_addresses=$(POD_IP)"
- "--master_addresses=yb-masters.default.svc.cluster.local:7100"
- "--master_replication_factor=3"
Each yb-master gets to know of the other yb-masters with the –master_addresses flag populated using the fully qualified endpoint of the yb-masters headless service yb-masters.default.svc.cluster.local:7100 (see next section).
Ports
ports:
  - containerPort: 7000
    name: master-ui
  - containerPort: 7100
    name: master-rpc
The rpc port where other yb-masters and yb-tservers communicate is 7100 while the UI port for checking the current state of the master is 7000.
Volume mounts
volumeMounts:
  - name: datadir
    mountPath: /mnt/data0
…
volumeClaimTemplates:
  - metadata:
      name: datadir
The --fs_data_dirs flag in the command points to the same disk /mnt/data0 that is mounted to the container using the datadir volume mount.
Update strategy
updateStrategy:
    type: RollingUpdate
The RollingUpdate strategy will update all the pods in the yb-master StatefulSet, in reverse ordinal order, while respecting the StatefulSet guarantees.
yb-masters Headless service
Kubernetes StatefulSets require the use of a headless service so that the StatefulSet pods can be discovered individually and communicated directly by other services (such as client applications). Kubernetes is not responsible for any load balancing across these pods. Such a headless service is created by simply specifying the clusterIP of the service to be None.
apiVersion: v1
kind: Service
metadata:
  name: yb-masters
  labels:
    app: yb-master
spec:
  clusterIP: None
  ports:
  - name: ui
    port: 7000
  - name: rpc-port
    port: 7100
  selector:
    app: yb-master
As shown above, the yb-masters headless service yaml is extremely simple. It simply opens up the UI and the rpc ports of the underlying yb-master pods.
yb-master-ui LoadBalancer service
apiVersion: v1
kind: Service
metadata:
  name: yb-master-ui
  labels:
    app: yb-master
spec:
  clusterIP:
  ports:
  - name: ui
    port: 7000
  selector:
    app: yb-master
  type: LoadBalancer
The clusterwide admin UI for the yb-master can be viewed at the 7000 port of any yb-master. The yb-master-ui service is of the LoadBalancer type for this port which means that the service will load balance all the incoming requests across all the underlying pods.
Running YB-TServer on Kubernetes
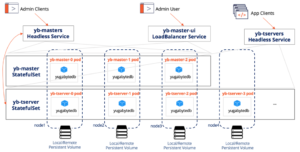
Assuming you don’t need to view the YB-TServer’s Admin UI, the YB-TServer Kubernetes deployment needs one StatefulSet and one headless service. One important point to note is that the YB-Master service has to be up and running before the YB-TServer service.
yb-tserver StatefulSet
The YugabyteDB Kubernetes YAML has a section for the yb-master StatefulSet. A few points to highlight in the specification.
Replica count
apiVersion: apps/v1beta1
kind: StatefulSet
metadata:
  name: yb-tserver
  labels:
    app: yb-tserver
spec:
  serviceName: yb-tservers
  podManagementPolicy: "Parallel"
  replicas: 4
As shown in the figure above, to setup a 4-node YugabyteDB cluster with RF3, 4 replicas of the yb-master StatefulSet pod are needed.
Pod anti-affinity
podAntiAffinity:
  preferredDuringSchedulingIgnoredDuringExecution:
    - weight: 100
      podAffinityTerm:
        labelSelector:
          matchExpressions:
          - key: app
            operator: In
            values:
            - yb-tserver
Pod anti-affinity rules are used to ensure no two yb-tserver pods can be scheduled onto the same Kubernetes node. This enforces maximum fault tolerance possible since a single node failure will only impact one yb-tserver pod and the cluster will continue functioning normally as long as quorum of yb-tserver pods are available. Note that 1 yb-tserver pod and 1 yb-master pod can be located on the same node. Again as noted in the yb-masters section, a stronger guarantee like requiredDuringSchedulingIgnoredDuringExecution is better for mission-critical environments.
Communicating with yb-masters
Command:
  - "/home/yugabyte/bin/yb-tserver"
  - "--fs_data_dirs=/mnt/data0"
  - "--tserver_master_addrs=yb-masters.default.svc.cluster.local:7100"
  - "--tserver_master_replication_factor=3"
Each yb-tserver gets to know of the other yb-masters with the --tserver_master_addrs flag populated using the fully qualified endpoint of the yb-masters headless service yb-masters.default.svc.cluster.local:7100.
Ports
ports:
- containerPort: 9000
  name: tserver-ui
- containerPort: 9100
  name: tserver-rpc
- containerPort: 9042
  name: cassandra
- containerPort: 6379
  name: redis
The rpc port where yb-masters and other yb-tservers communicate is 9100 while the UI port for checking the current state of the tserver is 9000. Additionally, YCQL (the Cassandra compatible API) is available at port 9042 and YEDIS (the Redis compatible API) is available at port 6379. PostgreSQL API, currently in beta, can be enabled by adding the port 5433.
Volume mounts
volumeMounts:
  - name: datadir
    mountPath: /mnt/data0
…
volumeClaimTemplates:
  - metadata:
      name: datadir
The --fs_data_dirs flag points to the same disk /mnt/data0 that is mounted to the container using the datadir volume mount.
Update strategy
updateStrategy:
    type: RollingUpdate
The RollingUpdate update strategy will update all the pods in the yb-tserver StatefulSet, in reverse ordinal order, while respecting the StatefulSet guarantees.
yb-tservers Headless service
apiVersion: v1
kind: Service
metadata:
  name: yb-tservers
  labels:
    app: yb-tserver
spec:
  clusterIP: None
  ports:
  - name: ui
    port: 9000
  - name: rpc-port
    port: 9100
  - name: cassandra
    port: 9042
  - name: redis
    port: 6379
  selector:
    app: yb-tserver
As expected, the yb-tservers headless service yaml is extremely simple. It opens up the UI, the rpc ports as well as client API ports of the underlying yb-tserver pods.
YugabyteDB on Kubernetes in Action
In order to keep things simple to understand, we will run a 4-node YugabyteDB cluster on minikube, the preferred method for running Kubernetes on your local environment.
Prerequisites
Follow the instructions to install minikube and kubectl if you don’t have them setup already.
Step 1 – Download the YugabyteDB Kubernetes YAML
mkdir ~/yugabyte && cd ~/yugabyte
wget https://raw.githubusercontent.com/YugaByte/yugabyte-db/master/cloud/kubernetes/yugabyte-statefulset.yaml
Step 2 – Change the yb-tserver replica count from 3 to 4
Open the the YAML in the editor of your choice and set the yb-tserver replica count to 4.
spec:
  serviceName: yb-tservers
  podManagementPolicy: "Parallel"
  replicas: 4
Step 3 – Create the DB cluster
Now you can create the YugabyteDB cluster through the following command.
kubectl apply -f yugabyte-statefulset.yamlStep 4 – Check status of the pods and services
Since Kubernetes has to first pull the yugabytedb/yugabyte image from hub.docker.com, the cluster may take a few minutes to become live. You can check the status using the following commands.
kubectl get podsNAME READY STATUS RESTARTS AGE
yb-master-0 0/1 ContainerCreating 0 7s
yb-master-1 0/1 ContainerCreating 0 7s
yb-master-2 0/1 ContainerCreating 0 7s
yb-tserver-0 0/1 ContainerCreating 0 7s
yb-tserver-1 0/1 ContainerCreating 0 7s
yb-tserver-2 0/1 ContainerCreating 0 7s
yb-tserver-3 0/1 ContainerCreating 0 7sWhen the cluster is ready, it will have all the 7 pods (3 for yb-master and 4 for yb-tserver) in the Running status.
NAME           READY     STATUS    RESTARTS   AGE
yb-master-0    1/1       Running   0          7m
yb-master-1    1/1       Running   0          7m
yb-master-2    1/1       Running   0          7m
yb-tserver-0   1/1       Running   0          7m
yb-tserver-1   1/1       Running   0          7m
yb-tserver-2   1/1       Running   0          7m
yb-tserver-3   1/1       Running   0          7m
You can also check the status of the 3 services we launched along with the status of the default kubernetes service itself.
kubectl get services
NAME TYPE CLUSTER-IP EXTERNAL-IP PORT(S) AGE
kubernetes ClusterIP 10.96.0.1 443/TCP 10m
yb-master-ui LoadBalancer 10.102.121.64 7000:31283/TCP 8m
yb-masters ClusterIP None 7000/TCP,7100/TCP 8m
yb-tservers ClusterIP None 9000/TCP,9100/TCP,9042/TCP,6379/TCP 8m
Finally, you can view the nice UI dashboard provided by Kubernetes that you can launch by the following command.
minikube dashboard
Step 5 – View the YB-Master Admin UI
Once the cluster is live, you can launch the YB-Master Admin UI. First use the command below to get the exact URL for the UI and then launch the URL via the browser.
minikube service yb-master-ui --urlhttps://192.168.99.100:31283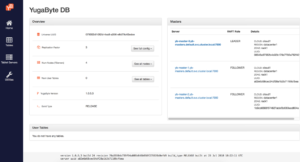
Step 6 – Perform Day 2 Operational Tasks
The next few steps show how to perform common day 2 operational tasks such as adding/removing nodes and performing rolling upgrades. All these operations do not impact the availability and performance of client applications thus allowing the applications to continue to operate normally.
Add a Node
Horizontal scaling is a breeze with YugabyteDB and with Kubernetes, the process could not be simpler. All we have to do is to let Kubernetes know how many replicas to scale to.
kubectl scale statefulset yb-tserver --replicas=5statefulset "yb-tserver" scaledNow we can check the status of the scaling operation. Note that YugabyteDB automatically moves a few tablet-leaders and a few tablet-followers into the newly added node so that the cluster remains balanced across all the nodes.
kubectl get podsNAME READY STATUS RESTARTS AGE
yb-master-0 1/1 Running 0 4h
yb-master-1 1/1 Running 0 4h
yb-master-2 1/1 Running 0 4h
yb-tserver-0 1/1 Running 0 4h
yb-tserver-1 1/1 Running 0 4h
yb-tserver-2 1/1 Running 0 4h
yb-tserver-3 1/1 Running 0 4h
yb-tserver-4 1/1 Running 0 1m
Remove Two Nodes
Removing nodes is also very simple. Reduce the number of replicas and see the combination of Kubernetes and YugabyteDB do the rest.kubectl scale statefulset yb-tserver --replicas=3
statefulset "yb-tserver" scaledAs expected in StatefulSets, we can see that the nodes with the largest ordinal indexes (i.e. 4 and 3) are removed first.
kubectl get podsNAME READY STATUS RESTARTS AGE
yb-master-0 1/1 Running 0 4h
yb-master-1 1/1 Running 0 4h
yb-master-2 1/1 Running 0 4h
yb-tserver-0 1/1 Running 0 4h
yb-tserver-1 1/1 Running 0 4h
yb-tserver-2 1/1 Running 0 4h
yb-tserver-3 0/1 Terminating 0 4h
yb-tserver-4 0/1 Terminating 0 2m
NAME           READY     STATUS    RESTARTS   AGE
yb-master-0    1/1       Running   0          4h
yb-master-1    1/1       Running   0          4h
yb-master-2    1/1       Running   0          4h
yb-tserver-0   1/1       Running   0          4h
yb-tserver-1   1/1       Running   0          4h
yb-tserver-2   1/1       Running   0          4h
Perform Rolling Upgrade
We can also perform rolling upgrades on the YugabyteDB cluster. This involves changing the YugabyteDB container image to a different version first on the yb-master StatefulSet and then on the yb-tserver StatefulSet. As expected in StatefulSets, we can see that the nodes with the largest ordinal indexes are upgraded first.
Upgrading the yb-master StatefulSet uses the command below. Assuming the new container image is not already available with Kubernetes, the image will be pulled from hub.docker.com first and this may result in the first pod upgrade taking a few minutes.
kubectl patch statefulset yb-master --type='json' -p='[{"op": "replace", "path": "/spec/template/spec/containers/0/image", "value":"yugabytedb/yugabyte:1.0.4.0-b24"}]'NAME READY STATUS RESTARTS AGE
yb-master-0 1/1 Running 0 17h
yb-master-1 1/1 Running 0 17h
yb-master-2 1/1 Terminating 0 17h
yb-tserver-0 1/1 Running 0 17h
yb-tserver-1 1/1 Running 0 17h
yb-tserver-2 1/1 Running 0 17h
NAME           READY     STATUS    RESTARTS   AGE
yb-master-0    1/1       Running   0          6s
yb-master-1    1/1       Running   0          46s
yb-master-2    1/1       Running   0          4m
yb-tserver-0   1/1       Running   0          17h
yb-tserver-1   1/1       Running   0          17h
yb-tserver-2   1/1       Running   0          17h
Now we can upgrade the yb-tserver StatefulSet as well. This will lead to the yb-tserver pods getting upgraded in the same way we saw for the yb-master pods.
kubectl patch statefulset yb-tserver --type='json' -p='[{"op": "replace", "path": "/spec/template/spec/containers/0/image", "value":"yugabytedb/yugabyte:1.0.4.0-b24"}]'
Summary
Running distributed databases using a distributed orchestration technology such as Kubernetes continues to remain a non-trivial problem. YugabyteDB is a distributed database with a unique sharding and replication architecture that makes it a perfect fit for Kubernetes-based orchestration. In this post, we reviewed the underlying details of how YugabyteDB runs on Kubernetes and how this looks in action in the context of a real cluster. As part of our upcoming 1.1 release, we expect to release additional Kubernetes-related enhancements such as running the YugabyteDB Enterprise Admin Console on the same Kubernetes cluster as YugabyteDB. Subscribe to our blog at the bottom of this page and stay tuned with our progress.
What’s Next?
- Read “Orchestrating Stateful Apps with Kubernetes.”
- Compare YugabyteDB to databases like Amazon Aurora, CockroachDB, Google Cloud Spanner and MongoDB.
- Get started with YugabyteDB on Kubernetes.
- Contact us to learn more about licensing, pricing or to schedule a technical overview.


