Porting Oracle to YugabyteDB
July 22, 2020
I am presenting an Introduction to SQL webinar at the end of the month–July 29 at 10am PT (1pm ET). In preparation for this, I needed a dataset. Because YugabyteDB is compatible with PostgreSQL, it seemed obvious to try out the PostgreSQL Tutorial site. However, I have never liked the “film database” example. I prefer the classic customers, orders, and products example. So instead I checked out the sister site the Oracle Tutorial. Let us look at what it takes to port this database to YugabyteDB.
The Oracle Tutorial Sample Database
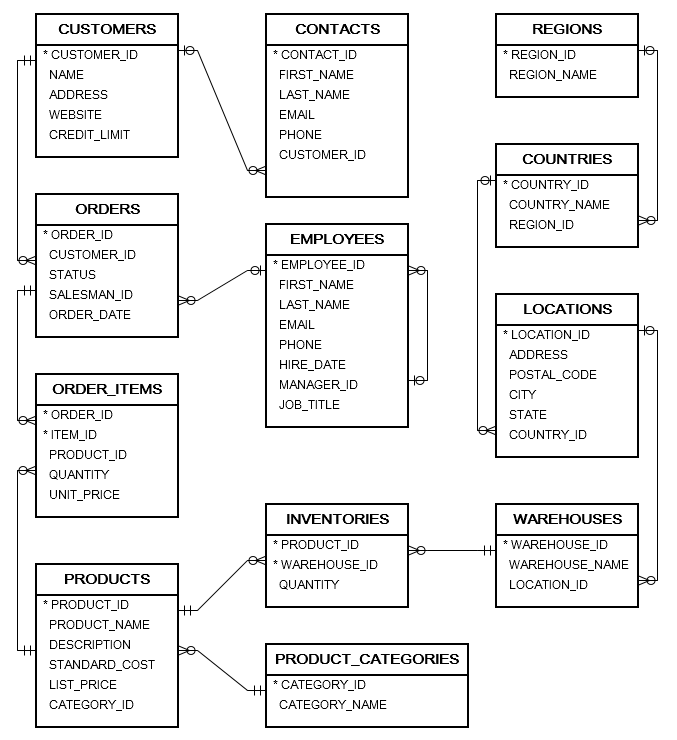
The Oracle Tutorial sample database contains a dozen tables each with a handful to a few hundred records. It maps pretty clearly to the kind of data that a company with some customers and products might manage.
The download consists of a few scripts. These create the users, the schema, and load the data. They are not that different off from what you might generate with the Oracle get_ddl PL/SQL tool. The zip file contains:
- ot_create_user.sql – creates an initial user called “ot” and grants privileges to the user
- ot_schema.sql – creates all of the tables and constraints
- ot_drop.sql – drops all of the tables
- ot_data.sql – disables the constraints, inserts all of the data, enables the constraints
Running SQL in YugabyteDB
If you want to follow along first install YugabyteDB by following the instructions on the download site. Pay extra care to make sure you have enough file handles.
From the home directory of an existing YugabyteDB installation type “./bin/ysqlsh.” If this is a local install you should be immediately taken to a shell. This is basically the same as the postgresql psql command. You can execute SQL statements here. There are also built in commands that are executed with the backslash ‘\’ character.
\?– displays help\dt– lists the tables (similar to select table_name from user_tables)\q– exits the shell
Making changes to the Oracle Tutorial Scripts
While both Oracle and YugabyteDB are relational databases and both support SQL, like any other two relational databases there are some minor differences that require consideration. For the purpose of the tutorial here are the main issues:
- Users and roles
- Schema references
- Data Types
- YugabyteDB does not support enabling or disabling constraints
- YugabyteDB does not support “generated” identity fields
Running all of the scripts through the SQL Lines web tool
Because YugabyteDB supports PostgreSQL’s dialect and datatypes, the Oracle scripts have to be converted. This could be done by hand, but that would be really boring. Instead there is a free-to-use webtool at https://www.sqlines.com/online. You literally cut and paste each script into it, select “oracle” as the source format and “postgresql” as the output format and click convert. Copy the output (on the right) into the original file and save over the original. This fixes all of the datatypes.
Changing the ot_create_user.sql script
The original script has comments, the word “privileges” spelled with a “d” multiple times and two lines:
CREATE USER OT IDENTIFIED BY yourpassword;
GRANT CONNECT, RESOURCE, DBA TO OT;
The YugabyteDB version looks like this:
-- create new user
CREATE USER OT WITH PASSWORD 'yugabyte';

-- create database
CREATE DATABASE OT WITH OWNER=OT;

-- grant privileges
GRANT ALL ON DATABASE OT TO OT;
However, for convenience sake you may also add to the top of the file:
DROP DATABASE OT;
DROP USER OT;
This is mainly for convenience sake while creating/destroying the database during testing.
Changing ot_schema.sql
Most of the work is in this file. It is also useful to divide it into two files: One to create schema and table elements and another to create constraints.
- Copy ot_schema.sql to ot_create_constraints.sql
- Add:
CREATE SCHEMA OT;
SET search_path TO OT,public;

CREATE SEQUENCE OT.regions_seq;
This creates the “ot” schema and changes the user’s search path to look at the “OT” schema first before the default “public” schema. This has to be done because all of the insert statements in the “ot_data.sql” script directly reference the schema name i.e. “insert into OT.countries” but in other places the table is referenced without the schema name.
Next, change every create table statement to explicitly reference the schema. For example:
CREATE TABLE regions
becomes
CREATE TABLE OT.regions
Next, remove every “GENERATED BY DEFAULT AS IDENTITY” line. For example:
“GENERATED BY DEFAULT AS IDENTITY START WITH 320” — just delete these lines. I will blog about sequences some other time, but my colleague Bryn has explained in another blog why database sequences are not good in a distributed database and some alternatives. While they are not needed for the example database to work for our purposes, if you were doing something more production-ready you would want to replace sequences with UUIDs, Bryn’s blog explains this in exquisite detail.
Finally, remove all of the lines around foreign key constraints except for the primary keys. While YugabyteDB does support the constraint clause, it does not support “enable” or “disable.” Instead it is better to create them after a data load and delete them before a data load. In order to do that without duplicating the creation, it makes sense to delete them here and create them with “alter table” statements instead. Delete all of the foreign key constraint clauses except for the primary key clauses.
For example, in the OT.orders definition, remove:
CONSTRAINT fk_orders_customers
      FOREIGN KEY( customer_id )
      REFERENCES customers( customer_id )
      ON DELETE CASCADE,
    CONSTRAINT fk_orders_employees
      FOREIGN KEY( salesman_id )
      REFERENCES employees( employee_id )
      ON DELETE SET NULL
And the comma in the line above this clause. The orders table definition should be simplified to:
CREATE TABLE OT.orders
  (
    order_id DOUBLE PRECISION PRIMARY KEY,
    customer_id INT NOT NULL, -- fk
    status      VARCHAR( 20 ) NOT NULL ,
    salesman_id INT         , -- fk
    order_date  TIMESTAMP(0) NOT NULL
  );
However, leave in all of the primary key constraint clauses. For example, order_items should remain:
CREATE TABLE OT.order_items
  (
    order_id   BIGINT                                , -- fk
    item_id    BIGINT                                ,
    product_id BIGINT NOT NULL                       , -- fk
    quantity   DECIMAL( 8, 2 ) NOT NULL                        ,
    unit_price DECIMAL( 8, 2 ) NOT NULL                        ,
    CONSTRAINT pk_order_items
      PRIMARY KEY( order_id, item_id )
  );
And the inventories table should remain:
CREATE TABLE OT.inventories
  (
    product_id   BIGINT        , -- fk
    warehouse_id BIGINT        , -- fk
    quantity     INT NOT NULL,
    CONSTRAINT pk_inventories
      PRIMARY KEY( product_id, warehouse_id )
  );
Those are all the changes required for the schema script.
ot_create_constraints.sql
In the beginning we made a copy of the “ot_schema.sql” script. Leave the “SET search_path TO OT,public;” at the top but erase everything except the create table statements. Each create_table statement should be changed to ALTER TABLE … ADD. The field definitions should be deleted and only the constraints should remain. For example the “order_items” constraint definition should be:
ALTER TABLE OT.order_items ADD
    CONSTRAINT fk_order_items_products
      FOREIGN KEY( product_id )
      REFERENCES products( product_id )
      ON DELETE CASCADE;
ALTER TABLE OT.order_items ADD
    CONSTRAINT fk_order_items_orders
      FOREIGN KEY( order_id )
      REFERENCES orders( order_id )
      ON DELETE CASCADE
  ;
Copy this to another file called ot_drop_constraints.sql.
ot_drop_constraints.sql
Change all of the “ALTER TABLE ADD” statements to “DROP” and add one per constraint. The entire output should look like this:
ALTER TABLE countries DROP CONSTRAINT fk_countries_regions;
ALTER TABLE locations DROP CONSTRAINT fk_locations_countries;
ALTER TABLE warehouses DROP CONSTRAINT fk_warehouses_locations;
ALTER TABLE employees DROP CONSTRAINT fk_employees_manager;
ALTER TABLE products DROP CONSTRAINT fk_products_categories;
ALTER TABLE contacts DROP CONSTRAINT fk_contacts_customers;
ALTER TABLE orders DROP CONSTRAINT fk_orders_customers;
ALTER TABLE orders DROP CONSTRAINT fk_orders_employees;
ALTER TABLE order_items DROP CONSTRAINT fk_order_items_products;
ALTER TABLE order_items DROP CONSTRAINT fk_order_items_orders;
ALTER TABLE inventories DROP CONSTRAINT fk_inventories_products;
ALTER TABLE inventories DROP CONSTRAINT fk_inventories_warehouses;
ot_data.sql
Remove all of the ALTER TABLE statements from the top and bottom of the file. We have externalized this into the ot_create_constraints.sql and ot_drop_constraints.sql scripts.
Running the Oracle Tutorial Scripts on YugabyteDB
The scripts should now be run in this sequence:
- ot_create_user.sql
- ot_schema.sql
- ot_data.sql
- ot_create_constraint.sql
The “drop_constraint.sql” is not technically needed unless running another bulk load, but it is nice to have.
Back to ysqlsh
Run the YugabyteDB shell:
./bin/ysqlsh
Run these steps:
\i ot_create_user.sql
\c ot ot
You are now connected to database “ot” as user “ot”.
\i ot_schema.sql
\i data.sql
\i ../ot_create_constraint.sql
Testing it out
That is it. The Oracle Tutorial sample database has been successfully loaded into YugabyteDB.
\dt tells you what tables are here:
ot=> \dt
    List of relations
 Schema |        Name        | Type  | Owner
--------+--------------------+-------+-------
 ot     | contacts           | table | ot
 ot     | countries          | table | ot
 ot     | customers          | table | ot
 ot     | employees          | table | ot
 ot     | inventories        | table | ot
 ot     | locations          | table | ot
 ot     | order_items        | table | ot
 ot     | orders             | table | ot
 ot     | product_categories | table | ot
 ot     | products           | table | ot
 ot     | regions            | table | ot
 ot     | warehouses         | table | ot
(12 rows)
Describe a table:
\d orders
                               Table "ot.orders"
   Column    |              Type              | Collation | Nullable | Default
-------------+--------------------------------+-----------+----------+---------
 order_id    | double precision               |           | not null |
 customer_id | integer                        |           | not null |
 status      | character varying(20)          |           | not null |
 salesman_id | integer                        |           |          |
 order_date  | timestamp(0) without time zone |           | not null |
Indexes:
    "orders_pkey" PRIMARY KEY, lsm (order_id HASH)
Foreign-key constraints:
    "fk_orders_customers" FOREIGN KEY (customer_id) REFERENCES customers(customer_id) ON DELETE CASCADE
    "fk_orders_employees" FOREIGN KEY (salesman_id) REFERENCES employees(employee_id) ON DELETE SET NULL
Referenced by:
    TABLE "order_items" CONSTRAINT "fk_order_items_orders" FOREIGN KEY (order_id) REFERENCES orders(order_id) ON DELETE CASCADE
You can get row counts to make sure the data got inserted:
select count(*) from customers;
 count
-------
   319
(1 row)
And even run a more complicated query to get totals per order:
select order_id, sum(total) from (select o.order_id as order_id, o.customer_id, o.order_date, i.item_id as item_id, i.quantity * i.unit_price as total from orders o inner join order_items i on o.order_id=i.order_id) as x group by order_id, item_id;
 order_id |     sum
----------+-------------
       28 | 166798.6100
      102 |  75899.3100
       94 |   4232.5400
       46 | 166074.3500
       23 |  54167.2600
       72 | 130993.7700
       34 |  31638.8700
       88 | 213601.6600
       24 |  18605.0000
        1 |  89609.1300
       36 |  30914.5500
       95 |  37921.7100
       13 |  20253.8000
       27 |  25080.0000
       83 |  55631.2400
       67 |  85186.7600
       43 | 240799.1400
       27 | 279407.0400
      105 |  62369.2300
       18 |  78278.9700
       22 |  53577.1100
        5 |  70846.3600
       98 |  41598.9600
What’s next?
If you want to learn more SQL:
- If you are new to SQL then I would love to see you at the webinar on July 29 at 10am PT (1:00 pm ET)
- Check out the Yugabyte Docs and the Northwind sample database, which is very similar to the Oracle Tutorial sample database
- …but if you are not a command-line junkie, consider one of the great graphical tools available for Yugabyte including pgAdmin
If you want to learn more about SQL or porting Oracle or Learning SQL:
- Try other paths in the Oracle Tutorial
- Try the PostgreSQL Tutorial
- Read more about sequences and the concurrency issues caused by sequences as well as the alternative (UUIDs)


