Getting Started with YugabyteDB, Temporal, and the Temporal-Maru Benchmarking Tool
December 15, 2021
“Does YugabyteDB integrate with temporal.io?” is a common question from developers. Temporal enables technologists to build highly reliable applications without having to worry about all the edge cases. Developers use Temporal not just because it is an open-source solution. They also use it to build workflows in code and operate resilient applications using developer-friendly primitives.
Temporal supports independent horizontal scaling of each of the Temporal Server services: Frontend, Matching, History, and Worker. As a result, Temporal requires a persistent datastore with support for Cassandra, MySQL, Postgres, and ElasticSearch. YugabyteDB is an open-source, PostgreSQL compatible distributed SQL database that can also horizontally scale.
Recently, a prospect wanted to see how to integrate YugabyteDB as the datastore database for Temporal. Not only was I able to integrate a YugabyteDB cluster database as the persistent datastore for Temporal. But I was also able to use Maru as a benchmarking tool and run a few workflows that represent a workload.
For folks new to Temporal, Maru as a benchmarking tool can help answer questions about capacity planning. Maru identifies infrastructure needs for target workloads as well as capacity requirements for a Kubernetes cluster, server components, workers, and persistent datastores.
In this blog post, we’ll share the high-level steps needed to integrate Temporal with YugabyteDB and implement Maru to run the sample workflows.
Step 1: Create a YugabyteDB cluster
First, you’ll need to create a YugabyteDB database cluster. YugabyteDB Managed provides an easy way to set up a free YugabyteDB cluster quickly. Just sign up for a YugabyteDB Managed free cluster with a valid email address. Since it’s free, no credit card is required.
When setting up your cluster, you will need your Database Administrator Name and Password. The Cluster Wizard requires that you save a credentials file with these details. You’ll need this name and password when connecting your YugabyteDB Managed cluster with Temporal Maru.
For your YugabyteDB Managed free cluster, you need to create one or more IP entries for an IP Allow List. An IP Allow List is a security measure that helps ensure only authorized IP addresses can connect to your Yugabyte database cluster. Here are the steps:
- In Cluster Details, in (1) Connect to your cluster, in Configure network access, select Add IP Allow List.
- In the Add IP Allow List panel, select Create New List and Add to Cluster. This allows you to create and save one or more IP address entries for the IP Allow List of your cluster.
- Specify the Name, Description, and IP Address or Range. You can specify multiple addresses using a comma separated list of values.
- To identify and use your own IP address, select the “Detect and add my IP to the list”.
- When complete, select Save.
You will also need your CA certificate for a TLS connection. To download your CA certificate file, follow these steps:
- In Cluster Details, in (2) Connect, select Run your own application.
- In the Connect to Cluster dialog, select Download CA Cert.
- Save the location of the downloaded root.crt file.
Step 2: Clone and Compile Temporal
Once you have a YugabyteDB cluster running, you can clone Temporal and compile the temporal-sql-tool as follows:
- In a directory of your choice, clone the temporal.io git repository.
mkdir ~/Documents/GitHub/temporalio
cd ~/Documents/GitHub/temporalio
git clone https://github.com/temporalio/temporal.git
- For Mac OS, in bash shell, compile the temporal-sql-tool.
brew install go
cd ~/Documents/GitHub/temporalio
make temporal-sql-tool
- For Linux (CentOS), here are the commands to compile the temporal-sql-tool.
yum install git make golang
cd ~/Documents/GitHub/temporalio
make temporal-sql-tool
Note: If you encounter the “fatal: git fetch-pack: expected shallow list” error, here is a remedy:
Fix GitLab runner (Centos 7).
- Verify that temporal-sql-tool successfully compiled.
./temporal-sql-tool --version
./temporal-sql-tool --help
Step 3: Use temporal-sql-tool to connect to Yugabyte DB Managed cluster
After compiling temporal-sql-tool, you can use temporal-sql-tool to connect to the yugabyte database and create two databases Temporal requires in your YugabyteDB Managed cluster.
In order to make this connection, you will need the HOST DNS for your YugabyteDB Managed cluster. Here’s how to find your HOST DNS in the console:
- In Cluster Details, select the Settings tab.
- In the Network Access section, in Connection Parameters, you can view the HOST.
Now that you have your HOST DNS, you can set your shell variables and use the temporal-sql-tool to create the Temporal databases. Here are the steps:
- Set your shell variables for the connection. Remember to change the token values to that of the free YugabyteDB Managed cluster.
cd ~/Documents/GitHub/temporalio
export TLS_CERT_FILE=<ROOT_CRT_FILE_PATH>
export SQL_HOST=<YUGABYTEDB_IP_OR_HOST_DNS>
export SQL_USER=<DATABASE_ADMIN>
export SQL_PASSWORD=<DATABASE_ADMIN_PASSWORD>
export SQL_DRIVER=sql
export SQL_PLUGIN=postgres
export SQL_PORT=5433
export SQL_YB_DB=yugabyte
export SQL_TEMPORAL_DB=temporal
export SQL_TEMPORAL_VISIBILITY_DB=temporal_visibility
- Next, create the temporal and temporal_visibility databases.
./temporal-sql-tool \
  --tls \
  --tls-disable-host-verification \
  --tls-cert-file  $TLS_CERT_FILE\
  --ep $SQL_HOST \
  -p $SQL_PORT \
  -u $SQL_USER \
  -pw $SQL_PASSWORD \
  --pl $SQL_PLUGIN \
  --db $SQL_YB_DB \
  create-database -database ${SQL_TEMPORAL_DB}

./temporal-sql-tool \
  --tls \
  --tls-disable-host-verification \
  --tls-cert-file  $TLS_CERT_FILE\
  --ep $SQL_HOST \
  -p $SQL_PORT \
  -u $SQL_USER \
  -pw $SQL_PASSWORD \
  --pl $SQL_PLUGIN \
  --db $SQL_YB_DB \
  create-database -database ${SQL_TEMPORAL_VISIBILITY_DB}
- Create and update the schema version of the temporal database.
./temporal-sql-tool \
  --tls \
  --tls-disable-host-verification \
  --tls-cert-file  $TLS_CERT_FILE\
  --ep $SQL_HOST \
  -p $SQL_PORT \
  -u $SQL_USER \
  -pw $SQL_PASSWORD \
  --pl $SQL_PLUGIN \
  --db $SQL_TEMPORAL_DB \
  setup-schema -v 0.0

./temporal-sql-tool \
  --tls \
  --tls-disable-host-verification \
  --tls-cert-file  $TLS_CERT_FILE\
  --ep $SQL_HOST \
  -p $SQL_PORT \
  -u $SQL_USER \
  -pw $SQL_PASSWORD \
  --pl $SQL_PLUGIN \
  --db $SQL_TEMPORAL_DB \
  update-schema -schema-dir ./schema/postgresql/v96/temporal/versioned
- Create and update the schema version of the temporal_visibility database.
./temporal-sql-tool \
  --tls \
  --tls-disable-host-verification \
  --tls-cert-file  $TLS_CERT_FILE\
  --ep $SQL_HOST \
  -p $SQL_PORT \
  -u $SQL_USER \
  -pw $SQL_PASSWORD \
  --pl $SQL_PLUGIN \
  --db $SQL_TEMPORAL_VISIBILITY_DB \
  setup-schema -v 0.0

./temporal-sql-tool \
  --tls \
  --tls-disable-host-verification \
  --tls-cert-file  $TLS_CERT_FILE\
  --ep $SQL_HOST \
  -p $SQL_PORT \
  -u $SQL_USER \
  -pw $SQL_PASSWORD \
  --pl $SQL_PLUGIN \
  --db $SQL_TEMPORAL_VISIBILITY_DB \
  update-schema -schema-dir ./schema/postgresql/v96/temporal/versioned
The terminal output will not show any errors. Otherwise, if you want to confirm the creation of the databases, you can use YSQL shell, connect to each database, and then list the tables in each database.
To verify the success of these previous steps, you can launch the Yugabyte Cloud Shell from Cluster Details of the Yugabyte Console. Simply select Launch Cloud Shell. Then follow these steps:
- In Yugabyte Cloud shell, enter the Database Administrator password.
- At the yugabyte database prompt, list the databases.
\l
- Connect to the temporal database.
\c temporal
- Verify the two tables, schema_version and schema_update_history.
\dt
- Close the connection.
exit
- Close the Yugabyte Cloud shell browser tab.
Step 4: Create a Temporal cluster in Kubernetes
Now that you have the two databases—temporaland temporal_visibility—in your YugabyteDB cluster, you can create a Temporal cluster using Kubernetes and Helm.
Review the Kubernetes installation guide if you don’t already have Kubernetes installed. Since you are most likely running Kubernetes on a local machine such as your laptop, you need to install minikube. minikube is local Kubernetes, and helps make it easy to learn and develop Kubernetes.
Helm is the package manager for Kubernetes, so you will also need Helm installed by following these instructions. Before you begin, make sure Kubernetes is up and running.
Here are the steps to create the temporal.io cluster in Kubernetes:
- Clone the helm-charts repository from temporal.io.
cd ~/Documents/GitHub/temporalio
git clone
- Next, create your chart template. The following example enables Prometheus and Grafana:
cd ~/Documents/GitHub/temporalio/helm-charts
helm dependencies update
helm template . \
  --set persistence.default.driver=${SQL_DRIVER} \
  --set persistence.visiblity.driver=${SQL_DRIVER} \
  --set sql.driver=${SQL_PLUGIN} \
  --set sql.host=${SQL_HOST} \
  --set sql.port=${SQL_PORT} \
  --set sql.user=${SQL_USER} \
  --set sql.password=${SQL_PASSWORD} \
  --set cassandra.enabled=false \
  --set elasticsearch.enabled=false \
  --set mysql.enabled=false \
  --set postgres.enabled=true \
  --set prometheus.enabled=true \
  --set grafana.enabled=true
- You can now adjust what are called the Temporal roles. For more details, refer to this blog post from Temporal on running the tool with Cassandra. We’ll use the Cassandra recommendations for YSQL.
- Now that the template is created, you can deploy the Temporal k8’s cluster. First, create the temporal namespace.
kubectl create namespace temporal
- Next, install temporaltest into the temporal namespace.
helm dependency update
helm install -n temporal temporaltest .
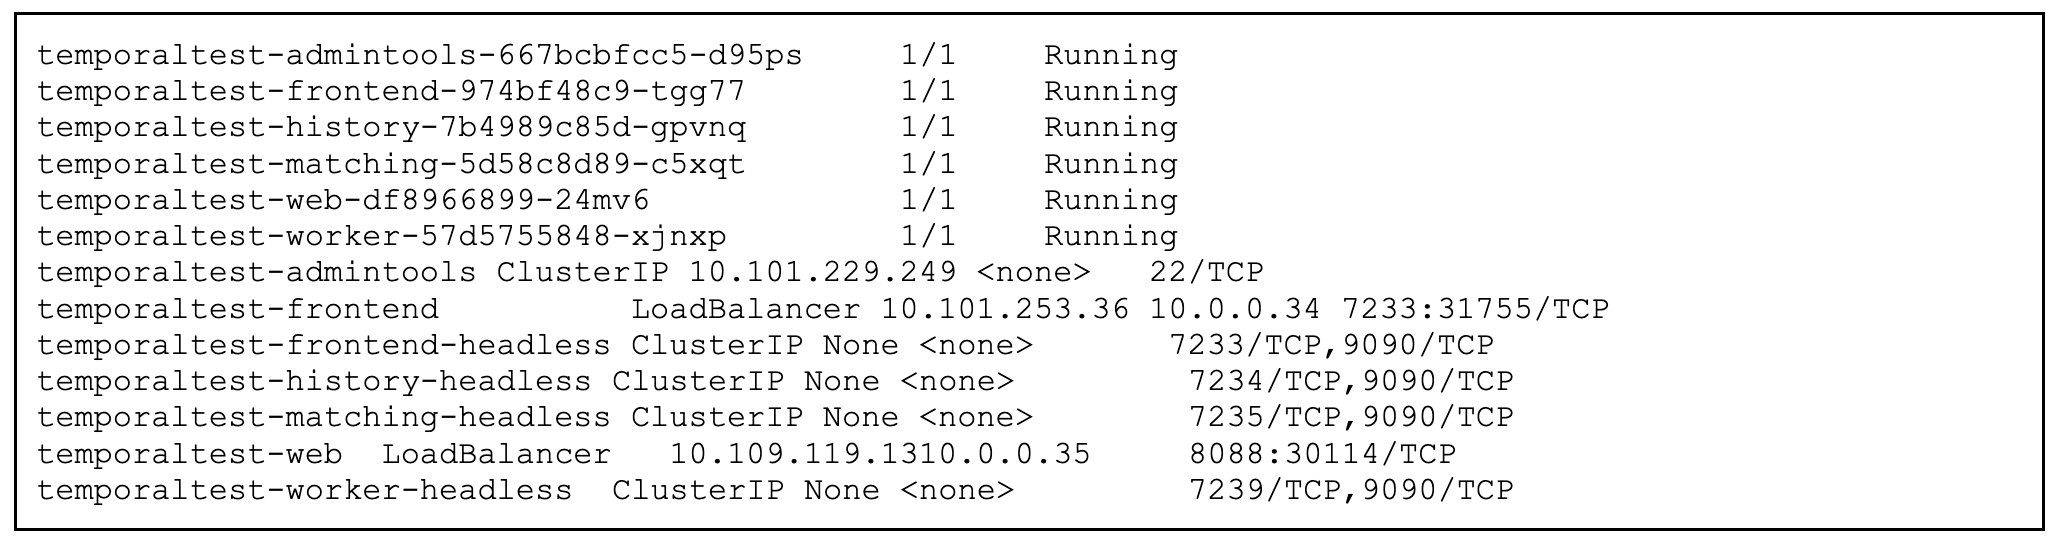
- View the status of pods in the temporal namespace with kubectl.
kubectl get pods -n temporal
Step 5: Create a Maru pod
Maru is a load testing tool that allows you to define a Temporal workflow which serves as a driver for load tests. Given the definition of a target load profile, a bench workflow drives the target load and collects the workflow execution statistics.
You can learn more about how to use Maru at the author’s blog site and at the Maru GitHub repository.
Just as you did for Temporal, you can use Helm to configure and deploy Maru:
- Clone the maru repository.
cd ~/Documents/GitHub/temporalio
git clone https://github.com/temporalio/maru.git
- Next, create your chart template and update the values of the namespaceName and frontendAddress to match that of your Temporal Kubernetes deployment. You can also define the podSecurityContext or securityContext. The following example enables Prometheus and Grafana:
helm dependencies update
cd ~/Documents/GitHub/temporalio/maru/helm-charts
helm template . \
    --set tests.namespaceName=marutest \
    --set tests.namespaceRetention=1 \
    --set
tests.frontendAddress=temporaltest-frontend-headless:7233 \
    --set tests.grafana=enabled
    --set tests.prometheus=enabled
    --set worker-node-number=2
- Next, install the chart archive in the temporal namespace.
helm install -n temporal temporal-maru .
- View the status of pods in the temporal namespace with kubectl.
kubectl get pod -n temporal

Step 6: Run the bench tests pod
Now that the Temporal and Maru pods are running in the Temporal namespace in Kubernetes, you can copy the tests in the maru/scenarios folder to the admintools container. There are four files: basic-const12k.json, basic-payload.json, basic-spike.json, and basic-test.json.
The following steps require jq, a lightweight and flexible command-line JSON processor, to help find value in kubectl JSON output:
- Using the kubectl command-line tool, copy the JSON files to the /tmp directory of the temporaltest-admintools container using the container name.
cd ~/Documents/GitHub/temporalio/maru/scenarios/

ADMIN_TOOLS_CONTAINER=$(kubectl get pods -n temporal \
-o=jsonpath='{.items[?(@.metadata.labels.app\.kubernetes\.io/comp
onent=="admintools")]}' \
| jq -r '.metadata.name')

echo $ADMIN_TOOLS_CONTAINER

kubectl cp basic-test.json \
  temporaltest/${ADMIN_TOOLS_CONTAINER}:/tmp/

kubectl cp basic-const12k.json \
  temporaltest/${ADMIN_TOOLS_CONTAINER}:/tmp/

kubectl cp basic-payload.json \
  temporaltest/${ADMIN_TOOLS_CONTAINER}:/tmp/

kubectl cp basic-spike.json \
  temporaltest/${ADMIN_TOOLS_CONTAINER}:/tmp/
- Using the exec command, run the basic-test.json workload.
kubectl exec -it temporaltest/${ADMIN_TOOLS_CONTAINER} -- bash
- From bash, use the Temporal CLI, a command-line tool, to start the basic-test workflow.
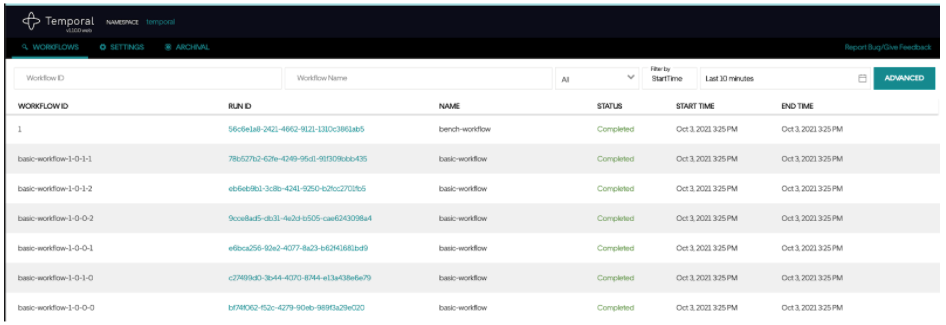
tctl wf start --tq temporal-bench --wt bench-workflow --wtt 5 --et 1800 --if /tmp/basic-test.json --wid 1
- Verify that the workload started.
Started Workflow Id: 1, run
Id:56c6e1a8-2421-4662-9121-1310c3861ab5
- Open the Temporal Web UI (this is the IP of the temporaltest-web container) on port 8088 by default and view the workflow execution.
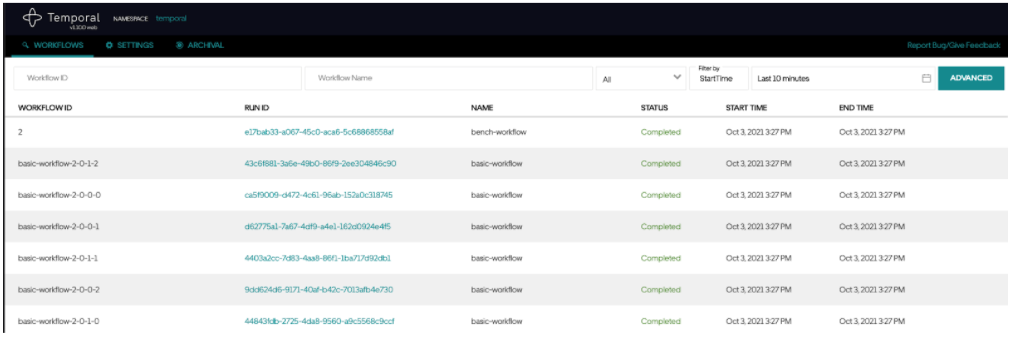
- Use the Temporal CLI to start the basic-payload workflow.
tctl wf start --tq temporal-bench --wt bench-workflow --wtt 5 --et 1800 --if /tmp/basic-payload.json --wid 2
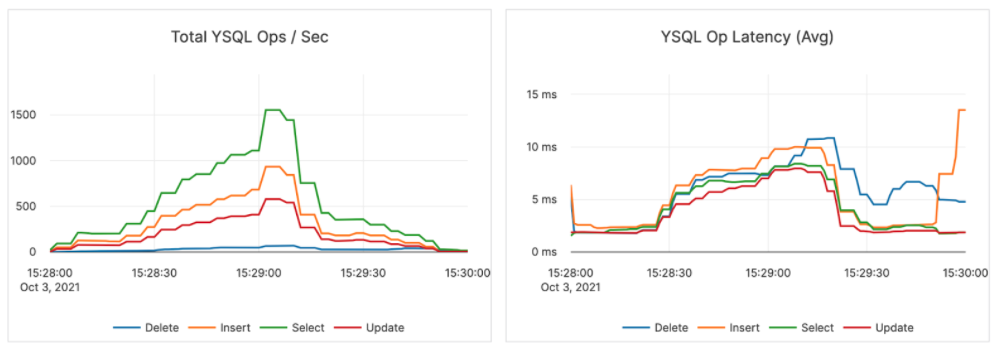
- The Temporal Web UI shows this workflow now.
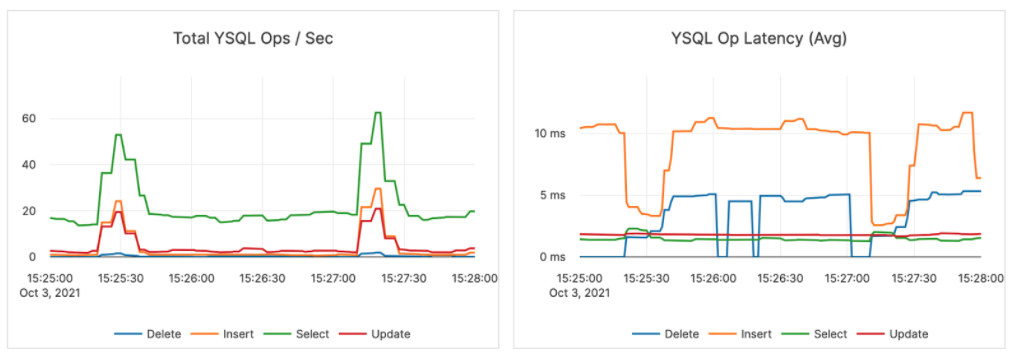
- Here is an image of how the two workflows impact the YugabyteDB cluster:
- Use the Temporal CLI to start the basic-spike.json workflow.
tctl wf start --tq temporal-bench --wt bench-workflow --wtt 5 --et 1800 --if /tmp/basic-spike.json --wid 3
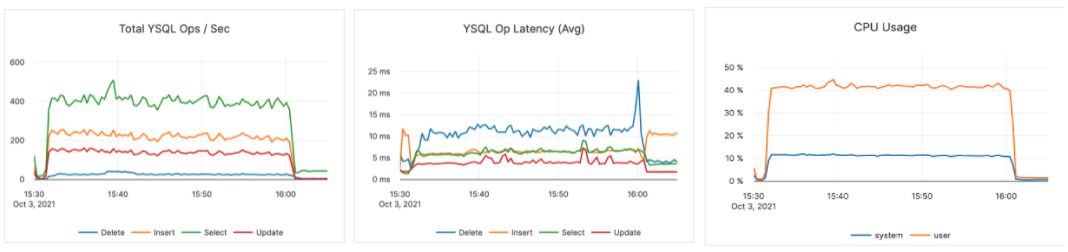
- Here is an image of how the basic-spike workflow impacts the YugabyteDB cluster:
- Use the Temporal CLI to start the basic-const12k.json workflow.
tctl wf start --tq temporal-bench --wt bench-workflow --wtt 5 --et 1800 --if /tmp/basic-const12k.json --wid 4
- Here is an image of how the basic-const12k.json workflow impacts the YugabyteDB cluster:
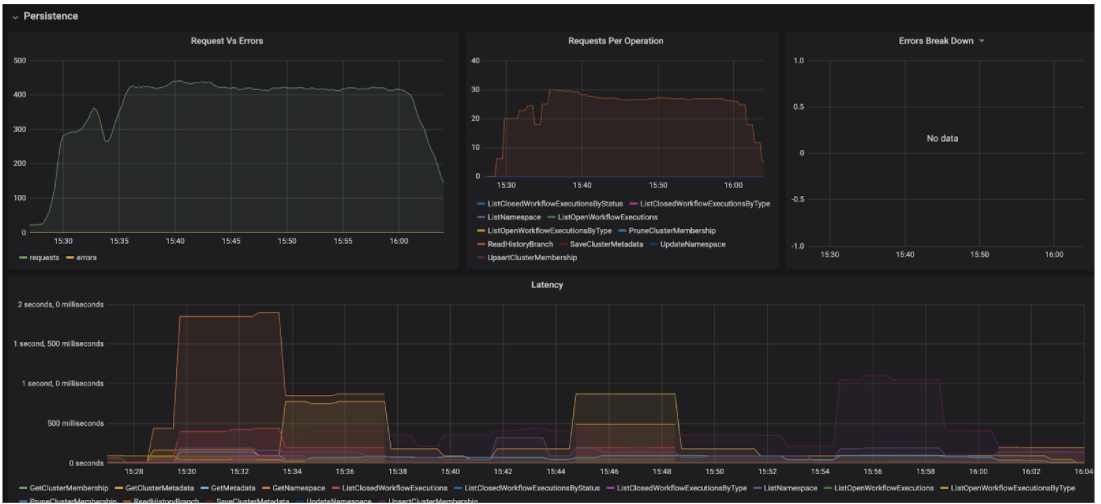
- If you enabled Prometheus and Grafana, you can also view the metrics for defined Temporal roles such as the Persistence role:
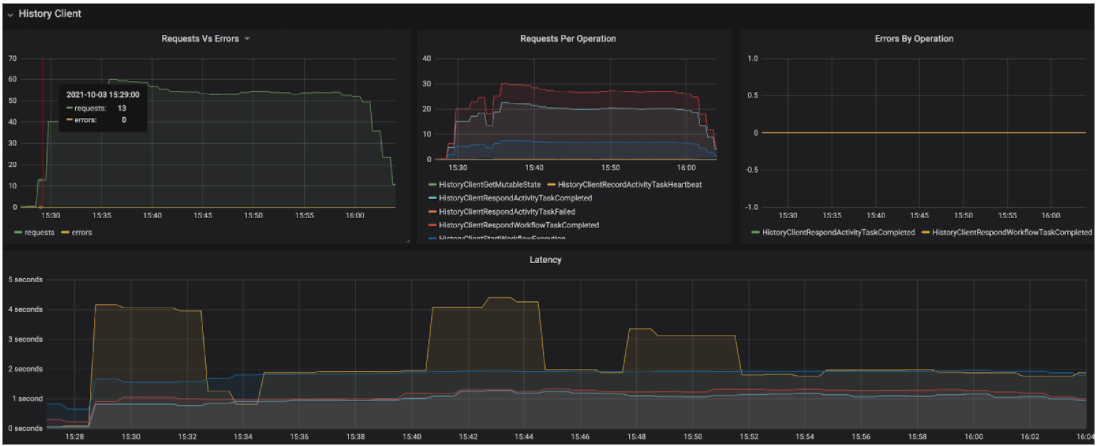
- Here is an example of the metrics for the History role:
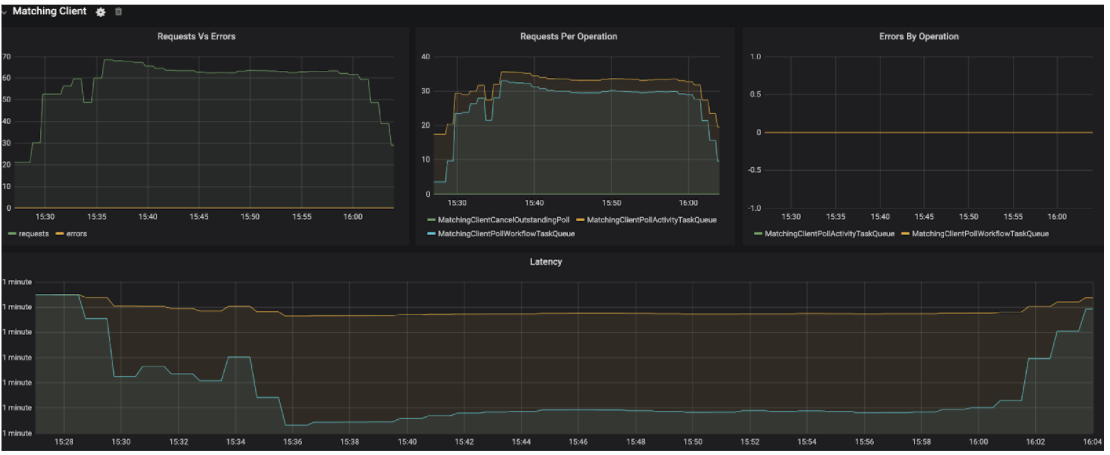
- And here is an example of the metrics for the Matching role:
Next Steps
Maru offers numerous options for configuring workflows so that you can configure your own scenario. You can even generate random payloads for target workflows!
With workflows, Temporal is more than just an orchestration service. Temporal is quickly becoming a new paradigm for building applications that are workflows themselves. Having a distributed SQL database such as YugabyteDB that supports this new paradigm for cloud native applications is critical. With YugabyteDB, you can horizontally scale your Temporal persistent datastores.
To get started with YugabyteDB, sign up for a free YugabyteDB Managed account. It provides an easy way to set up a free YugabyteDB cluster quickly and easily. All you need is a valid email address. And since it’s free, no credit card is required.


