Getting Started with Hasura GraphQL Remote JOINs on Multi-Cloud Distributed SQL
August 24, 2020
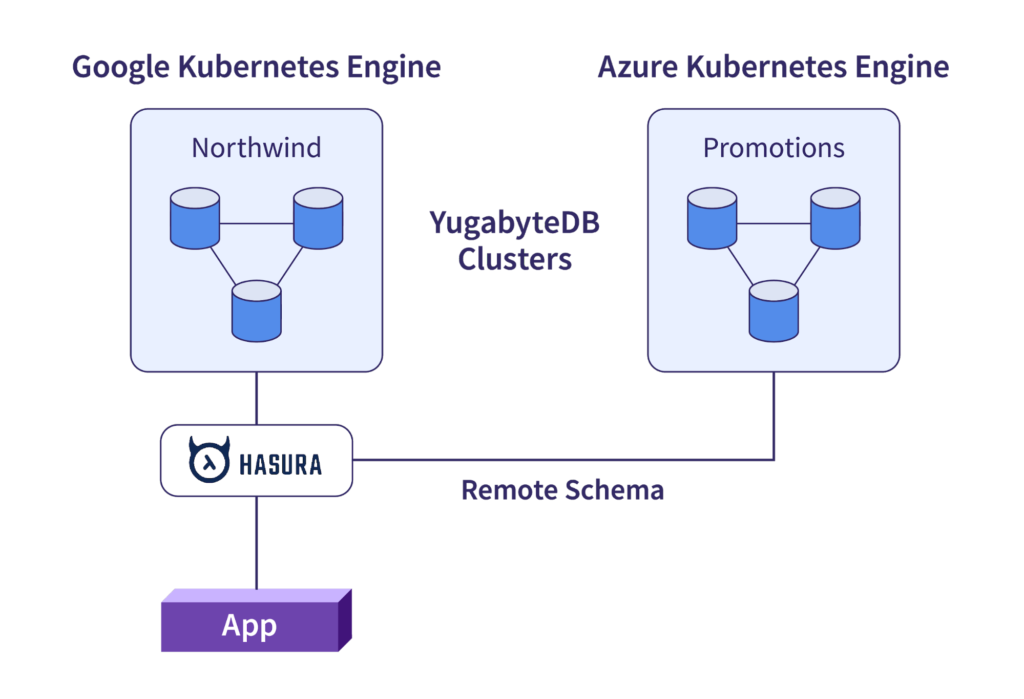
Remote joins in Hasura GraphQL extend the concept of joining data across tables, to being able to join data across tables and remote data sources. In this blog post we are going to demonstrate this capability by configuring the following set up.
- A 3 node YugabyteDB cluster running on GKE with a Hasura GraphQL Engine attached
- A 3 node YugabyteDB cluster running on AKS with a Hasura GraphQL Engine attached
- A Remote Schema and Remote Relationship configured
- The ability to issue GraphQL queries that join data from two different databases, hosted in two different clouds, into a single result set
First things first, for those of you who might be new to either distributed SQL or YugabyteDB…
What Is Distributed SQL?
Distributed SQL databases are becoming popular with organizations interested in moving data infrastructure to the cloud or to cloud native environments. This is often motivated by the desire to reduce TCO or move away from the scaling limitations of monolithic RDBMS like Oracle, MySQL, and SQL Server. The basic characteristics of Distributed SQL are:
- A SQL API for querying and modeling data, with support for traditional RDBMS features like primary keys, foreign keys, indexes, stored procedures, and triggers.
- Automatic distributed query execution so that no single node becomes a bottleneck.
- A distributed SQL database should support automatically distributed data storage. This includes indexes which should be automatically distributed (aka sharded) across multiple nodes of the cluster so that no single node becomes a bottleneck for ensuring high performance and high availability.
- Distributed SQL systems should also provide for strongly consistent replication and distributed ACID transactions.
What Is YugabyteDB?
YugabyteDB is an open source, high-performance distributed SQL database built on a scalable and fault-tolerant design inspired by Google Spanner. YugabyteDB is PostgreSQL wire compatible and supports GraphQL along with advanced RDBMS features like stored procedures, triggers, and UDFs.
Got questions? Make sure to ask them in our YugabyteDB Slack channel. Ok, let’s dive in…
Step 1: Install YugabyteDB on GKE
Here are the complete steps to install a 3 node YugabyteDB cluster on Google Kubernetes Engine. Once you have a YugabyteDB cluster running on GKE, check the status of the cluster by executing the command below:
$ kubectl get services --namespace yb-demo

NAME					EXTERNAL-IP		PORT(S)
yb-tserver-service   	35.224.XX.XX    	5433:3067/TCP
Note the external IP for yb-tserver-service which we are going to use to establish a connection between YugabyteDB and Hasura GraphQL Engine. From the output above we can see that the IP is 35.224.XX.XX and the YSQL port is 5433.
Step 2: Create the Northwind Sample Database
In our documentation, you can find a variety of sample databases that are compatible with YugabyteDB. For the purposes of this tutorial we are going to use the Northwind sample database. The Northwind database contains the sales data for a fictitious company called “Northwind Traders,” which imports and exports specialty foods from around the world. The Northwind database is an excellent tutorial schema for a small-business ERP, with customers, orders, inventory, purchasing, suppliers, shipping, employees, and single-entry accounting.
Connect to the yb-tserver-pod by running the following command:
$ kubectl exec -n yb-demo -it yb-tserver-0 /bin/bash
To download the schema and data files, run the following commands:
$ wget https://raw.githubusercontent.com/yugabyte/yugabyte-db/master/sample/northwind_ddl.sql
$ wget https://raw.githubusercontent.com/yugabyte/yugabyte-db/master/sample/northwind_data.sql
Note: If the Google Cloud Shell tells you that the wget command does not exist, you can execute:
$ yum install wget -y
To connect to the YSQL service, exit out of the pod shell and run the following command:
$ exit

$ kubectl exec -n yb-demo -it yb-tserver-0 -- ysqlsh -h yb-tserver-0.yb-tservers.yb-demo
Create a database and connect to it using the following commands:
yugabyte=# CREATE DATABASE northwind;
northwind=# \c northwind;
We can now create the database objects and load them with data using the files we downloaded to yb-tserver-pod using the following commands:
northwind=# \i 'northwind_ddl.sql';
northwind=# \i 'northwind_data.sql';
By default, a YugabyteDB installation doesn’t have a password setup for the default yugabyte user. Specifying one is done the same way you’d do it in PostgreSQL.
northwind=# ALTER ROLE yugabyte WITH PASSWORD 'password';
Step 3: Set Up Hasura on GKE to Use YugabyteDB
We are now ready to install the Hasura GraphQL Engine on GKE. Exit the YSQL shell and get the Hasura Kubernetes deployment and service files by executing the commands below.
$ wget https://raw.githubusercontent.com/hasura/graphql-engine/master/install-manifests/kubernetes/deployment.yaml
$ wget https://raw.githubusercontent.com/hasura/graphql-engine/master/install-manifests/kubernetes/svc.yaml
Modify the database URL in deployment.yaml file to include the IP of YugabyteDB. For the purposes of this tutorial, the modification should look like this:
value: postgres://yugabyte:password@35.224.XX.XX:5433/northwind
Note: If you’d like everything to run in the yb-demo namespace, make sure to modify the namespace value in both the deployment.yaml and svc.yaml files. This is the setup I have chosen for this demo.
After saving the file, use kubectl to create a Hasura deployment using the commands below:
$ kubectl create -f deployment.yaml

deployment.apps/hasura created
$ kubectl create -f svc.yaml

service/hasura created
To find the external IP and open the Hasura console execute the command below:
$ kubectl get services --namespace yb-demo

NAME       EXTERNAL-IP     PORT(S)                                    hasura     35.192.XX.XX    80:30546/TCP
Now use https://<EXTERNAL-IP>/console to access the Hasura console. In this case it is 35.192.XX.XX. You should now see the Hasura console.
Step 4: Track the Northwind Objects in Hasura
Click on Data in top nav, click on Track All for tables, views, and foreign key relations. Refresh your browser and you should now see the northwind tables in the Explorer tree on the left-hand side when you click on GraphQL in the top nav.

Step 5: Install YugabyteDB on AKS
Here are the complete steps to install a 3 node YugabyteDB cluster on Azure Kubernetes Service. Once you have a YugabyteDB cluster running on AKS, check the status of the cluster by executing the command below:
$ kubectl get services --namespace yb-demo

NAME					EXTERNAL-IP		PORT(S)
yb-tserver-service   	20.190.XX.XX   	5433:3067/TCP
Note the external IP for yb-tserver-service which we are going to use to establish a connection between YugabyteDB and Hasura GraphQL Engine. From the output above we can see that the IP is 20.190.XX.XX and the YSQL port is 5433.
Step 6: Install the Promotions Database
In this step we are going to create a database called promotions, as well as a table called promotions. We’ll then load it with data about what types of promotions there are, what company is sponsoring them, and the duration of the promotion.
Log into the YSQL shell:
$ kubectl exec -n yb-demo -it yb-tserver-0 -- ysqlsh -h yb-tserver-0.yb-tservers.yb-demo
Create a database and connect to it using the following commands:
yugabyte=# CREATE DATABASE promotions;
yugabyte=# \c promotions;
By default, a YugabyteDB installation doesn’t have a password setup for the default yugabyte user. Specifying one is done the same way you’d do it in PostgreSQL.
promotions=# ALTER ROLE yugabyte WITH PASSWORD 'password';
Create the following table in the promotions database.
CREATE TABLE promotions (
	promotion_id serial PRIMARY KEY,
	supplier_id int2 NOT NULL,
	promotion_name VARCHAR ( 50 ) NOT NULL,
	company_name VARCHAR ( 40 ) NOT NULL,
	start_date DATE NOT NULL,
	stop_date DATE NOT NULL,
	created_on DATE NOT NULL DEFAULT CURRENT_DATE
);
Populate the promotions table with the following data.
INSERT INTO promotions (supplier_id, promotion_name, company_name, start_date, stop_date, created_on)
values
('28','Buy One Get One Free', 'Gai pâturage', '1996-08-15', '1996-08-30', CURRENT_DATE),
('19', 'Free Shipping', 'New England Seafood Cannery', '1996-10-15', '1996-10-30', CURRENT_DATE),
('16', 'Free T-Shirt With Every Purchase', 'Bigfoot Breweries', '1996-12-15', '1996-12-30', CURRENT_DATE),
('20','10% Off', 'Gula Malacca', '1996-11-15', '1996-11-30', CURRENT_DATE),
('8', '20% Off', 'Specialty Biscuits, Ltd.', '1996-09-15', '1996-09-30', CURRENT_DATE);
Step 7: Set Up Hasura on AKS to Use YugabyteDB
We are now ready to install the Hasura GraphQL Engine on Azure Kubernetes Service. Fortunately, it is very easy to get Hasura up and running on AKS and pointed to our YugabyteDB cluster with a simple wizard. Use this “one-click deployment” to set up the particulars. After selecting the option to connect to an existing database, you should see the following.
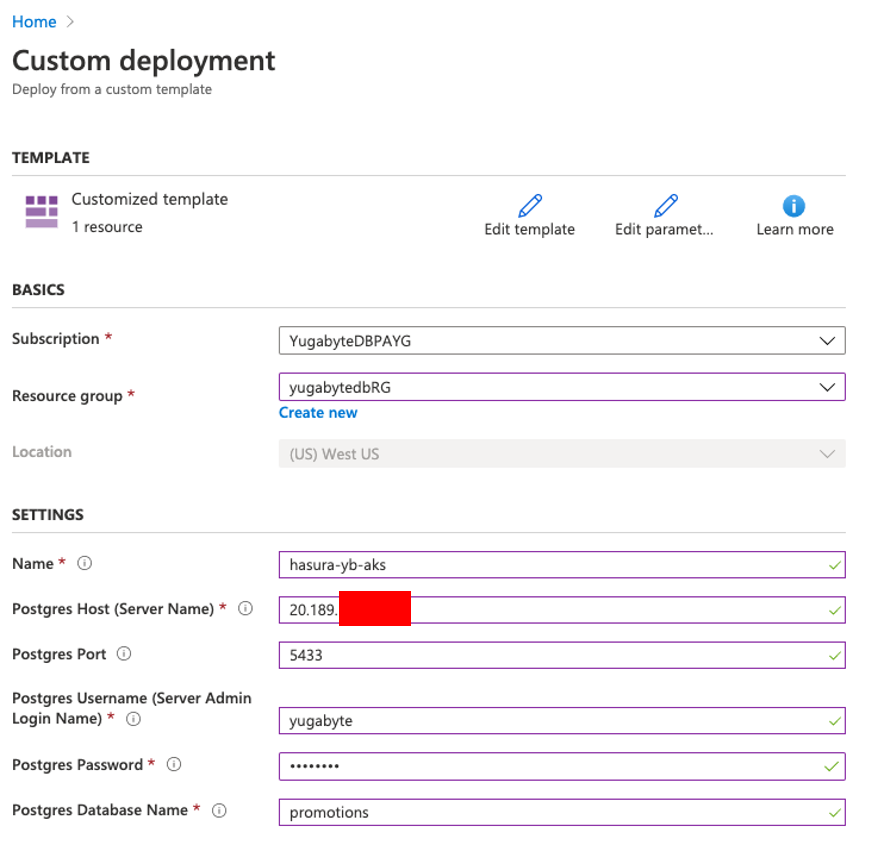
Note that we are specifying the external IP and port of our YugabyteDB cluster. In this case 20.189.XX.XX and 5433. We are also specifying the yugabyte user and the promotions database in the settings.
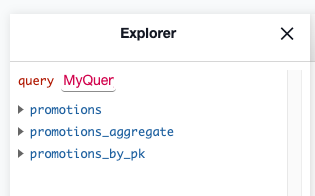
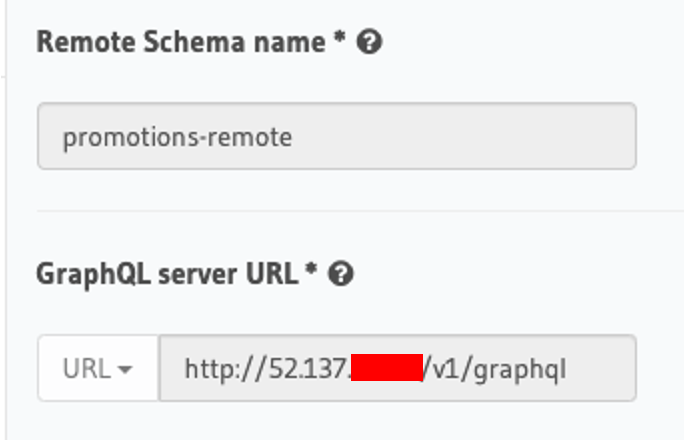
After Hasura is successfully deployed on AKS, locate the external IP for the console. In my case I looked in the Azure Portal under All Services > Resource groups > /Resource Group/ > hasura-promotions-container-group and saw that 52.137.XX.XX was the public IP assigned to my Hasura GraphQL Engine. With this information you should now be able to open up the Hasura console and track the promotions table. Once that’s accomplished, you should now see the promotions table in your Explorer as shown below.
Step 8: Set Up a Remote Schema and Remote Relationship
On the Hasura console running on GKE, navigate to the Remote Schemas tab, click on Add and provide the necessary information for the Hasura server running on AKS.
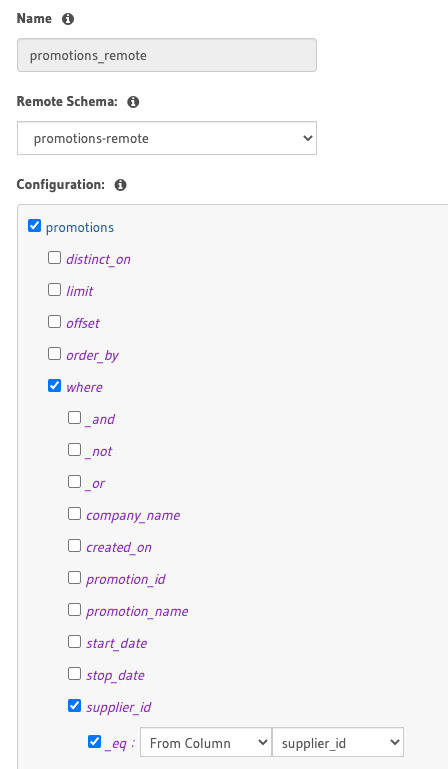
Next, let’s add a Remote Relationship on the supplier_id table between the suppliers and promotions table that we can leverage in our remote JOIN. You can accomplish this by navigating to Data > suppliers > Relationships > Remote Schema Relationships and specify the relationship.
Step 9: Issue a Remote Join Across Two Databases
We are now finished with setting up a Remote Schema to the promotions database and a Remote Relationship on supplier_id. We can now issue a query that processes data located in two different YugabyteDB databases, hosted on two different clouds. For the purposes of this demo, we want to issue a Remote Join GraphQL query that will allow us to determine if a supplier in the “primary” Northwind database has a promotion scheduled in the “remote” Promotions database.
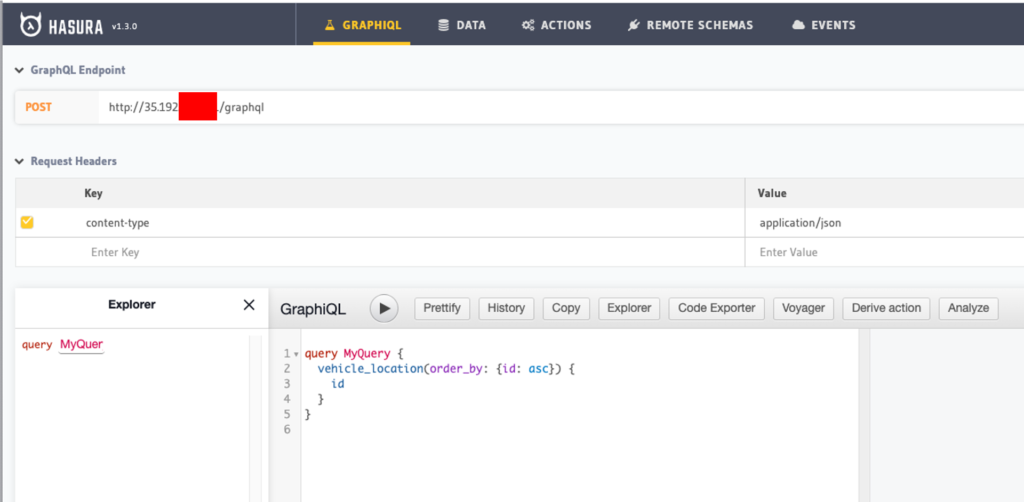
For example, in the query below we want to know if supplier “16” is running any promotions, and if so, what is the name of the promotion and for what dates is the promotion active.

The GraphQL query should return the following results.
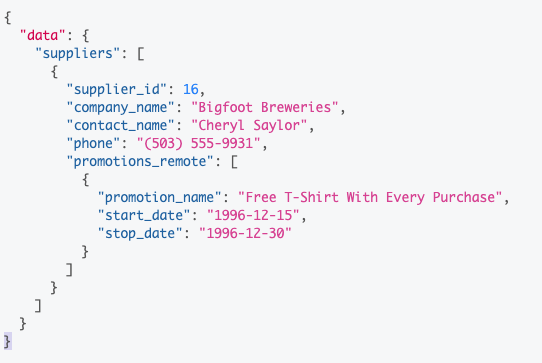
If we break down the GraphQL query, here’s what is happening.
From the suppliers table, which is hosted on a YugabyteDB cluster running on GKE, we are returning:
supplier_id = "16"company_name = "Bigfoot Breweries"contact _name = "Cheryl Saylor"phone = "(503) 555-9931"
We then make use of the Remote Schema promotions_remote that has a relationship on supplier_id to allow us to return the following data from the promotions table, which is hosted on a YugabyteDB cluster running on AKS.
promotion_name = "Free T-Shirt With Every Purchase"start_date = "1996-12-15"stop_date = "1996-12-30"
Conclusion
That’s it, if you followed all the instructions in this blog post, you now have the following configured.
- 3 node YugabyteDB cluster running on GKE with a Hasura GraphQL Engine attached
- 3 node YugabyteDB cluster running on AKS with a Hasura GraphQL Engine attached
- A Remote Schema and Remote Relationship configured
- The ability to issue GraphQL queries that join data from two different databases into a single result set
Additional Resources
Building Cloud Native GraphQL Applications on Kubernetes with YugabyteDB and Hasura
Scaling a Hasura GraphQL Backend with Distributed SQL
How to Set Up a Scalable and Highly-Available GraphQL API in Minutes


