Distributed SQL Tips and Tricks – April 7, 2021
April 7, 2021
Welcome back to our bi-weekly tips and tricks blog where we recap some distributed SQL questions from around the Internet. We’ll also review upcoming events, new documentation, and blogs that have been published since the last post. Got questions? Make sure to ask them on our YugabyteDB Slack channel, Forum, GitHub, or Stack Overflow. Let’s dive right in:
How to create client certs and propagate those on the yb-nodes using the YSQL API
There was a behavior change for the YSQL API after YugabyteDB version 2.5.2 where client certs are no longer required to authenticate to a TLS enabled cluster. We found that customers preferred the default authentication mode to be password even on a TLS enabled cluster, so we updated that accordingly. That GitHub issue can be found here. It is still possible to use client certs for auth using some additional flags.
There are three main configuration flags related to TLS:
ysql_enable_auth– used to enable password (md5) authenticationuse_client_to_server_encryption– used to enable client-server TLS encryptionysql_hba_conf_csv– used to manually set a HBA configuration
The current default (auto-generated) configuration depends on whether auth (ysql_enable_auth) and/or TLS (use_client_to_server_encryption) are enabled. The four cases are shown in the table below:
| Auth disabled | Auth enabled | |
|---|---|---|
| TLS disabled | host all all all trust(no ssl, no password) | host all all all md5(no ssl, password required) |
| TLS enabled | hostssl all all all trust(require ssl, no password) | hostssl all all all md5(require ssl and password) |
Note: Previously the TLS enabled case used the more strict cert when auth was disabled and md5 clientcert=1 (effectively md5 + cert) when auth was enabled.
Additionally, ysql_hba_conf_csv can be used to manually configure a custom HBA configuration. For instance, to use TLS with both md5 and cert authentication one can set the ysql_hba_conf_csv flag to:
hostssl all all all md5 clientcert=1
Note: Implementation-wise, the ysql_hba_conf_csv rules are just added above the auto-generated ones, so if they do not match the connection-type, database, user, host, then the auto-generated rules (i.e. from the table above) could still be used.
Therefore, If the custom user-defined rules only apply to some connection-types (e.g. host vs hostssl), databases, users, hosts, then we would still get to the auto-generated rules below for the non-matching hosts, users, or databases. To fully disable those, one can use the reject auth method.
For example, to enable TLS with cert authentication, but only for some particular database, user, and host, one can use the following ysql_hba_conf_csv setting:
hostssl mydb myuser myhost cert,hostssl all all all reject
You can see docs here on how to create a user through the YSQL interface (ysqlsh) and how to set permissions per database for each user.
Granting permissions like createdb between roles isn’t working
YugabyteDB supports inheritance in most of its operations, however this is not always straightforward. An example that illustrates this possible complexity when creating new roles can be found below.
CREATE ROLE new_role NOSUPERUSER INHERIT CREATEDB NOCREATEROLE;
CREATE ROLE new_user LOGIN NOSUPERUSER INHERIT NOCREATEDB NOCREATEROLE;
GRANT new_role TO new_user;
Now after we connect as new_user, we can’t create a database:
yugabyte=# CREATE DATABASE foobar;
ERROR:  permission denied to create database
This issue arises because not all attributes are inherited in PostgreSQL, including LOGIN, SUPERUSER, CREATEDB, and CREATEROLE. You must manually assign them to get around this issue. Since YugabyteDB reuses the PostgreSQL query layer, this issue will be encountered using PostgreSQL as well.
To get around this issue from the example above you can run the following command:
yugabyte=# ALTER USER new_user CREATEDB;
See more in the PostgreSQL docs.
How to identify a colocated database from the rest
Initially addressed in a Tips & Tricks blog back in July, we decided to include this question again as we see it asked quite frequently. Colocated tables are shown in the yb-master UI on the https://<yb-master-ip>:7000/tables URL as seen in the screenshot below:
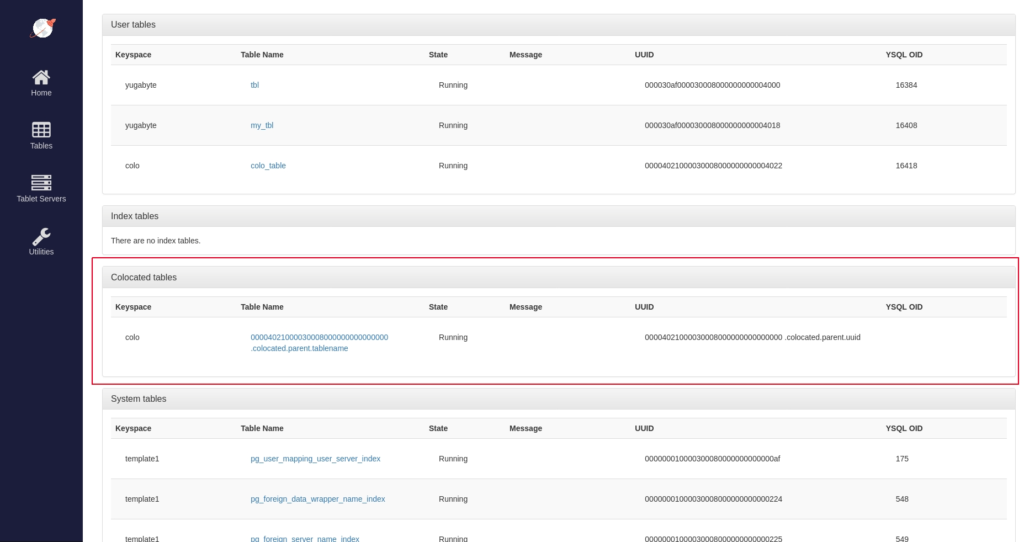
As you can tell from the highlighted section above, all collocated databases will have a system table entry with the name (<id>.colocated.parent.tablename).
If you would rather get this information from the command line you can also use the yb-admin utility like in the example below (which takes into account the Table Name highlighted above):
./bin/yb-admin --master_addresses <master_addresses> list_tables_with_db_types | grep '\.colocated\.parent\.tablename’ ysql.colo.00004021000030008000000000000000.colocated.parent.tablename
Crosstab queries in YSQL
Crosstab queries, also known as “pivot queries” in excel, are easy to do using the YugabyteDB YSQL API crosstab function enabled by the tablefunc extension. See example below:
yugabyte=# CREATE TABLE my_tbl (section text, status text, total integer);
yugabyte=# INSERT INTO my_tbl VALUES ('A', 'Active', 1), ('A', 'Inactive', 2), ('B', 'Active', 4), ('B', 'Inactive', 5), ('C', 'Inactive', 7);  -- ('C', 'Active') is missing
yugabyte=# CREATE EXTENSION IF NOT EXISTS tablefunc;
Now we can make a simple crosstab query:
yugabyte=# SELECT *
FROM   crosstab(
   'SELECT section, status, total
	FROM   my_tbl
	ORDER  BY 1,2'  -- needs to be "ORDER BY 1,2" here
   ) AS ct ("Section" text, "Active" int, "Inactive" int);

 Section | Active | Inactive
---------+--------+----------
 A       |      1 |        2
 B       |      4 |        5
 C       |      7 |
(3 rows)
Check out more functionality on the tablefunc docs page.
If you look closely at the table above you can see that the for row ‘C’ the number ‘7’ is in the wrong column. Sometimes this may be the desirable action for the use case. In those in which it is not, you can use the method below with 2 input parameters.
yugabyte=# SELECT *
FROM   crosstab(
   'SELECT section, status, total
	FROM   my_tbl
	ORDER  BY 1,2'  -- needs to be "ORDER BY 1,2" here
   ,  $VALUES (‘Active’::text), (‘Inactive’)$
   ) AS ct ("Section" text, "Active" int, "Inactive" int);
This will return a result with ‘7’ in the ‘Inactive’ column of row C.
In YSQL, is it better to use multiple databases with one schema each, or one database with multiple schema?
Each method has its strengths and weaknesses. Generally, a single database may be better for the following reasons:
- You can share connections between schemas but not databases. Each connection to the database has overhead, and it’s better when you can pool connections on the application across schemas.
- You can’t query across databases. While you can use extensions such as
dblinkthis isn’t as straightforward as normal tables. - Dumping and restoring a single schema is easier when you’re using database-per-schema. With the introduction of Tablegroups in v2.7 (coming soon!) multiple schemas can be split and scaled independently in colocated databases.
New Documentation, Blogs, Tutorials, and Videos
New Blogs
- Fortune 500 Financial Services Company Chooses YugabyteDB
- Getting Started with DBeaver EE and Yugabyte Cloud Query Language (YCQL)
- Yugabyte Secures $48M in Funding and Sets the Stage for Global Growth
- Using the PostgreSQL Recursive CTE
- DSS Asia Recap: YugabyteDB with Apache Airflow
New Videos
- Recap of Distributed SQL Summit Asia 2021
- YugabyteDB Fundamentals Community Training & Certification
- How to Run Distributed SQL Databases on Kubernetes
Upcoming Events
- April 22, 2021 – YugabyteDB YSQL Development Intermediate Certification and Training
- April 28, 2021 – How to Implement Distributed ACID Transactions Without Atomic Clocks
- May 4 – May 7, 2021 – KubeCon + CloudNativeCon Europe 2021 Virtual
- May 27, 2021 – YugabyteDB DBA Fundamentals Training and Certification
- June 30, 2021 – High Performance Design & Architecture in a Distributed SQL Database
New and Updated Docs
We’re continually adding to and updating the documentation to give you the information you need to make the most out of YugabyteDB. We had so many new and updated docs for you, that we wrote a blog post this month to cover recent content added, and changes made, to the YugabyteDB documentation – What’s New and Improved in YugabyteDB Docs, Mar 2021
Get Started
Ready to start exploring YugabyteDB features? Getting up and running locally on your laptop is fast. Visit our quickstart page to get started.


