Distributed SQL on Google Kubernetes Engine (GKE) with YugabyteDB’s Helm Chart
April 10, 2019
The glory days of the heavy-weight hypervisor are slowly fading away, and in the last few years, containerization of applications and services is the new reality. With containerization, enterprises can prototype, deploy, and meet scale demands more quickly. To systematically and efficiently manage these large-scale deployments, enterprises have bet on technologies like Kubernetes (aka k8s), a powerful container orchestrator, to get the job done. Kubernetes was originally developed by Google, but it has been open sourced since 2014 and is today developed by a large community of contributors.
Now, working with Kubernetes at scale can be complex as it involves tying together several interdependent Kubernetes resources and concepts – pods, services, and replica sets – each requiring you to write a detailed manifest definition in YAML (Yet Another Markup Language) prior to deployment. The complexity can rise to whole another level when dealing with distributed databases which are distributed systems on their own right. That’s where Helm charts can come to the rescue. In this article we will get you started with Google Kubernetes Engine, Google’s managed Kubernetes service, using the YugabyteDB Helm chart. If you are new to Kubernetes, it may be helpful to review some basics called out here.
Introducing Google Kubernetes Engine
Google Kubernetes Engine (GKE) provides a managed environment for deploying, managing, and scaling containerized applications using infrastructure resources from the Google Cloud Platform (GCP). The environment GKE provides consists of multiple machines (specifically, Google Compute Engine instances) grouped together to form a cluster. It has been general available since August 2015 and hence can be easily thought of as the most mature managed Kubernetes service in the market.
Users adopt GKE over other alternatives primarily to benefit from GCP’s advanced cluster management features. These include:
- Load balancing for Compute Engine instances.
- Node pools to designate subsets of nodes within a cluster for additional flexibility.
- Automatic scaling of a cluster’s node instance count.
- Automatic upgrades for a cluster’s node software.
- Automatic node repair to maintain node health and availability.
- Logging and monitoring with Stackdriver for visibility into the cluster.
Helm and Helm Charts
Almost every operating system or programming language has a package manager. For example, Debian has apt, Redhat has rpm, Java has maven and so, when it comes to k8s, the package manager is called Helm.
Helm enables developers and administrators to streamline packaging, configuration, deployment, and managing services on K8s clusters. This means that by using Helm, you can install applications from a webpath or repo, figure out application dependencies and install them, upgrade the software if a new version is available, and configure the software deployment. All of this can be done using a single package file. Isn’t that wonderful?
Helm packages are called charts. A chart in Helm essentially is made by bundling together multiple YAML configuration files that specify the metadata, configuration, dependencies, and documentation. The following table captures some of the important YAML files in a charts package.
- chart.yaml: This file has the metadata of the chart such as the chart name, version, maintainer, etc.
- requirements.yaml: This file stores the charts dependency libraries and references
- values.yaml: This file stores the default input values for the chart. Some of these values may be passed to the underlying container to configure the application
How Does Helm Work?
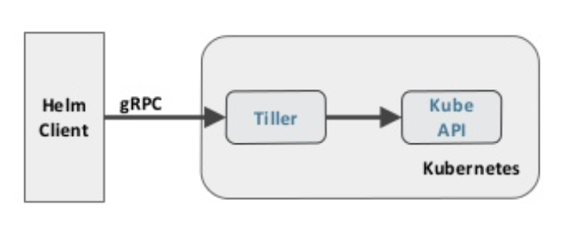
Helm consists of several key components as shown in the figure below. Helm has a client-server architecture, with a gRPC-based command line tool called Helm client, and a server component called tiller, which has to run on the cluster it manages. Tiller listens for commands sent by the Helm client, renders charts templates, creates/updates resources, and tracks application state. It leverages the underlying K8s API for it’s operations.
Learning GKE Basics with the YugabyteDB Helm Chart
We can learn GKE basics using the YugabyteDB Helm chart. Simply along these steps.
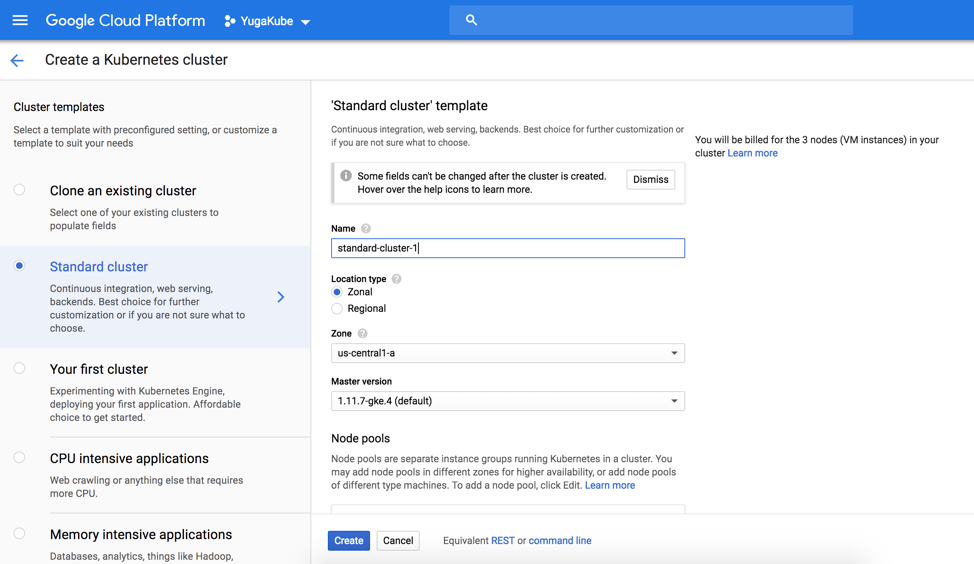
Step 1. Using the GKE dashboard, create a kubernetes 3 node cluster as shown in the figure below. Just go with the default settings.
Step 2. Once the cluster is created, we can interact with the cluster simply using the Google Cloud Shell.
user@cloudshell:~ (yugakube)$ gcloud container clusters list
NAME LOCATION MASTER_VERSION MASTER_IP MACHINE_TYPE NODE_VERSION NUM_NODES STATUS
standard-cluster-1 us-central-a 1.11.7-gke.4 35.203.104.236 n1-standard-2 1.11.7-gke.4 3 RUNNING
Step 3. Check if Kubernetes master is running
user@cloudshell:~ (yugakube)$ kubectl cluster-info

Kubernetes master is running at https://35.238.63.196
GLBCDefaultBackend is running at https://35.238.63.196/api/v1/namespaces/kube-system/services/default-http-backend:http/proxy
Heapster is running at https://35.238.63.196/api/v1/namespaces/kube-system/services/heapster/proxy
KubeDNS is running at https://35.238.63.196/api/v1/namespaces/kube-system/services/kube-dns:dns/proxy
Metrics-server is running at https://35.238.63.196/api/v1/namespaces/kube-system/services/https:metrics-server:/proxy
Step 4. Install Helm and Tiller
Follow the instructions here, to install Helm client and the Tiller server.
Step 5. Run Helm version command to verify that Helm client and server exists
user@cloudshell:~ (yugakube)$ helm version
Client: &version.Version{SemVer:"v2.13.0", GitCommit:"79d07943b03aea2b76c12644b4b54733bc5958d6", GitTreeState:"clean"}
Server: &version.Version{SemVer:"v2.13.0", GitCommit:"79d07943b03aea2b76c12644b4b54733bc5958d6", GitTreeState:"clean"}
Step 6. Create a service account for Tiller to use
user@cloudshell:~ (yugakube)$ kubectl create serviceaccount --namespace kube-system tiller
serviceaccount/tiller created
Step 7. Get the YugabyteDB Helm repo
git clone https://github.com/YugaByte/yugabyte-db.git
cd ./yugabyte-db/cloud/kubernetes/helm/

kubectl create -f yugabyte-rbac.yaml
Step 8. Initialize Helm with the service account, and make sure to upgrade any previous initializations
helm init --service-account yugabyte-helm --upgrade --wait

$HELM_HOME has been configured at /home/user/.Helm.Tiller (the Helm server-side component) has been upgraded to the current version.

Happy Helming!
Step 9. Install YugabyteDB using Helm
helm install yugabyte --setresource.master.requests.cpu=0.1,resource.master.requests.memory=0.2Gi,resource.tserver.requests.cpu=0.1,resource.tserver.requests.memory=0.2Gi --namespace yb-demo --name yb-demo --set "enablePostgres=true"

kubectl exec -it -n yb-demo yb-tserver-0 bash -- -c "YB_ENABLED_IN_POSTGRES=1 FLAGS_pggate_master_addresses=yb-master-0.yb-masters.yb-demo.svc.cluster.local:7100,yb-master-1.yb-masters.yb-demo.svc.cluster.local:7100,yb-master-2.yb-masters.yb-demo.svc.cluster.local:7100 /home/yugabyte/postgres/bin/initdb -D /tmp/yb_pg_initdb_tmp_data_dir -U postgres"
Step 10. Connect using psql, the PostgreSQL command line shell
kubectl exec -n yb-demo -it yb-tserver-0 /home/yugabyte/bin/psql -- -U postgres -d postgres -h yb-tserver-0.yb-tservers.yb-demo -p5433
Step 11. Create a sample table, and seed it with some data
CREATE TABLE sample(k1 INT, k2 INT, v1 INT, v2 TEXT, PRIMARY KEY (k1, k2));

INSERT INTO sample VALUES (1, 2.0, 3, 'a'), (2, 3.0, 4, 'b'), (3, 4.0, 5, 'c’);

SELECT * FROM sample;
Step 12. Check cluster status
helm status yb-demo
Step 13. Delete cluster, including all Helm PVC’s
helm del --purge yb-demo

kubectl delete pvc --namespace yb-demo --all
Best Practices for using Helm Charts
If you’re new to Helm and wondering about some best practices to keep it simple and tidy, take a look at the official Helm Best Practices documentation, which is a good starting point.
Conclusion
In this article we learnt about GKE, Helm, and demonstrated how to learn the basics of GKE using a YugabyteDB Helm chart. To learn more GKE, review the official GKE docs. Also review the the official Helm docs. To find official charts for Helm, check out the official Helm/charts Git repo. Also, don’t forget to check out the YugabyteDB docs on Helm here. Happy Helming with GKE & YugabyteDB!
What’s Next?
- Compare YugabyteDB in depth to databases like CockroachDB, Google Cloud Spanner and MongoDB.
- Get started with YugabyteDB on macOS, Linux, Docker, and Kubernetes.
- Contact us to learn more about licensing, pricing or to schedule a technical overview.


