Cloud Native Meets Distributed SQL: Bringing Microservices, Kubernetes, Istio & YugabyteDB Together with Hipster Shop Demo
March 5, 2020
Polyglot persistence is the widely accepted database implementation strategy when it comes to decomposing monoliths into microservices. In practice, this requires every microservice to model its data needs independently using a database that is purpose-built for that particular model, and thereafter store the data in an independent database instance. While independent database instances as a deployment paradigm makes sense from an decoupled microservices architecture standpoint, choosing multiple different databases each with a specialized data model is usually justified in the context of performance, scalability, and availability. As we have previously highlighted in “Why Distributed SQL Beats Polyglot Persistence for Building Microservices?”, the root cause behind this rationalization is the lack of horizontal write scalability and native failover/repair in monolithic SQL databases, the dominant database type prior to the advent of polyglot persistence.
This leads to the inevitable question–would the high development and operations costs of polyglot persistence still be justified if we solve the three foundational problems–horizontal write scalability, high fault tolerance, and geo-distribution–plaguing SQL databases? Enter distributed SQL, a ground-breaking RDBMS architecture that provides the solution to those problems, without introducing any of the complexity associated with polyglot persistence.
So how can we see the benefits of distributed SQL in action? The simplest answer is to build and evangelize feature-rich demo applications that developers can use as blueprints when developing their own cloud-native applications. Rather than starting from scratch, we created a fork of Google Cloud’s Hipster Shop, a 10-tier microservices-based e-commerce demo application that already does an excellent job of highlighting how Kubernetes, Istio, gRPC, and OpenCensus come together to create a modern infrastructure layer.
Unsurprisingly, the database layer of the original application is based on polyglot persistence. In reality, only one of the microservices uses Redis as its backing store while others simulate data persistence with hardcoded, in-memory data structures. Hence, the most natural area of enhancement in our fork is to strengthen the database layer of the various microservices with YugabyteDB as the distributed SQL database. It is also valuable to show how this strengthened database layer remains integrated with the various cloud-native technologies like Istio that are already leveraged in the app. The next few sections detail how we have started on these enhancements. You are invited to collaborate with us by contributing your changes via GitHub.
What’s YugabyteDB? It is an open source, high-performance distributed SQL database built on a scalable and fault-tolerant design inspired by Google Spanner. The Yugabyte SQL API, YSQL, supports PostgreSQL’s functionality and is wire-protocol compatible with PostgreSQL drivers.
Note that all components of our demo app can be built from source code and deployed as services backed by Docker containers on a Kubernetes target cluster. The latest version also leverages Istio for service discovery and communication. A load-generator service that emulates user connections is included. It is very easy to get started with this sample application in your local minikube or regular Kubernetes environments. If this piques your interest, let’s review the architecture of the application.
Service Architecture
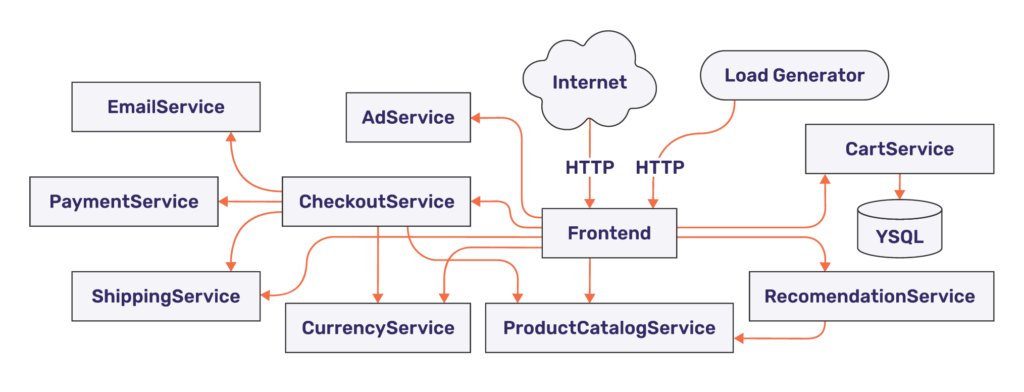
The Hipster Shop app is composed of many microservices written in different languages that talk to each other over gRPC. Source code for all of the services is available from our GitHub repo. Once deployed, users can browse the UI of the app via a web browser.
Following is the list of microservices in the app. This list remains unchanged from the original implementation as of now.
| Service | Language | Description |
|---|---|---|
| frontend | Go | Exposes an HTTP server to serve the website. Does not require signup/login and generates session IDs for all users automatically. |
| cartservice | C# | Stores the items in the user’s shopping cart in YugabyteDB and retrieves it. |
| productcatalogservice | Go | Provides the list of products from a JSON file and ability to search products and get individual products. |
| currencyservice | Node.js | Converts one money amount to another currency. Uses real values fetched from the European Central Bank. It’s the highest QPS service. |
| paymentservice | Node.js | Charges the given credit card info (mock) with the given amount and returns a transaction ID. |
| shippingservice | Go | Gives shipping cost estimates based on the shopping cart. Ships items to the given address (mock). |
| emailservice | Python | Sends users an order confirmation email (mock). |
| checkoutservice | Go | Retrieves user cart, prepares order, and orchestrates the payment, shipping, and the email notification. |
| recommendationservice | Python | Recommends other products based on what’s given in the cart. |
| adservice | Java | Provides text ads based on given context words. |
| Python/Locust | Continuously sends requests imitating realistic user shopping flows to the frontend. |
Even though Redis is not a true persistent database, the original CartService uses Redis as its backend store. As a first step of introducing distributed SQL into our fork of the application, CartService has been rewritten to use YSQL, YugabyteDB’s PostgreSQL-compatible distributed SQL API. Examples of these interactions can be seen in source code here:
The CartService dynamically parses the service address given in the cartservice kubernetes yaml manifest and uses that to identify which service and IP it should direct its SQL connections to:
https://github.com/yugabyte/microservices-demo/blob/master/kubernetes-manifests/cartservice.yaml
Hipster App in Action with a Distributed SQL Backend
Getting Started
While you can install the demo app on your local machine, we will use Google Cloud and Google Kubernetes Engine (GKE) for this blog.
The Kubernetes cluster to deploy your YugabyteDB as well as your microservices application should have at least 8 vcpus and 30GB of RAM per node. For example, you will need at least “n1-standard-8” instances to power your GKE cluster. The microservices demo environment can be deployed without Istio for a simpler deployment. If you plan on leveraging Istio with your deployment, ensure that you enable mTLS in permissive mode if necessary when you create your cluster.
Step 1. Prep your cluster and deploy a YugabyteDB cluster via Helm:
kubectl create namespace yb-demo
kubectl config set-context --namespace yb-demo --current
helm repo add yugabytedb https://charts.yugabyte.com
helm repo update
helm search repo yugabytedb/yugabyte
helm install yb-demo yugabytedb/yugabyte --namespace yb-demo
Step 2. Prep your YugabyteDB instance with the following DDL:
ysqlsh -h EXTERNAL_IP_OF_YB_TSERVER_SERVICE
\l
CREATE DATABASE sample;
\c sample
CREATE TABLE carts(id serial PRIMARY KEY, userid VARCHAR(50), productid VARCHAR(50), quantity integer);
Step 3. Enable Google Container Registry (GCR) on your GCP project and configure the Docker CLI to authenticate to GCR:
gcloud services enable containerregistry.googleapis.com
gcloud auth configure-docker -q
Step 4. Initialize a local copy of the microservices-demo repository:
git clone https://github.com/yugabyte/microservices-demo.git
cd microservices-demo
Step 5. In the root of this repository, run the following command where [PROJECT_ID] is your GCP project ID. You can quickly retrieve your potential projects with the gcloud CLI:
gcloud projects list
skaffold run --default-repo=gcr.io/[PROJECT_ID]
This command will build, push, and register the individual microservices with your Kubernetes cluster. Find the IP address of your application, then visit the application UI on your browser to confirm that the installation has been successfully completed.
kubectl get service frontend-external
Work In Progress – Istio Deployment
Step 1. If you followed the GKE deployment steps above, first delete what’s deployed. Enabling Istio-on-GKE sidecar injection may not allow previously deployed versions to be re-deployed until it is disabled and removed.
skaffold delete --default-repo=gcr.io/[PROJECT_ID]
Step 2. Install the automatic sidecar injection:
kubectl label namespace yb-demo istio-injection=enabled
Step 3. Apply the manifests in the “./istio-manifests” directory. (This is required only once.)
kubectl apply -f ./istio-manifests
Step 4. Deploy the Hipster Shop application again:
skaffold run --default-repo=gcr.io/[PROJECT_ID]
Step 5. Ensure all pods are in a healthy and ready state:
kubectl get pods -n yb-demo
Step 6. Find the IP address of your Istio gateway Ingress or Service, and visit the application:
INGRESS_HOST="$(kubectl -n istio-system get service istio-ingressgateway -o jsonpath='{.status.loadBalancer.ingress[0].ip}')"
echo "$INGRESS_HOST"
curl -v "https://$INGRESS_HOST"
Future Work
In order to add metrics monitoring for this GKE environment, you can enable Stackdriver Tracing/Logging with Istio Stackdriver Adapter by following this guide. Work still needs to be done to document Prometheus monitoring in this demo environment. GKE’s current procedures are here. Setting up your own monitoring dashboard of Kubernetes and YugabyteDB will be the focus area of future blog post. Stay tuned.


