Building Serverless Applications Using Spring Boot, AWS Lambda, and YugabyteDB
October 19, 2020
Introduction to Serverless Applications
Serverless applications allow developers to run code without having to provision or manage any servers; developers can just concentrate on implementing the business logic of their applications.
As workloads move to the cloud, serverless applications are gaining tremendous popularity with developers. Serverless frameworks allow developers to program for the cloud to take advantage of elastic scaling for workloads and provide cost benefits of using pay-for-use features, only getting billed for compute time they consume. Google search trends have shown that searches for the word “Serverless” have outgrown the historic peak reached by the searches for the word “Map Reduce” [1]. This suggests interest by developers and businesses alike looking to embrace serverless application development.
There are several serverless architecture characteristics which are different from traditional enterprise applications:
- Serverless applications are stateless
- Applications scale based on the workloads and can go to zero under no load
- Emphasis on event driven architecture and events triggering the downstream processing
- Cloud platform handling the application lifecycle
As you can see from several of these characteristics, serverless apps require the state of execution to be stored in a persistent database as serverless apps heavily rely on being stateless. The traditional databases designed before the cloud native era may not be a good fit for a serverless architecture. To architect a successful serverless application, we need to understand the effects serverless applications have on an operational database.
Distributed SQL for Serverless Architectures
We all know relational databases are massively popular when it comes to storing data due to their versatility for querying the dataset. As enterprises handle unprecedented volumes of digital traffic, there has been an explosion of applications querying the traditional monolithic database, which has saturated the performance gains from a single machine.
Distributed SQL databases are modern clustered relational databases that rely on sharding the dataset to scale the SQL workloads linearly. These are also cloud native databases which can massively scale by adding new nodes to the cluster while also providing strongly consistent replication and distributed ACID transactions. Distributed SQL Databases are becoming very popular with enterprises looking to deploy new applications to the cloud and modernize existing apps to become cloud native. For a more in-depth discussion about what distributed SQL is, check out “What is Distributed SQL?”
Developers at the Serverless framework have put out their findings discussing the effects that serverless applications have on databases. They focus on these main factors when selecting a database for serverless applications:
- DataSource connection model of the database
- Infrastructure as code and automation is the key
- Data model and access patterns
This blog post discusses the essential factors developers need to consider when choosing a database for serverless applications and how modern cloud native distributed SQL databases like YugabyteDB can help realize the elastic scalability of serverless applications.
Connection Model
One of the general issues faced by serverless applications is database connection exhaustion due to the workload’s nature. Serverless applications are short-lived. Every time the application boots up, it will need to rebuild the connection pool and create an expensive TCP connection to the database for querying the database.
In a serverless architecture, where applications can scale from 0 to N and back to 0, traditional relational databases that support 40-50 concurrent open connections will exhaust the database resources and affect the performance. Hence it becomes essential to choose databases that can handle a large number of concurrent database connections.
In YugabyteDB, each node in the cluster is identical and can handle incoming client connections. On a 16vCPU node, it can take 300 concurrent connections per node. As the database cluster is scaled linearly to handle an increase in web traffic, it will increase the capacity to manage the required number of concurrent connections. Another option is to employ a Data API layer for databases, so serverless apps don’t need to create persistent database connections.
Infrastructure as code
The cloud native era embraces infrastructure as code, which relies on automating workloads and infrastructure in an idempotent way.
Generally, with serverless applications, there are many moving parts in the architecture like queues, message brokers, ETL jobs, and databases that need to be automated for deploying at scale. Traditional databases that relied on a ticketing system for any new development or administrative tasks are not suitable for serverless applications.
Developers need to choose a database that supports a flexible deployment model irrespective of form factor or infrastructure and have automated day-2 operations like upgrades, scaling, and backups. YugabyteDB employs REST based access for all the management tasks which can be easily automated in a CI/CD pipeline. You can further explore YugabyteDB automation from the docs.
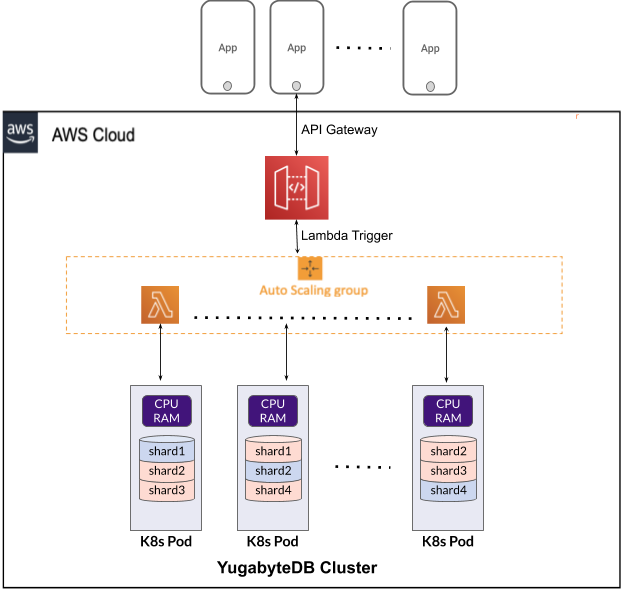
How to Implement Serverless Applications Using AWS Lambda, Spring Boot, and YugabyteDB
In this blog post we will implement a Spring Boot application which enables REST based CRUD access to a domain object and deploy it using AWS Lambda. We will walk you through the following steps:
- Install a 3 Node YugabyteDB cluster on Amazon EKS (Kubernetes)
- Implement a Spring Boot API CRUD application
- Deploy the Spring Boot app using AWS Lambda and AWS API gateway
- Perform REST API calls to invoke the Lambda application
Prerequisites
- Access to an AWS account with privileges to deploy AWS Lambda and S3
- Access to Amazon EKS with the following minimum requirements:
- 2 Kubernetes master node: 2 CPU, 4GB RAM
- 3 Kubernetes worker nodes: 8CPU, 16GB RAM
- Install AWS Lambda SAM CLI and AWS CLI
- Maven installed locally
- Docker installed locally
- About 15 minutes
Step 1: Install YugabyteDB on EKS cluster using Helm 3
In this section we are going to install YugabyteDB on the EKS cluster. The complete steps are documented here. We’ll assume you already have an EKS cluster up and running as a starting point.
Point your Kubectl context to the EKS cluster.
$ aws eks --region us-east-1 update-kubeconfig --name XXXXX
Now let’s start deploying YugabyteDB on the EKS cluster. The first thing to do is to add the charts repository.
$ helm repo add yugabytedb https://charts.yugabyte.com
Now, fetch the updates.
$ helm repo update
Create a namespace. In this case we’ll call it yb-demo.
$ kubectl create namespace yb-demo
Expected output:
namespace/yb-demo created
We are now ready to install YugabyteDB. In the command below we’ll be specifying values for a resource constrained environment.
$ helm install yb-demo-cluster yugabytedb/yugabyte \
--set resource.master.requests.cpu=1,resource.master.requests.memory=1Gi,\
resource.tserver.requests.cpu=2,resource.tserver.requests.memory=4Gi,\
storage.master.storageClass=gp2,storage.tserver.storageClass=gp2,\
enableLoadBalancer=True --namespace yb-demo --wait
To check the status of the cluster, execute the command below:
$ kubectl get services --namespace yb-demo

Note the external-IP for yb-tserver-service which we are going to use to establish a connection between YugabyteDB and the serverless application.
Connect the YugabyteDB SQL shell using yb-tserver-service LoadBalancer external-IP. This LoadBalancer round robins the client requests among all the available T-servers in the cluster.
Let’s create the products table required for the Spring Boot application:
$ ./bin/ysqlsh -h XXXXXX.us-east-2.elb.amazonaws.com

ysqlsh (11.2)
Type "help" for help.
yugabyte=# create table products (product_id  bigserial not null, description varchar(255), price numeric(10,2), product_name varchar(255), primary key (product_id));
Step 2: Create a Spring Boot skeleton project
AWS provides a Maven plugin to simplify the getting started experience with AWS Lambda. Let’s run the following Maven commands to create a Spring Boot skeleton project.
$ mvn archetype:generate -DgroupId=com.yugabyte -DartifactId=spring-lambda-serverless-api -Dversion=1.0.0-SNAPSHOT \
       -DarchetypeGroupId=com.amazonaws.serverless.archetypes \
       -DarchetypeArtifactId=aws-serverless-springboot-archetype \
       -DarchetypeVersion=1.5
This utility generates two important things, the AWS Lambda Maven dependency and the yaml file for deploying the Spring Boot app using AWS Lambda. We’ll review both of them in the subsequent steps.
Step 3: Add the dependencies required for YugabyteDB
Import the Maven project into an IDE of your choice and let’s review the pom.xml. The following dependency allows the Spring Boot application to create beans necessary for the AWS Lambda environment.
<dependency>
	<groupId>com.amazonaws.serverless</groupId>
	<artifactId>aws-serverless-java-container-springboot2</artifactId>
	<version>1.5</version>
</dependency>
We’ll be using YugabyteDB’s PostgreSQL wire compatible YSQL API for accessing data from our Lambda application. We will also be using Spring Data JPA and the PostgreSQL JDBC driver. Let’s add the following dependencies to pom.xml:
<dependency>
	<groupId>org.springframework.boot</groupId>
	<artifactId>spring-boot-starter-data-jpa</artifactId>
</dependency>
<dependency>
	<groupId>org.springframework.boot</groupId>
	<artifactId>spring-boot-starter-web</artifactId>
</dependency>

<dependency>
	<groupId>org.postgresql</groupId>
	<artifactId>postgresql</artifactId>
	<scope>runtime</scope>
</dependency>
Step 4: Implement CRUD APIs
In this step we’ll create a product domain object, repository, and controller for enabling REST access. Since these are generally the same in any Spring Boot application working with relational databases, we can review the files in the GitHub project.
Configure application.properties to use the Load-balancer ip-address we had noted in step 1.
spring.datasource.url=jdbc:postgresql://XXXXX.us-east-1.elb.amazonaws.com:5433/yugabyte
Step 5: Build and deploy the Spring Boot application using AWS Lambda
Build the application by running the following command:
$ mvn clean build
Review the template.yml file which holds the deployment topology for the AWS Lambda application. Update the MemorySize and Timeout to 1024 and 300 respectively.
Resources:
  SpringLambdaServerlessApiFunction:
    Type: AWS::Serverless::Function
    Properties:
      Handler: com.yugabyte.StreamLambdaHandler::handleRequest
      Runtime: java8
      CodeUri: target/spring-lambda-serverless-api-1.0.0-SNAPSHOT-lambda-package.zip
      MemorySize: 1024
      Policies: AWSLambdaBasicExecutionRole
      Timeout: 300
      Events:
        ProxyResource:
          Type: Api
          Properties:
            Path: /{proxy+}
            Method: any
Package the Spring Boot application and push the package to the S3 bucket using the following command:
$ aws cloudformation package --template-file template.yml --output-template-file output-sam.yml --s3-bucket yb.aws.lambda
Note: The above command assumes the following S3 bucket yb.aws.lambda is available in your AWS account. The S3 bucket of your choice can be chosen for uploading the Lambda package.
Deploy the application using the AWS CLI by running the following command:
$ aws cloudformation deploy --template-file ./spring-lambda-serverless-api/output-sam.yml --stack-name yb-lambda-dev
This will generate output-sam.yml file which will have the following output:
"Outputs" : {
"OutputKey": "SpringLambdaServerlessApiApi",
        "OutputValue": "https://xxxxxxx.execute-api.us-west-2.amazonaws.com/Prod/ping",
        "Description": "URL for application",
        "ExportName": "SpringLambdaServerlessApiApi"
    }
We will use the following URL https://xxxxxxx.execute-api.us-west-2.amazonaws.com for making rest calls to invoke the AWS Lambda application.
The Lambda application can also be tested locally using SAM CLI. Run the following command from the Spring Boot project base directory to simulate the Lambda function:
$ sam local start-api
Step 6: API calls for making CRUD operations
We can insert the product using the following REST call:
curl \
  --data '{ "productName": "Notebook", "description": "200 page notebook", "price": 7.50 }' \
  -v -X POST -H 'Content-Type:application/json' https://xxxxxxx.execute-api.us-west-2.amazonaws.com/products
You should see the following return value:
{
  "productId": "1",
  "productName": "Notebook",
  "description": "200 page, hardbound, blank notebook",
  "price": 7.5
}
You can connect to YugabyteDB using the below commands and select the product we inserted in the previous REST call:
$ kubectl exec -n yb-demo -it yb-tserver-0 -- ysqlsh -h yb-tserver-0.yb-tservers.yb-demo
yugabyte=# select * from products;
 product_id |    description    | price | product_name
------------+-------------------+-------+--------------
          1 | 200 page notebook |  7.50 | Notebook
(1 row)
List all the products by making the following REST call:
$ curl https://xxxxxxx.execute-api.us-west-2.amazonaws.com/products
You should see the output as follows:
{
  "content":[
    {
      "productId": "1",
      "productName": "Notebook","description":"200 page, hardbound, blank notebook",
      "price": 7.5
    }
  ],
  ...
}
Conclusion
That’s it! We deployed a Spring Boot application without having to provision any resources like VMs or application servers.
This blog walked you through the steps for quickly getting started with YugabyteDB and AWS Lambda, combining the advantages of elastic scalability supported by serverless applications with a linearly scalable distributed SQL database.
Reference
[1] https://cidrdb.org/cidr2019/papers/p119-hellerstein-cidr19.pdf


