Getting Started with the Kafka Connect for YugabyteDB (beta)
July 21, 2021
Kafka Connect is a popular tool for scaling and reliably streaming data between Apache Kafka and other data systems. It ships with a JDBC Sink which is used to insert data from Kafka to a database. Although the default JDBC Sink is good for many popular RDBMS it isn’t optimized for distributed SQL databases that provide linear scalability and high availability like YugabyteDB.
In our earlier blog introducing YugabyteDB 2.7, we announced the YugabyteDB Sink Connector for Apache Kafka that improves on the default JDBC Sink delivering better resilience and scale when used with the YugabyteDB distributed SQL database. The YugabyteDB Sink Connector supports inserting into SQL & CQL (Cassandra) tables. The YugabyteDB Sink Connector is currently in beta but is fully functional and ready for you to use.
YugabyteDB Sink Connector for Apache Kafka
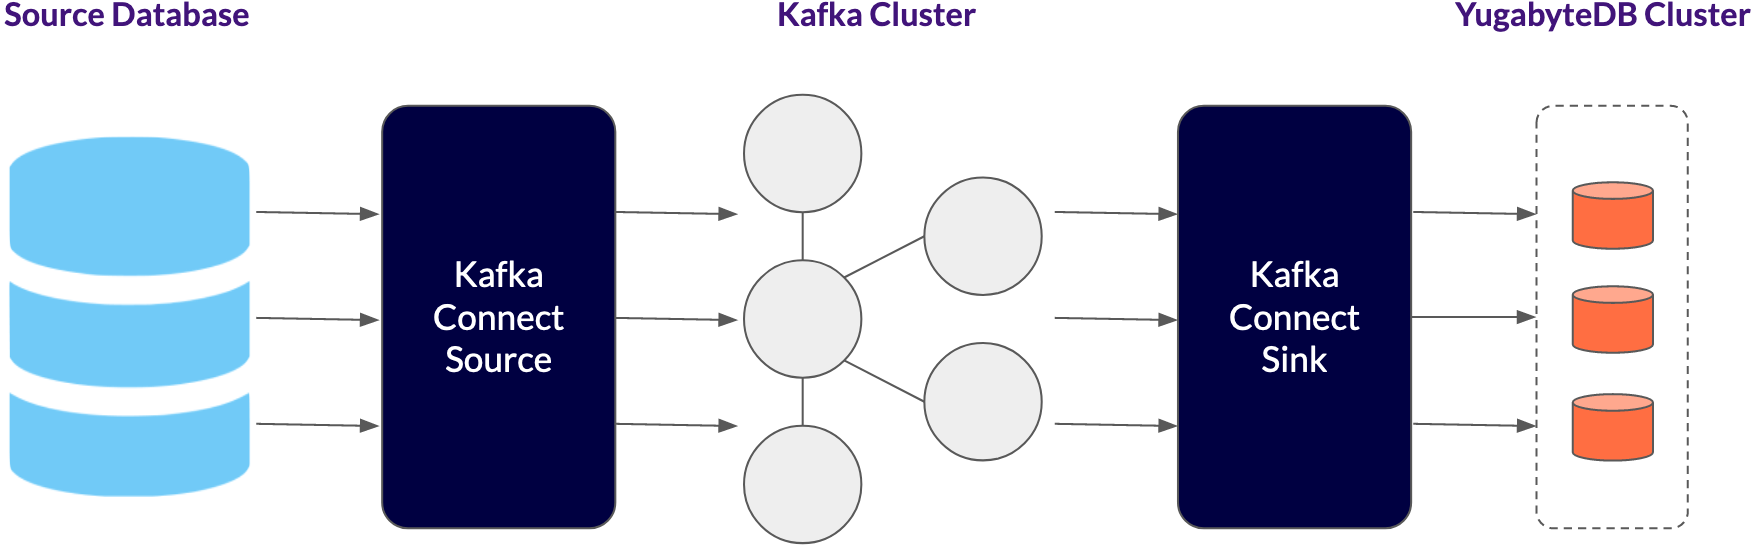
As seen in the diagram, using the YugabyteDB Sink Connector, multiple Kafka Connect workers can connect to different YugabyteDB TServers. This has two advantages:
- Higher throughput because the load is balanced between multiple TServers. (In a follow-up blog we will show how this achieves high throughput.)
- In case the node hosting a TServer goes down, the Kafka Connect workers will connect to other TServers and avoid downtime.
As you add new TServers to handle increased load, you can modify the YugabyteDB Sink Connector properties file and add the new TServer endpoints. This will allow the Kafka Connect workers to connect to new TServers as you scale out.
Getting Started:
To see the basic functionality of the sink connector, you’ll be copying Avro data from a single Kafka topic to a local YugabyteDB database using the JDBC as well as the CQL Sink connector.
Prerequisites
You will need the following:
- Confluent Platform: Download the Platform with Free Community Features
- YugabyteDB cluster: Follow the quickstart to install a YugabyteDB cluster
Configure Kafka
1. Assuming you have downloaded the tar file, extract it and set the env variables CONFLUENT_HOME and PATH.
confluent-6.1.1.tar
tar xzf confluent-6.1.1.tar
cd confluent-6.1.1
export CONFLUENT_HOME=/Users/suranjan/confluent-6.1.1
export PATH=$PATH:$CONFLUENT_HOME/bin
2. By default ZooKeeper, Kafka, Schema Registry, Kafka Connect REST API, and Kafka Connect are started with the `confluent local services start` command.
confluent local services start
The local commands are intended for a single-node development environment only,
NOT for production usage. https://docs.confluent.io/current/cli/index.html

Using CONFLUENT_CURRENT: /var/folders/_1/ltd94t1x2nsdrwj302jl85vc0000gn/T/confluent.127538
Starting ZooKeeper
ZooKeeper is [UP]
Starting Kafka
Kafka is [UP]
Starting Schema Registry
Schema Registry is [UP]
Starting Kafka REST
Kafka REST is [UP]
Starting Connect
Connect is [UP]
Starting ksqlDB Server
ksqlDB Server is [UP]
3. You need to stop the Kafka Connect service and restart it after changing the configuration to load the YugabyteDB Sink Connector jar.
To stop Kafka Connect execute the following:
confluent local services connect stop
The local commands are intended for a single-node development environment only,
NOT for production usage. https://docs.confluent.io/current/cli/index.html

Using CONFLUENT_CURRENT: /var/folders/_1/ltd94t1x2nsdrwj302jl85vc0000gn/T/confluent.127538
Stopping Connect
Connect is [DOWN]
4. Download the jar for the YugabyteDB Sink Connector here. Alternatively, build the YugabyteDB Sink Connector jar by following the instructions in the Building from Sources section of the readme.
5. Save the jar to etc/connectors/ in your Confluent folder.
6. In your Confluent folder, modify the file etc/schema-registry/connect-avro-distributed.properties to add the YugabyteDB Sink Connector jar to the plugin.path.Set plugin.path to the path of your YugabyteDB Sink jar, and save the file.
...
plugin.path=/Users/suranjan/confluent-6.1.1/etc/connectors/kafka-connect-yugabytedb-sink-1.4.1-SNAPSHOT.jar,share/java
7. You need to start Kafka Connect again.
To start only the Kafka Connect service with the properties file you just modified, execute the following:
connect-distributed
etc/schema-registry/connect-avro-distributed.properties
8. To verify that the plugins are loaded correctly, execute `confluent local services connect plugin list`. Verify that the list of plugins has com.yugabyte.jdbc.JdbcSinkConnector and com.datastax.oss.kafka.sink.CassandraSinkConnector.
confluent local services connect plugin list
{
    "class": "com.datastax.kafkaconnector.DseSinkConnector",
    "type": "sink",
    "version": "1.4.1-SNAPSHOT"
  },
  {
    "class": "com.datastax.oss.kafka.sink.CassandraSinkConnector",
    "type": "sink",
    "version": "1.4.1-SNAPSHOT"
  },
  {
    "class": "com.yugabyte.jdbc.JdbcSinkConnector",
    "type": "sink",
    "version": "1.4.1-SNAPSHOT"
  },
  {
    "class": "com.yugabyte.jdbc.JdbcSourceConnector",
    "type": "source",
    "version": "1.4.1-SNAPSHOT"
  },
Load the sink connector:
1. In your Confluent folder, create a file etc/kafka/yb-jdbc-sink-quickstart.properties with the following contents:
{
  "name": "yb-jdbc-sink",
  "config": {
    "connector.class": "com.yugabyte.jdbc.JdbcSinkConnector",
    "tasks.max": "10",
    "topics": "orders",
    "connection.urls":"jdbc:postgresql://localhost:5433/yugabyte",
    "connection.user":"yugabyte",
    "connection.password":"yugabyte",
    "batch.size":"256",
    "mode":"INSERT",
    "auto.create":"true"
  }
}
2. To load the sink connector, you need to connect to the rest API and provide the config file.
curl -X POST -H "Content-Type: application/json" -d @/Users/suranjan/confluent-6.1.1/etc/kafka/yb-jdbc-sink-quickstart.properties "localhost:8083/connectors"
{"name":"yb-jdbc-sink","config":{"connector.class":"com.yugabyte.jdbc.JdbcSinkConnector","tasks.max":"10","topics":"orders","connection.urls":"jdbc:postgresql://localhost:5433/yugabyte","connection.user":"yugabyte","connection.password":"yugabyte","batch.size":"256","mode":"INSERT","auto.create":"true","name":"yb-jdbc-sink"},"tasks":[],"type":"sink"}
Verify the integration
1. Produce a record into the orders topic in Kafka using the Avro producer.
./bin/kafka-avro-console-producer \
--broker-list localhost:9092 --topic orders \
--property value.schema='{"type":"record","name":"myrecord","fields":[{"name":"id","type":"int"},{"name":"product", "type": "string"}, {"name":"quantity", "type": "int"}, {"name":"price",
"type": "float"}]}'
2. The console producer waits for input.
Copy and paste the following record into the terminal and press Enter:
{"id": 999, "product": "foo", "quantity": 100, "price": 50}3. Verify that the message is published to the topic by using an Avro consumer.
./bin/kafka-avro-console-consumer --bootstrap-server localhost:9092 --topic orders --from-beginning
{"id":999,"product":"foo","quantity":100,"price":50.0}
Now you can query the YugabyteDB database, and you should see that the orders table was automatically created and contain the record you just published to Kafka.
yugabyte=# select * from orders;
 id  | product | quantity | price
-----+---------+----------+-------
 999 | foo     |      100 |    50
(1 row)
Next Steps
Interested in learning more about using Kafka Connect with YugabyteDB? Download the YugabyteDB Sink Connector for Apache Kafka to get started! You can also sign up for the beta of Yugabyte Cloud, a fully managed YugabyteDB-as-a-service. It’s PostgreSQL reimagined for a cloud native world.


