Automation Workflows: Using GitOps for YugabyteDB with Argo CD and Helm
March 31, 2022
GitOps is an operational framework for declarative-driven systems such as Kubernetes. More specifically, it provides a set of best practices that converge the runtime state of the services with the declarative state defined in Git. On the other hand, Argo CD is a declarative, continuous delivery tool for Kubernetes. Argo CD follows the GitOps pattern of using Git repositories as the source of truth for defining the desired application state. Both tools can be used for automation workflows.
In this post, we explore how to automate YugabyteDB with GitOps, Argo CD, and Helm. Additionally, over the course of this tutorial, we’ll walk through several workflows, including:
- Single-zone rollout
- Multi-zone rollout
- Day 2 operations, such as cluster placement policy updates, scale-out and scale-in, and upgrade rollouts.
By the end of this post, you’ll be able to automate YugabyteDB with confidence using all three tools.
Why GitOps and Argo CD for automation workflows?
GitOps workflows are gaining momentum and becoming the go-to automation workflow to continuously deliver the infrastructure and application rollout to production. In GitOps, the desired state of the service is stored and versioned in a version control system that serves as the single source of truth. As a result, the software agents and tools pick up the approved changes from Git and sync the runtime state with the desired state. Therefore, the agents with the declarative-driven runtime continue to reconcile the services state in sync with the source of truth. But the reconciliation loop is a powerful construct where the agents in the runtime system are always app-aware and make the workflow seamless in keeping with the source of truth.
Argo CD is implemented as a Kubernetes controller that continuously monitors running applications and compares the current, live state against the desired target state. Therefore, any modifications made to the desired target state in the Git repo can be automatically applied and reflected in the specified target environments.
Prerequisites
Here’s what you’ll need to have installed on your machine before moving ahead with this tutorial:
- Kubernetes 1.18 (or later) with 3 or 4 node(s) cluster, 8vCPU, 16GB memory, and 20GB storage per node.
- Follow Argo CD’s Getting Started instructions (steps 1-5) to install and configure server-side controllers in the Kubernetes cluster and CLI within the workstation.
- Git command-line tool.
Getting started with automation workflows
For starters, the complete source config is available at GitOps for YugabyteDB. You can fork this repository to your GitHub account for modifications and rollouts. You can also clone the forked repository to your local workstation.
![]()
We’ll use gitops-ybdb as the source repository in this blog. But it would be best to replace this with your repository name wherever you come across this reference. This repository consists of single-zone, multi-zone, and multi-region deployment-related configurations. As mentioned earlier, this blog will focus only on single and multi-zone deployments. We’ll cover multi-region deployment in a follow-up post.
We will also use YugabyteDB’s helm chart artifacts to roll out the database services using Argo CD’s “App of Apps” pattern. However, this blog post will cover only the YugabyteDB rollouts. This means Kubernetes and Argo CD related customizations need to be adjusted appropriately based on your configuration.
Base application
The base application info is in “app.yaml” based on the “App of Apps” pattern. Consequently, it encompasses the information regarding the database cluster application. But let’s explore this application in greater detail.
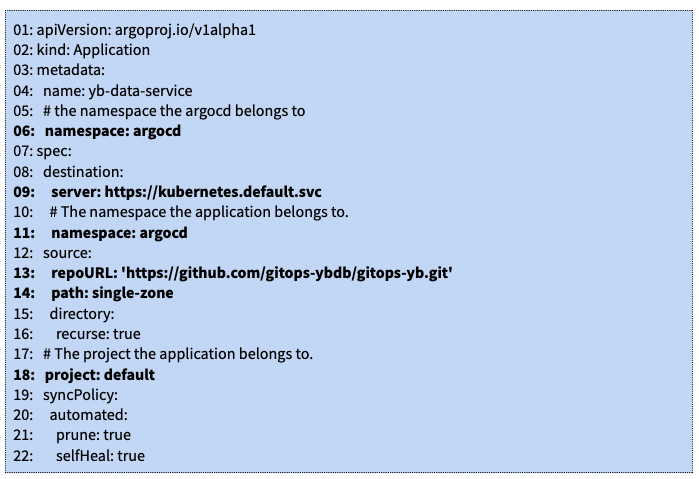
- 06: This is the namespace Argo CD’s objects belong to. But if Argo CD’s objects are in a different namespace, this value should point to that custom namespace.
- 09: This is the Kubernetes server endpoint. In this case, we are using the “in-cluster” instance where Argo CD is running. But if you want to deploy to a different cluster, this should reflect the target cluster’s details.
- 11: We deploy the base application to the namespace where Argo CD’s objects exist.
- 13: Update it to your source repository.
- 14: This should point to the “single-zone” or “multi-zone” sub-directory. This base application, when deployed, will refer to this sub-directory for Argo CD’s app manifests.
- 18: We deploy to the “default” project. Consequently, every installation comes with a default project.
Finally, if you make changes to the above manifest, save them, commit, and push them to your repository.
Automation workflows: single-zone rollout
For starters, deploy Kubernetes runtime to a single availability zone (i.e., a single fault-domain).
As a result, a single zone rollout will auto-provision a multi-instance YugabyteDB cluster to the underlying Kubernetes runtime in a single availability zone.
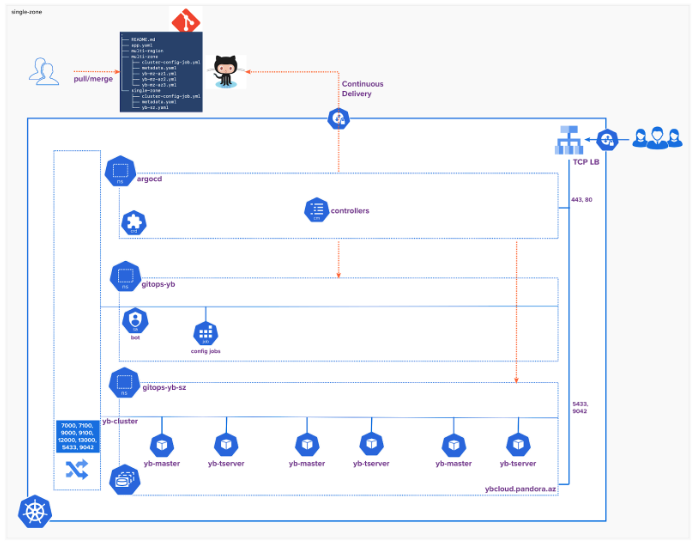
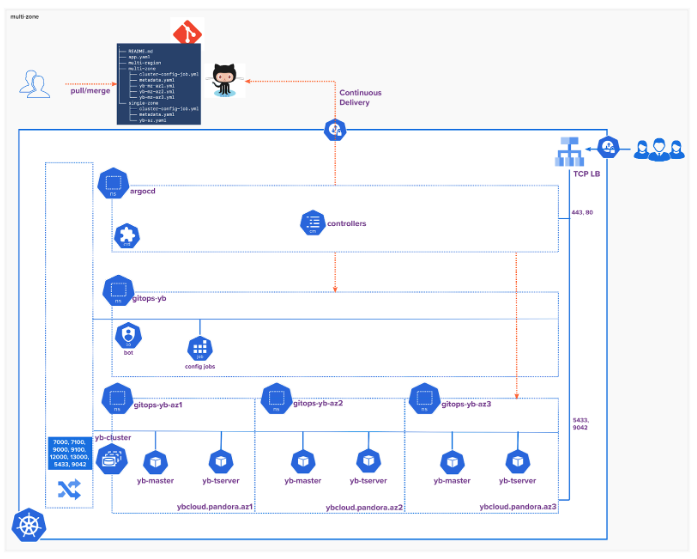
The following workflow illustrates the logical architecture of single-zone rollout:
Now let’s explore the single-zone manifests. The “single-zone” sub-directory consists of three files.
- Metadata: Kubernetes namespace, service account bot, and role binding related information.
- Cluster config: The cluster config image sets the cluster’s placement policy after the cluster creation.
- Application: The Argo CD’s application file holds the database cluster information. Consequently, this manifest refers to the upstream helm repository and has the configuration to provision a database cluster with three yb-master and yb-tserver instances.
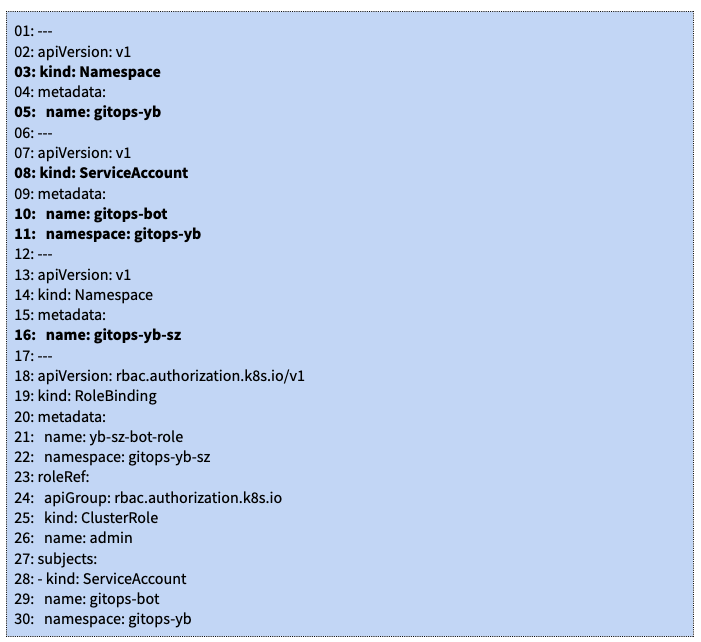
Metadata (metadata.yaml)
More specifically, this file creates two namespaces:
- gitops-yb keeps the cluster-config on-demand jobs, service account bot, and other database cluster-wide objects. It also creates a service account bot with the appropriate privileges to update placement policy via a Kubernetes job once the cluster is provisioned.
- gitops-yb-sz holds the database cluster instances.
Application (yb-sz.yaml)
This application manifest has the database cluster information based on the upstream helm repository.
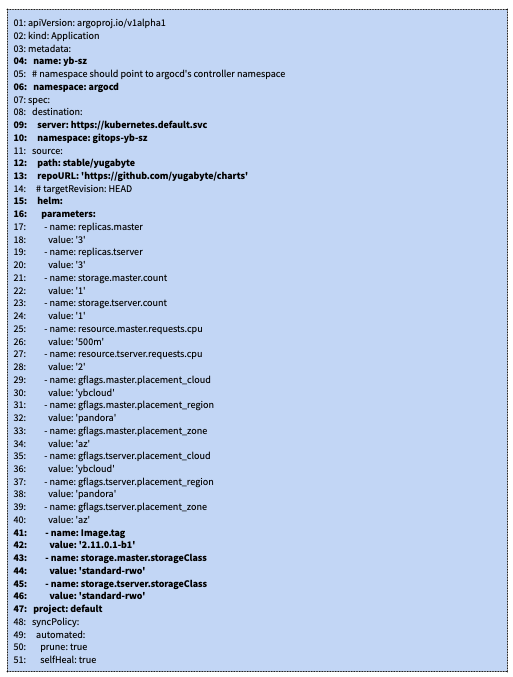
- 04: The application name.
- 10: The destination namespace is different. We deploy the database cluster to the gitops-yb-sz namespace.
- 13: The source helm chart repository. Argo CD extracts and applies the chart to the Kubernetes cluster.
- 15: Values.yaml file overrides.
- 42: Cluster image version.
- 43-46: Storage class name. Update it based on your Kubernetes cluster configuration.
Consequently, this application definition creates a YugabyteDB cluster with three yb-master and yb-tserver instances in the provisioned availability zone.
Cluster config (cluster-config-job.yaml)
Argo CD will deploy this manifest to the gitops-yb namespace. As a result, an on-demand job runs and waits for the yb-master instances to set the cluster placement policy. But the bot service account has the required privileges to query the cluster state and roll out the configuration changes.
Using the Argo CD command-line interface, let’s deploy the base application from the locally cloned repository.

Argo CD dashboard
Next, let’s connect to the Argo CD dashboard to verify the application rollout:

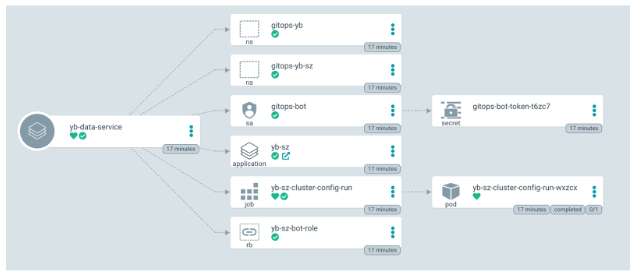
yb-data-service is the base application that has automatically extracted the sub-app yb-sz definition and rolled out the application to the target cluster.
yb-data-service
The below illustration shows the objects created as part of the yb-data-service application rollout:
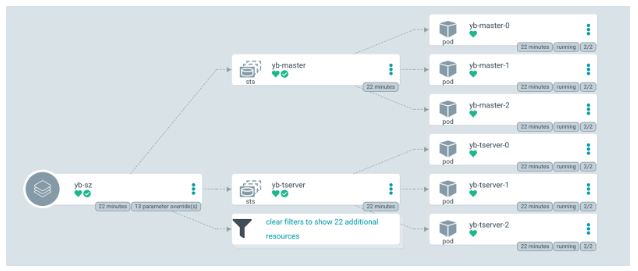
yb-sz
The following illustrates the objects of the yb-sz application. It consists of a YugabyteDB cluster with three yb-master and yb-tserver instances in the same zone.
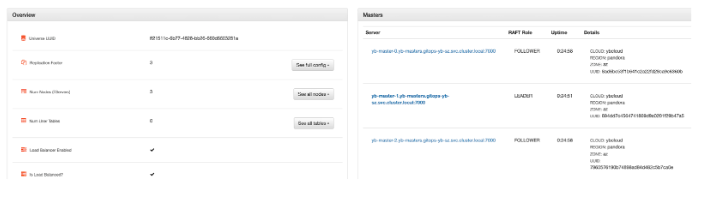
YugabyteDB console
We can verify the cluster details and placement policy by connecting to the YugabyteDB master console.
Automation workflows: multi-zone rollout
To get started, deploy the Kubernetes runtime across three availability zones (i.e., three fault-domains).
As a result, a multi-zone rollout will auto provision a YugabyteDB cluster across three availability zones. The following workflow illustrates the logical architecture of the rollout:
Let’s explore the multi-zone manifests.
Metadata (metadata.yaml)
More specifically, this manifest creates four namespaces:
- gitops-yb keeps the cluster-config on-demand jobs, bot service account, and other database cluster-wide objects. It also creates a service account bot with appropriate privileges to update placement policy via a Kubernetes job once the cluster is provisioned.
- gitops-yb-az1, gitops-yb-az2, and gitops-yb-az3 hold the DB cluster instances.
Application (yb-mz-az{1,2,3}.yaml)
Let’s explore the application manifests. There are three, one for each availability zone.
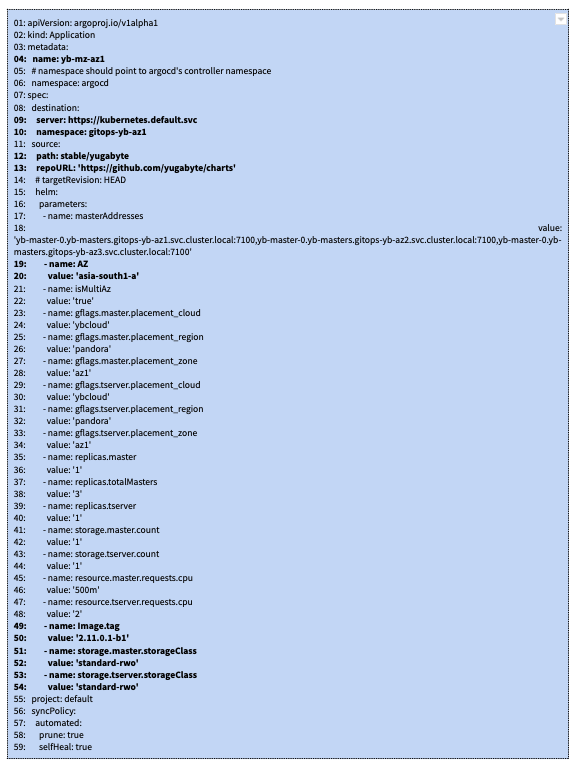
- 04: The multi-zone application name.
- 10: The destination namespace is different. This means we deploy the database cluster to the gitops-yb-az{1,2,3} namespace(s).
- 13: The source helm chart repository. As a result, Argo CD extracts and applies the chart to the target Kubernetes cluster.
- 19-20: Replace the zone value from your Kubernetes cluster node. First, run “kubectl get nodes –show-labels.” Next, grab the details of “topology.kubernetes.io/zone.” But you will have different values based on the availability zones. Therefore, each zone manifest file value needs to be set based on the zone value of the Kubernetes node.
- 15: Values.yaml file overrides.
- 49: The cluster image version.
- 51-54: The storage class name. Update it based on your Kubernetes cluster configuration.
The other two manifests are for the other two namespaces. But we need to appropriately update the AZ(20) value in the other manifests.
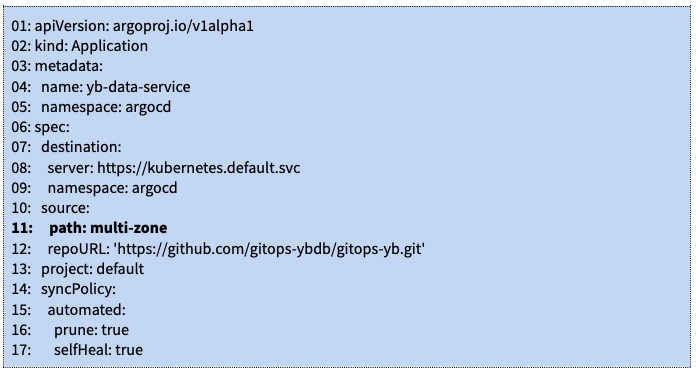
Next, let’s change the base application to rollout the multi-zone deployment. For starters, update path(11) to point to the multi-zone definition. From there, save, commit, and push this change to the Git repository.
Finally, from the command-line, run the following command:
![]()
The above change will delete the single-zone cluster and create a new multi-zone cluster across three availability zones. But to retain the single-zone cluster, we need to create a separate base application for multi-zone deployment.
Argo CD dashboard
Finally, let’s connect to the Argo CD dashboard to verify the application rollout:
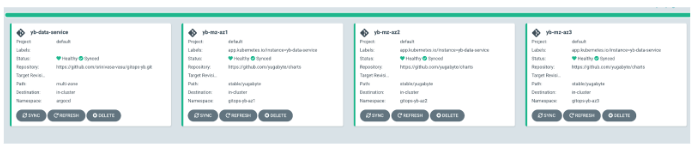
As you can see, the base application yb-data-service change has automatically extracted the sub-apps yb-mz-az{1,2,3} definition and rolled out the application to the target cluster.
yb-data-service
The following illustrates the objects created as part of the yb-data-service application rollout:
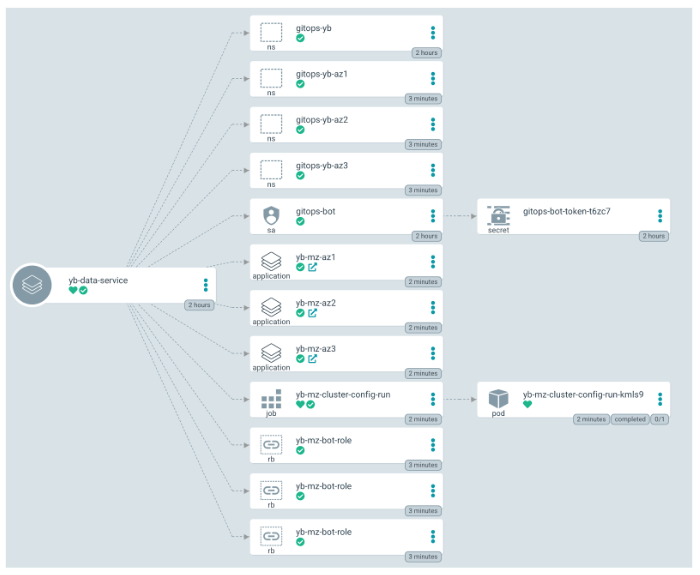
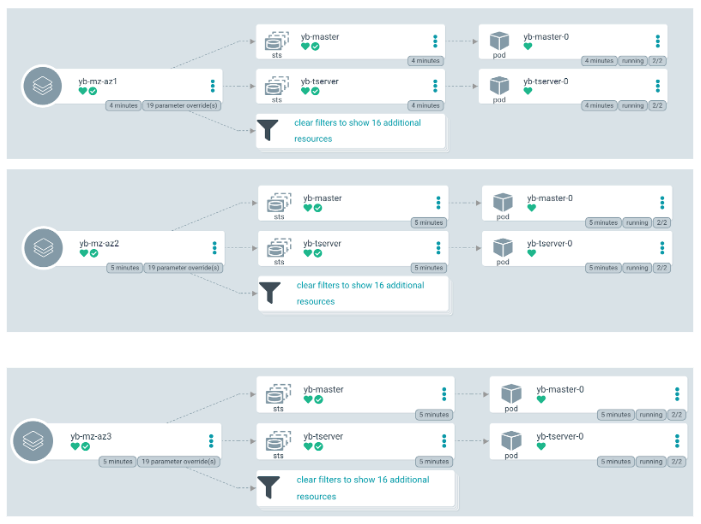
yb-mz-az{1,2,3}
The following illustrates the objects of yb-mz-az{1,2,3} applications. It consists of a YugabyteDB cluster with three yb-master and yb-tserver instances each in its availability zone.
Finally, we can verify the cluster details and placement policy by connecting to the YugabyteDB master console.
Automation workflows: Day 2 operations
The rollout workflow remains the same for Day 2 operations. But let’s look at the workflow for a cluster upgrade. We can mostly follow the same workflow for other Day 2 operations.
For starters, let’s open the yb-mz-az{1,2,3}.yaml files and update the image value to 2.11.1.0-b305 from 2.11.0.1-b1. Next, make the changes in all three files, save, commit, and push them to the Git repository. Argo CD will then detect the changes within a few minutes and sync the runtime state with the updated desired state in Git. From there, you can verify the changes via both the Argo CD and YugabyteDB consoles.
Similarly, we can override the other helm parameters such as “replicas.tserver” for scale-out and in related rollouts. We can also override “gflag.*” related entries to rollout cluster-wide configuration changes in a rolling-upgrade fashion.
Conclusion
In this post, we walked through how to automate YugabyteDB with GitOps, Argo CD, and Helm. We also showed you how to handle several workflows, including a single-zone rollout, a multi-zone rollout, and Day 2 operations.
For next steps, check out this article to learn more about the different deployment options of YugabyteDB on Kubernetes. And if you have any questions, feedback, or just want to give us a shout out, please join the YugabyteDB community Slack channel.


