An Adventure in Multi-Cloud with Kubernetes and Distributed Data
April 1, 2021
At this year’s Distributed SQL Summit Asia 2021, Leon Kuperman from CAST AI presented the talk, “An Adventure in Multi-Cloud with Kubernetes and Distributed Data.”
Setting the Scene
CAST AI is an AI-driven cloud optimization platform for Kubernetes that helps companies cut their cloud bill and prevent downtime. In the presentation, Leon walks through how to deploy a highly available YugaybteDB cluster across three cloud providers (AWS, GCP, & DigitalOcean) using Kubernetes and CAST AI automation. To showcase the deployment he built out an e-commerce application and performed numerous tests to show how persistence, latency, and performance can benefit from this set up. Aside from the demo of the e-commerce app he also walks us through the results of the TPC-C tests. Ultimately, what we get is a variety of proof points that show how, by combining CAST AI and YugabyteDB, you can effortlessly deploy a highly available, multi-cloud e-commerce application that performs extremely well.
The GitHub repository for this sample microservices “Boutique Web Shop” for deploying on CAST AI can be found here.
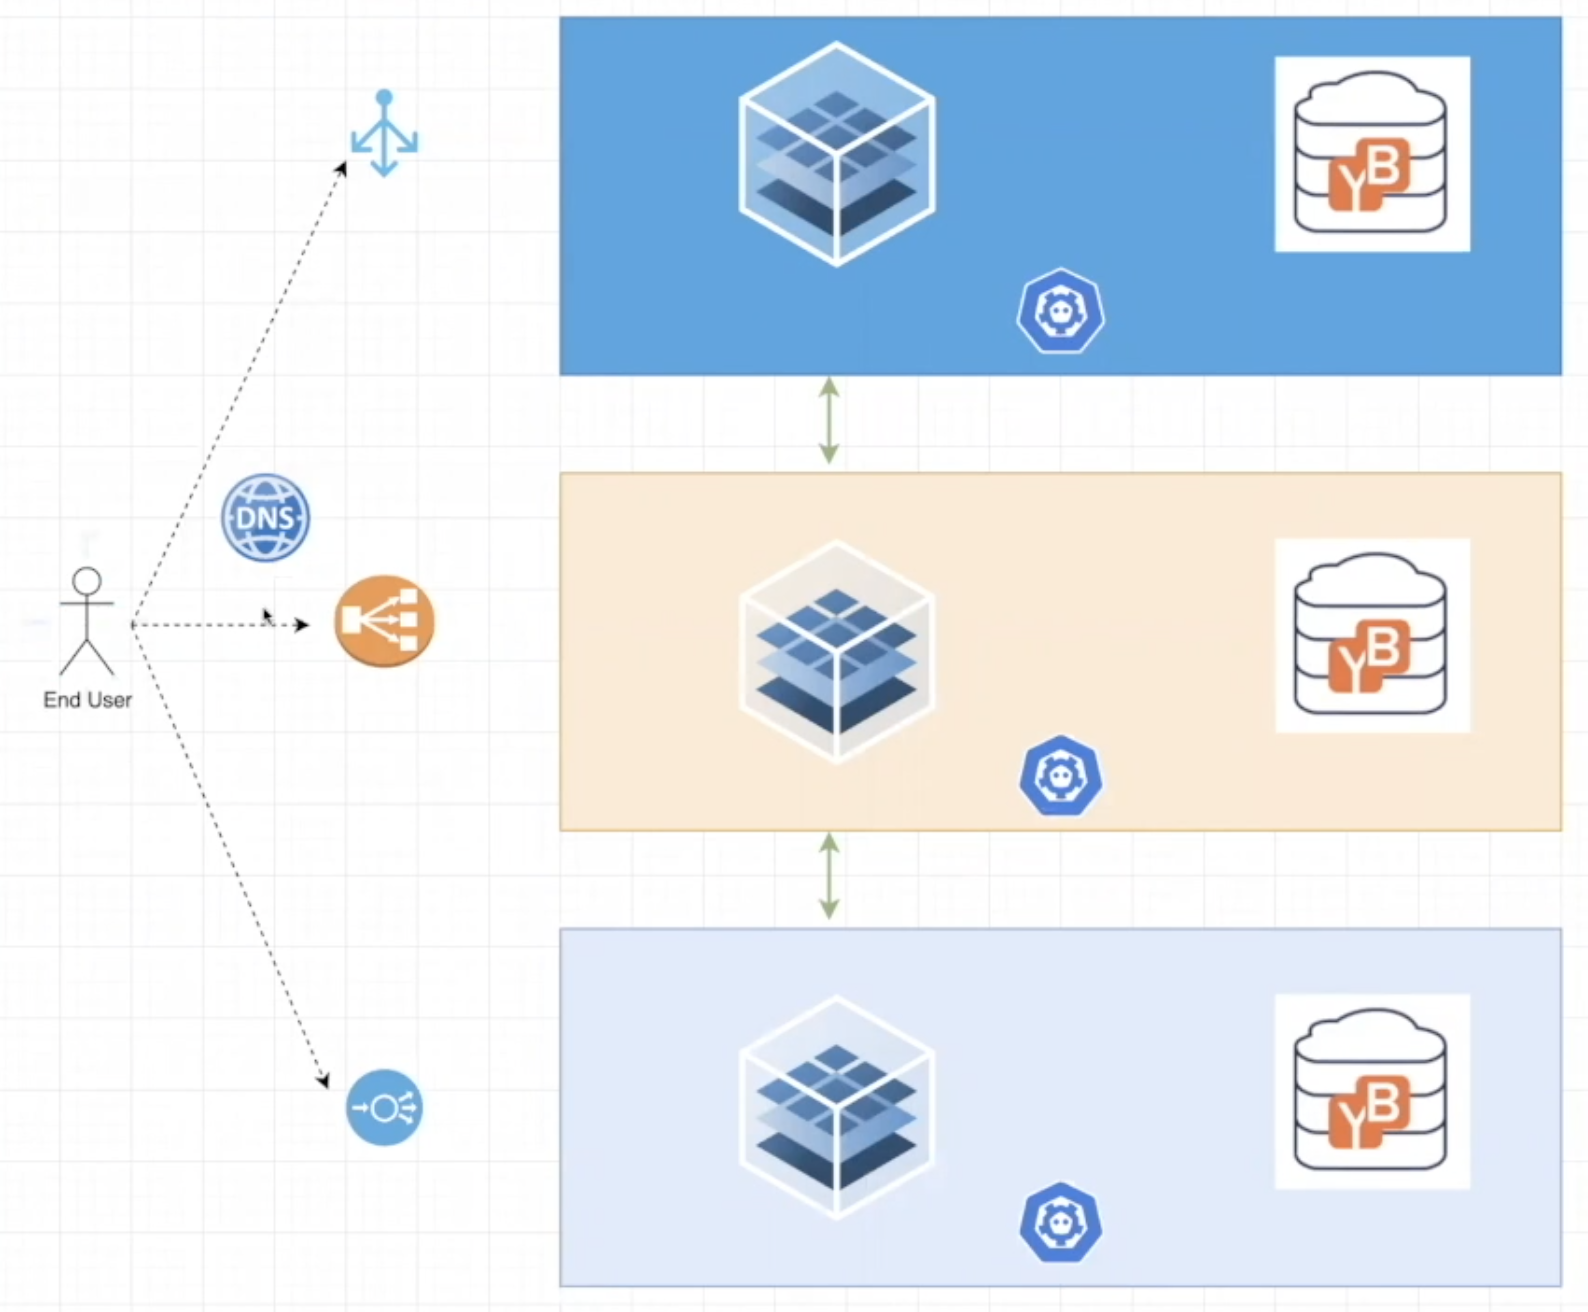
Architecting the Solution
At a high level the architecture demonstrated consists of multiple exposed load balancers and ingress controllers acting as the entryway into each of the three clouds. These resources are orchestrated using an authoritative DNS resolver that is load balancing traffic across the multi-cloud cluster. Inside each one of the cloud environments there is a highly available Kubernetes cluster that has been configured with CAST AI. This cluster is wired to YugabyteDB as the distributed backend. In this case it will be the Redis flavor of Yugabyte, via the YEDIS API, as a result of the application using Redis for its shopping cart functionality.
Deploying the Infrastructure
Leon starts us off with building out the infrastructure through the automation provided by the CAST AI console, where you can deploy a Kubernetes cluster across cloud providers that is connected through a virtual multi-cloud private network.
This process consists of three simple steps:
1. Enter your cluster details
2. Choose a cluster configuration
3. Select your cloud provider(s)
By choosing the highly available cluster configuration you will be able to deploy the architecture called out in the diagram of the previous section. This deploys three master nodes, one in each cloud provider. Leon has already pre-configured his cloud credentials in order to have the right IAM permissions to deploy a cluster in each of the cloud providers he selects. In order for you to do this you will need to follow the instructions laid out when selecting “Add New Cloud Credential” from the CAST AI wizard. Once you select “Create Cluster” the system will begin to build out the resources needed for a multi-cloud cluster. You can verify the success of this installation both through the CAST AI console, as well as the individual cloud providers themselves.
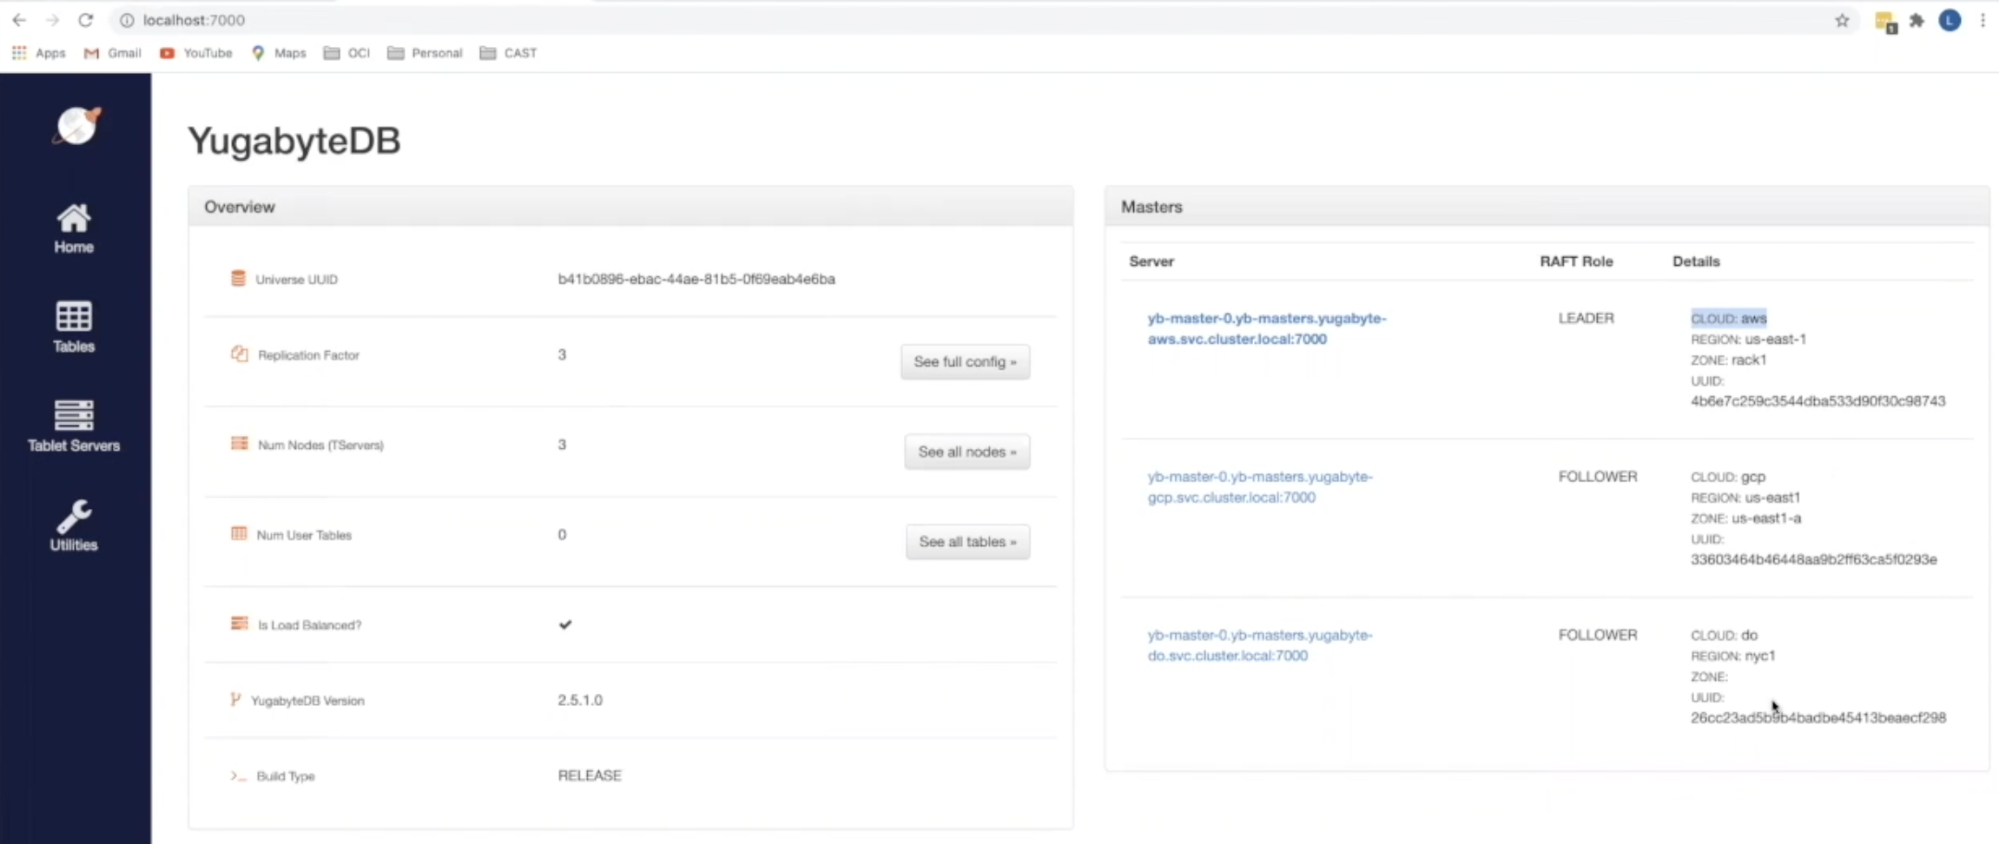
The YugabyteDB Setup
The next step is to set up YugabyteDB. To do this, Leon runs a deploy.sh script that creates a Kubernetes namespace for each of the cloud providers, as well as the “boutique” e-commerce application we are building. YugabyteDB is then deployed by calling a YAML file for each of the cloud providers. Within the CAST AI console, using the Kubernetes UI that is automatically pre-built and pre-authenticated for CAST users, you can look at the “namespaces” tab and verify that the YugabyteDB cluster has been built. From this UI you can also view other cluster and workload specific entries for your setup. A second method of validation that can be performed is to open up the Yugabyte UI locally using port-forward. This can be done by running the following command:
$ kubectl port-forward svc/yb-masters 7000 -n yugabyte-gcp
Once run you can open up the UI locally at https:// localhost:7000 and validate the deployment of your cluster by viewing the location of the “yb-masters” and “yb-tservers”.
At this point, we now have the foundation for our YugabyteDB deployment inside our Kubernetes cluster. The last task that remains is to enable Redis. Leon instructs users to go back to the deploy.sh file in order to copy and run the setup_redis_table command. From here we can go back to our Yugabyte UI and select the “Tables” tab to verify that our system_redis table has been built out.
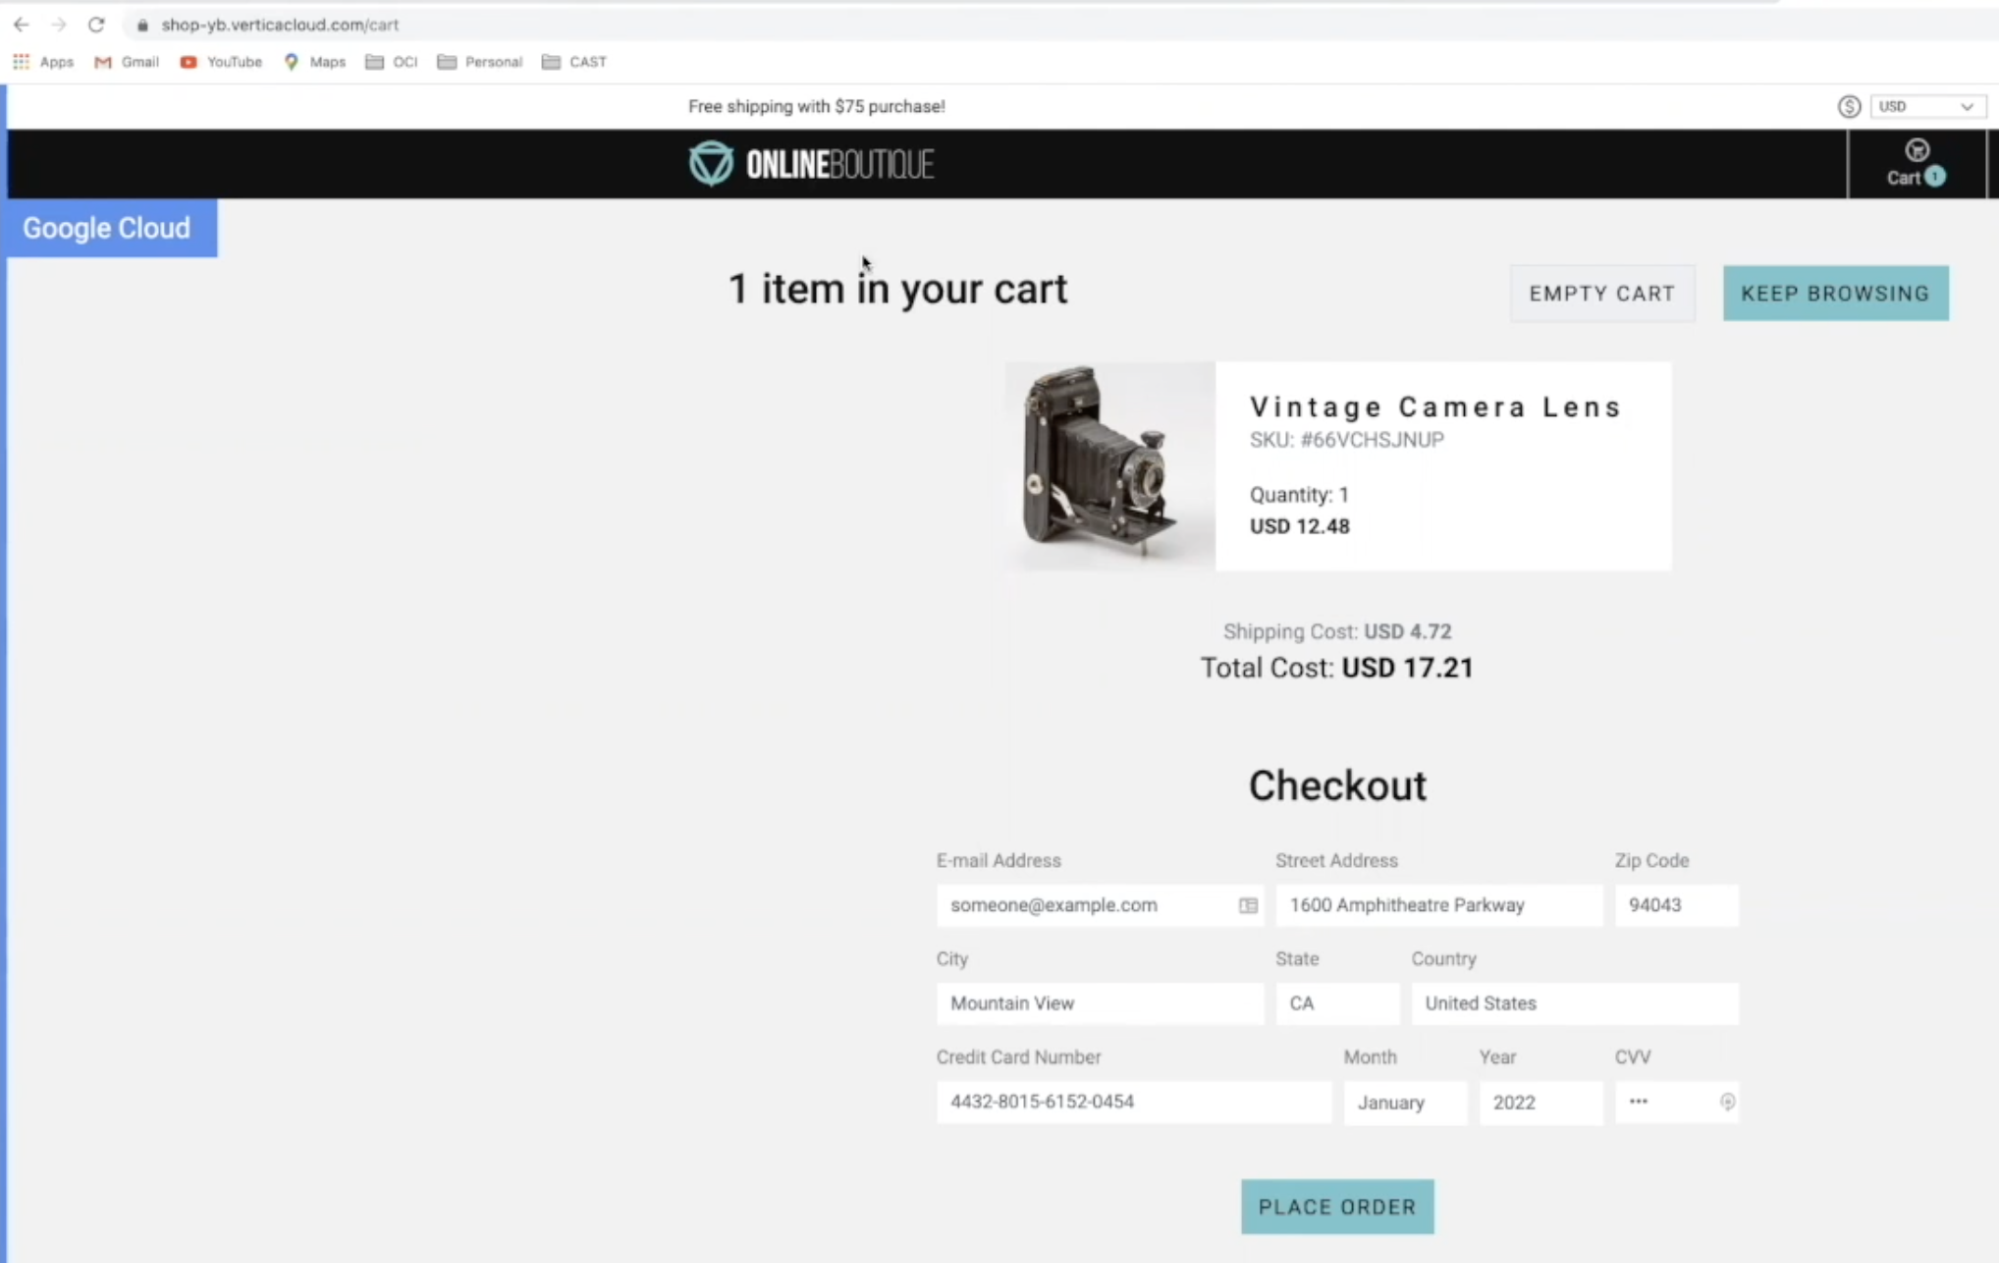
E-commerce App Deployment
Since we are exposing the application to the internet our first step in deploying the application will be to make sure we are configuring the DNS and routing correctly. Within this application there exists multiple microservices including the front end, recommendations, and shopping cart services. Leon explains that the front end container, which is responsible for rendering the e-commerce app, has a few interesting properties that are important to take note of:
1. The first property is that it has a replica count of 3. He has purposefully done this to allow this pod, and others, to be replicated across the three clouds simultaneously. What this means is that the microservice actually exists in AWS, GCP, as well as DigitalOcean.
2. Originally this application was built to use a small REDIS pod, but in this example we are using the YugabyteDB implementation of REDIS referred to as YEDIS. As a result we have to input the Redis addresses, and are using the core DNS name to resolve them. This way we pass those three servers, listed out and comma separated, for AWS, GCP, and DigitalOcean. This allows each microservice to know where to find its highly available Redis instance.
3. The last property he points out is the ingress controller. This sample app has been developed to use letsencrypt and nginx, which has been installed as the default by CAST AI. All you have to do is provide a hostname. In the demo, Leon uses a dummy domain name that they own, and finally you have to configure this DNS in order for it to all work. Leon then copies the cluster GSLB DNS, which can be found in the console UI cluster details page, and creates a CNAME on DigitalOcean that maps the cluster DNS to the dummy domain. This allows users to come in through one of the three load balancers (via the architecture diagram) and return with a result. However, if you try to go to that dummy domain you will notice that you are no longer getting a 404 nginx error, but a different error. This is due to the fact that we still do not have a certificate deployed.
From this point you can apply your boutique.yaml file to the boutique namespace. Once it has been run you can go back to the Kubernetes UI and verify that the appropriate services have been created by clicking on “Workloads”. Once you verify that all of your services are up you can go ahead and refresh the web page. You should now be able to see the content as it was intended.
Persistence & Low Latency in Action
To keep things interesting Leon and team have added a banner in the top left corner of the web page that calls out which cloud is rendering the front end.
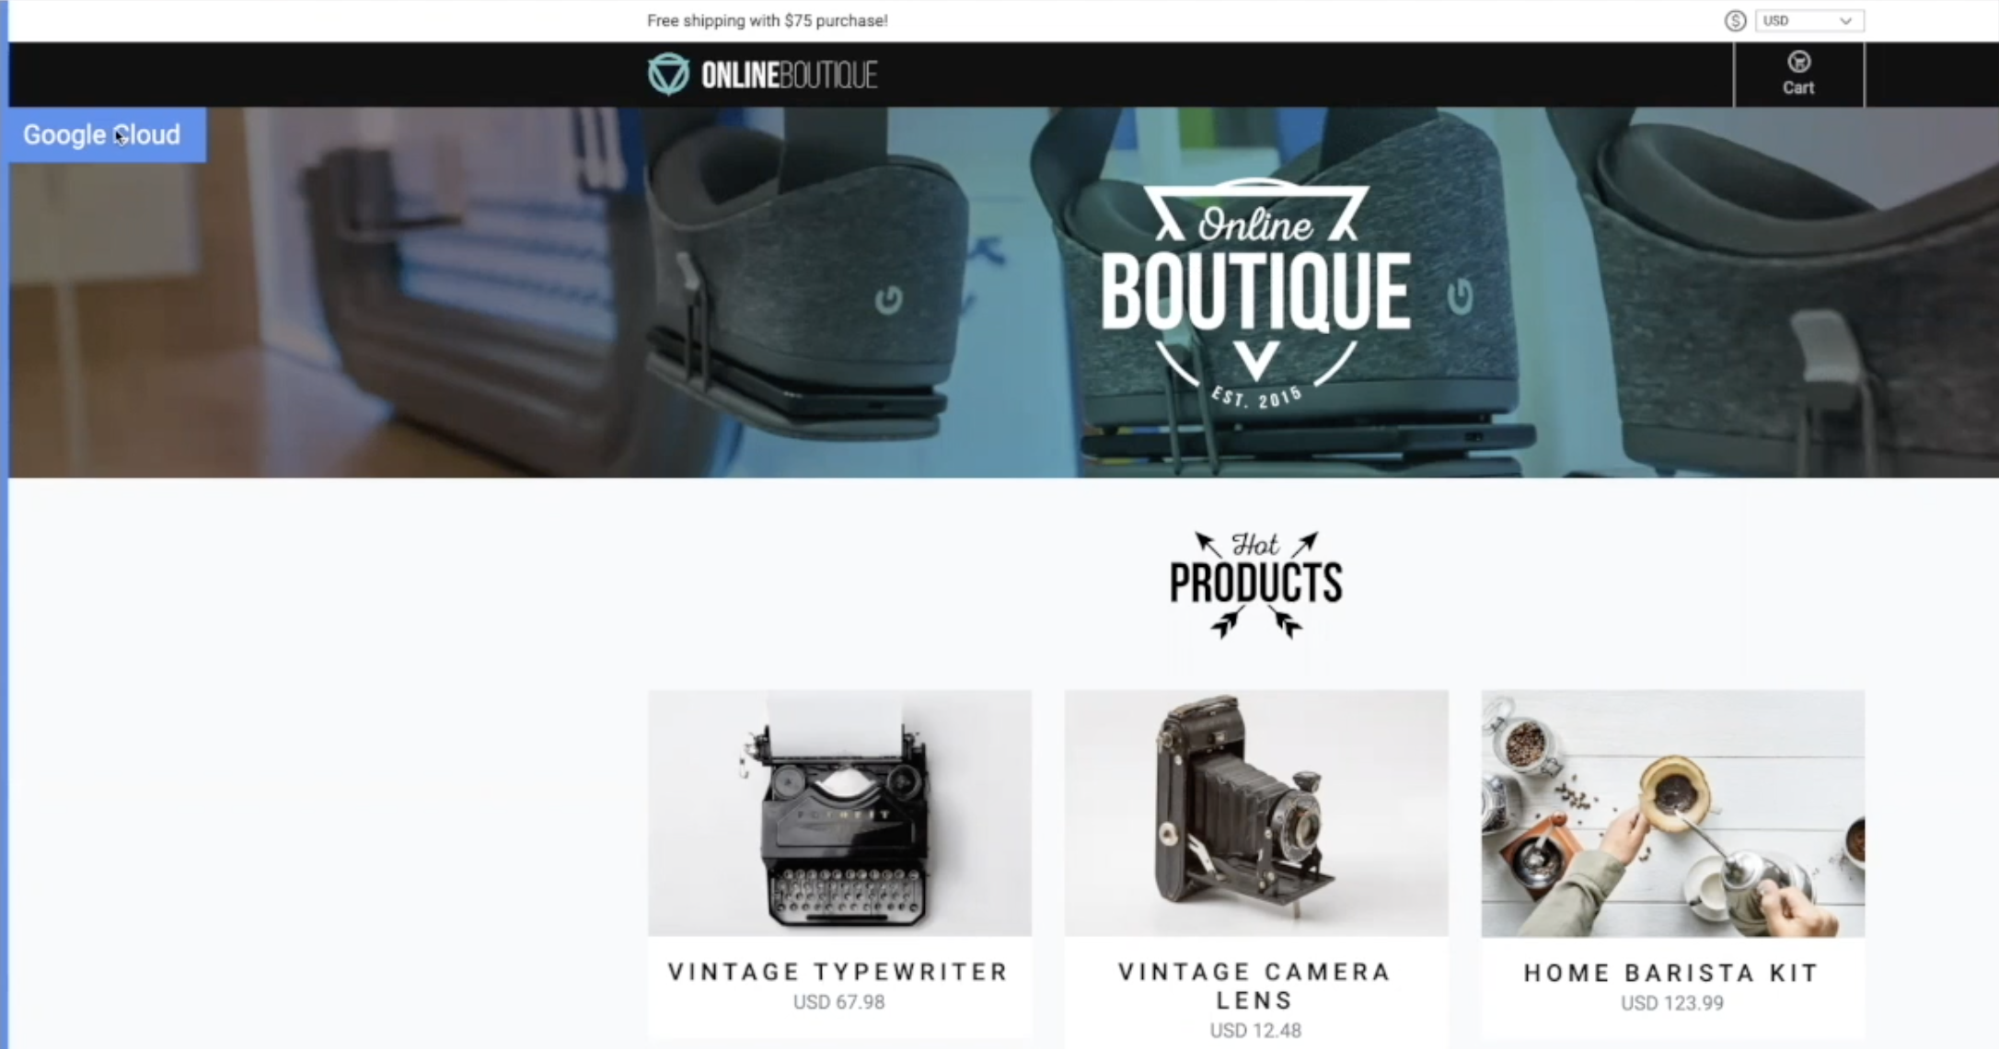
By refreshing the page a couple of times we can see different cloud providers rendering in a round robin format. The key here, Leon emphasizes, is the persistence. You want your application to be highly available throughout any cloud failure, regardless of whether it is AWS, GCP, or DigitalOcean. As you select different items and add them to your shopping cart you will see similar behavior. That same shopping cart has the exact same content while being refreshed with complete persistence using a multi-cloud database.
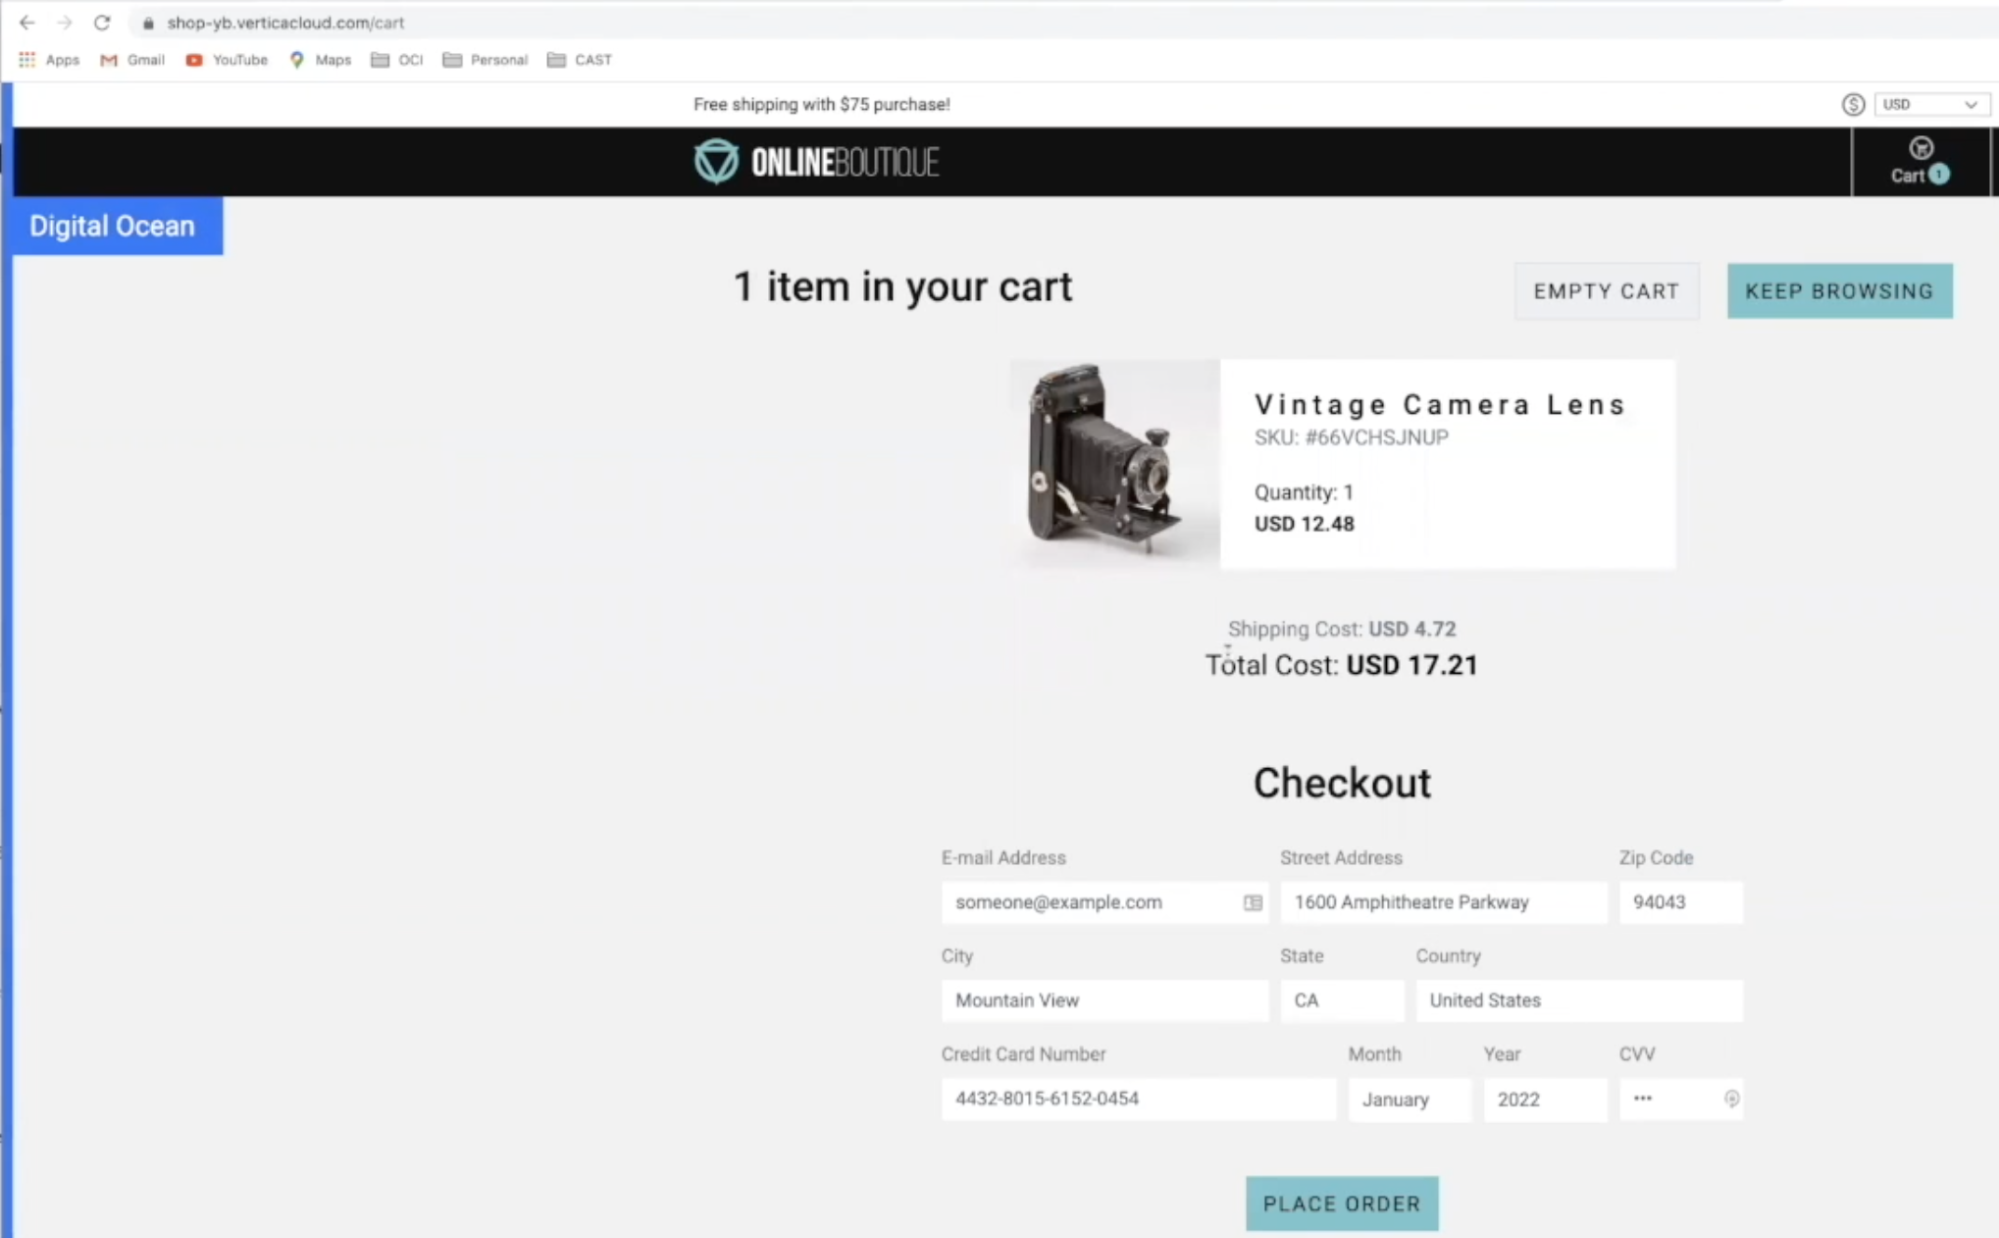
Screenshot 1: Rendering from DigitalOcean
Screenshot 2: Rendering from GCP, upon refresh
This is fantastic, but what about performance? One of the strategies that CAST AI implements when launching a multi-cloud setup is what they call a Goldilocks region. This means that latency should be no more than 10 milliseconds in the worst case from cloud to cloud. To see this live go to “All Namespaces” within your Kuberenetes UI and open the psyllium CNI network driver. By running psyllium-health status --probe you can get a quick perspective on the latencies between the multi-cloud nodes. As Leon shows in the demo, all of these fall within a range of 2-3 milliseconds on the low end and 6-8 milliseconds on the high end.
High Availability in Action
What happens when a node disappears? How does the database system behave? To show this resilience in action, Leon goes ahead and kills the stateful set of the yb-master and yb-tserver (you can also show this by killing the pods). Let’s see what happens to the environment from both a UI and app perspective. Take a glance at your YugaybteDB UI and you will see that the node that was your yb-master LEADER is no longer found, and one of the other nodes has been elected the leader. That was quick. This is because in YugabyteDB the failure of any tablet-peer leader automatically triggers a new RAFT level leader election within seconds, and another tablet-peer on a different YB-TServer takes its place as the new leader.
The unavailability window is in the order of a couple of seconds (assuming the default heartbeat interval of 500 ms) in the event of a failure of the tablet-peer leader. Now let’s refresh our app browser. Not only are the contents still in the shopping cart (persistence), but while you refresh and continue to add more items you will see that the rendering is now only being shown from the two nodes that are still alive (high availability).
YugabyteDB / CAST AI Benchmark
The last topic covered in Leon’s talk was a TPC-C benchmark. At a high level TPC Benchmark C is an OLTP performance benchmark meant to simulate typical OLTP workloads within an industry that must manage, sell, or distribute a product or service. For those of you that are not familiar with this you can find out more here.
There were multiple scenarios built out:
Mono-Cloud
- Single Cloud (GCP), Single Region (us-east-1), Multi-AZ
- 3 Nodes in the cluster managed by GKE using n1-standard-8 shape
- “Yb-master” pod with 2 CPU & 2 GB RAM
- “yb-tserver” pod with 2 CPU & 2 GB RAM
Multi-Cloud Scenario A
- 3 Cloud CAST AI cluster spanning AWS, GCP, Azure
- Networked together using cloud VPN servers from each provider, 2 tunnels per cloud-pair were used for HA
- Instance Types
- GCP: n1-standard-8
- AWS: m5.2xlarge
- Azure: Standard_D4_v2
- Pod spec remained the same across scenarios
Multi-Cloud Scenario B
- Same as Scenario A except for using 2 cloud providers: GCP & AWS
- Since YugabyteDB requires 3 nodes, GCP was used for 2 and 1 was placed in AWS
Multi-Cloud Scenario C
- Same as Scenario B except for the cluster was networked together using CAST AI’s Wireguard implementation (node-to-node full mesh configuration)
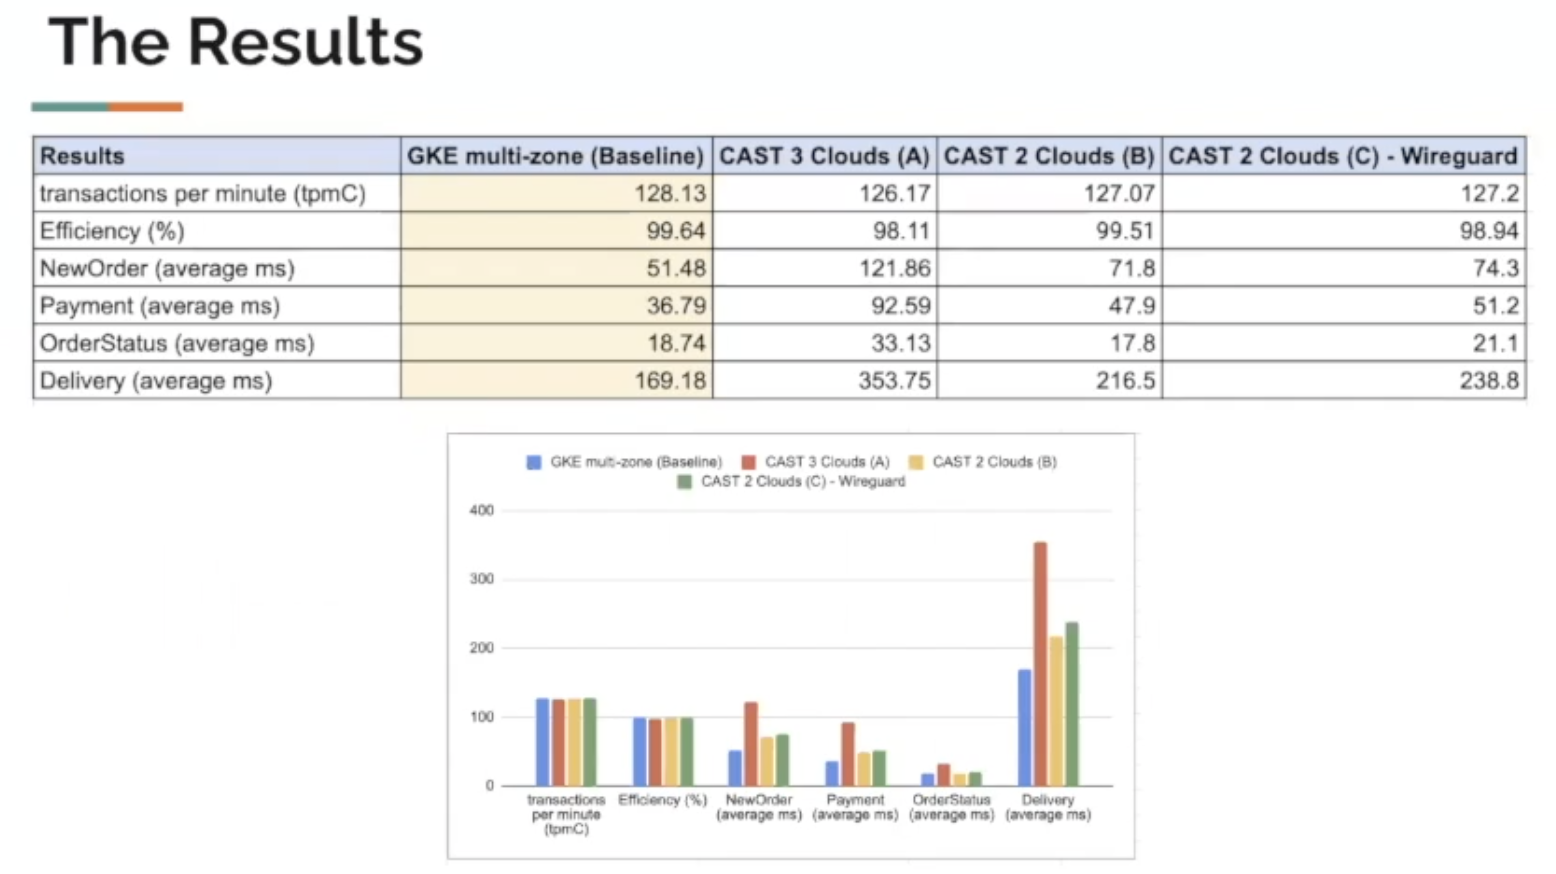
In the screenshot below you can view the results of the benchmarks. By comparing the transactions per minute you can see that the results are almost negligible across the different scenarios, which shows that we can in fact create a highly scalable, highly available cluster in various clouds that performs very well. An interesting observation, Leon states, is the additional latency that can be seen in some of the write intensive operations. He claims that this latency is due to the fact that we write to one of these clouds, and then the leader has to synchronize that write across clouds. This is the nature of the beast for any distributed system. Where this cross-cloud communication does not have to occur, i.e. reads, you can see that the latency difference is much lower.
What’s Next?
To view this talk, plus all twenty-four of the talks from this year’s Distributed SQL Summit Asia event make sure to check out our video showcase for the event on our Vimeo channel.
For more information on the relationship between distributed SQL and Kubernetes check out our recent webinar “How to Run Distributed SQL Databases on Kubernetes”. In this talk, we look at which stateful workloads, specifically databases, are ideal for running inside Kubernetes. We also explore best practices for running YugabyteDB in Kubernetes in production environments.
Ready to start a conversation about how Distributed SQL can help accelerate your cloud journey? Join us on the YugabyteDB Community Slack to get the conversation started.


